User Manual for iProX
1. Introduction of iProX
iProX is an integrated proteome submission system in China, which is built to support the Chinese Human Proteome Project and to promote sharing of proteome data. iProX has been developed in line with the data-sharing guidelines formulated by the ProteomeXchange consortium and as a public platform for collecting and sharing raw data, identifications, and standardized meta-data obtained from proteomics experiments. Registered users can submit their proteomics datasets to iProX as public or private datasets. All the released datasets are freely accessible to the public while private datasets can only be accessed by authorized users.
2. System requirement
It is recommended to use the latest version of Firefox or Chrome browser to access iProX.
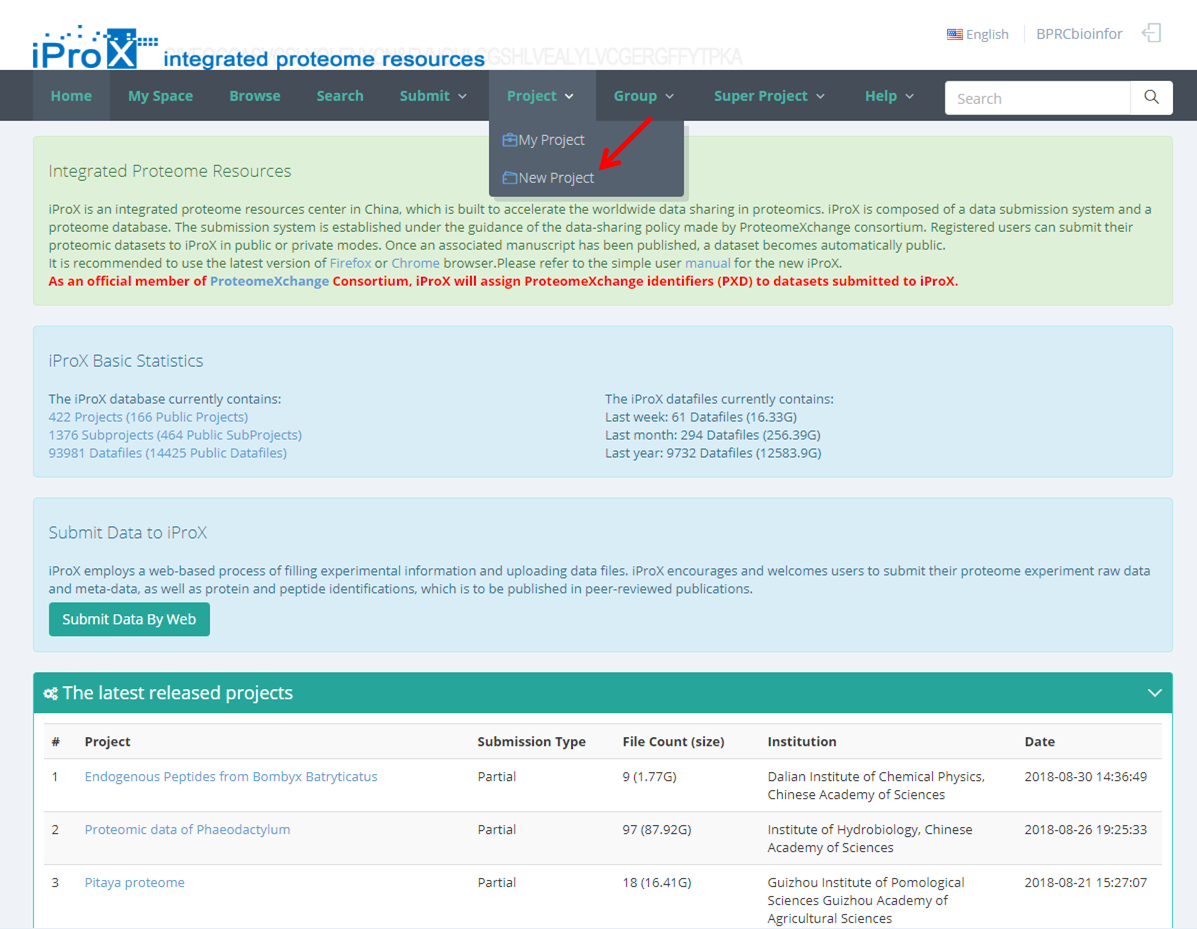
3. Homepage of iProX
As shown in the Figure 1, the homepage of iProX (www.iprox.org) contains several functions, including register, login, data browse, data search and, data submission.
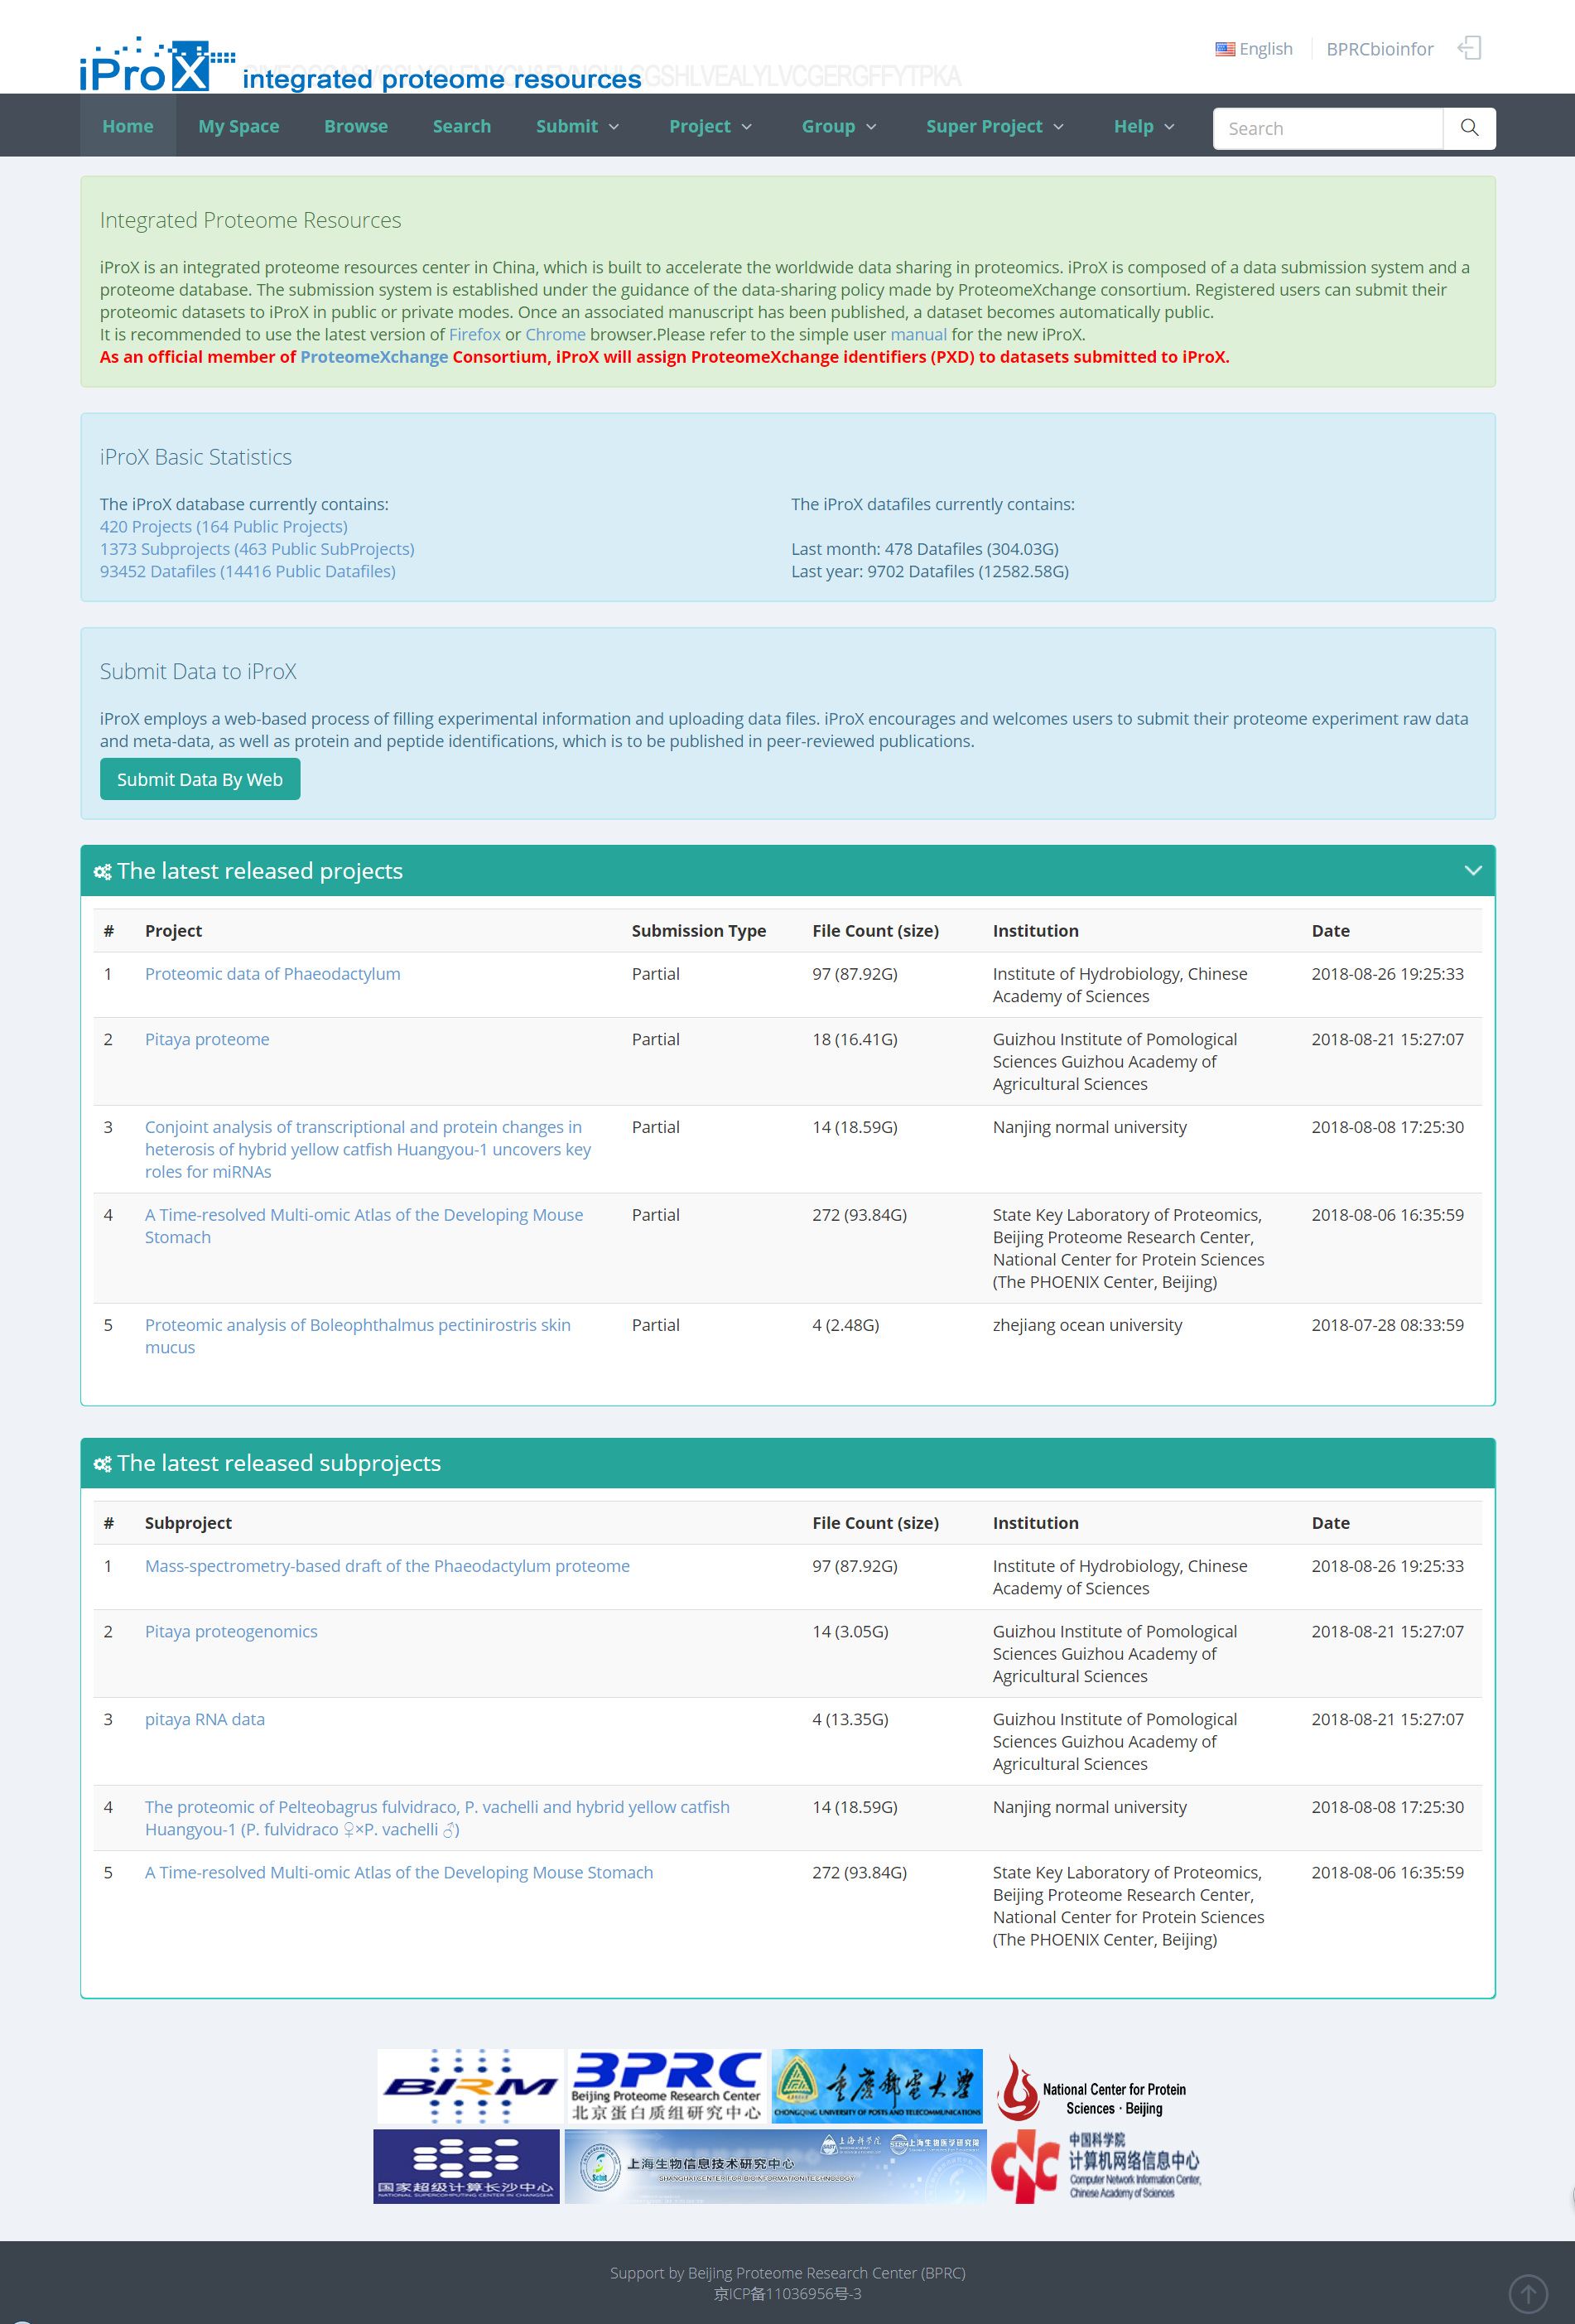
Figure 1. Homepage of iProX
4. Registration and login
4.1 Registration
Users must register in iProX before submitting your dataset. If you are not a registered user, please click the “Register” link on the homepage to create a iProX account. As shown in Figure 2, you will be required to setup an account by entering user name, password, email address and other information.
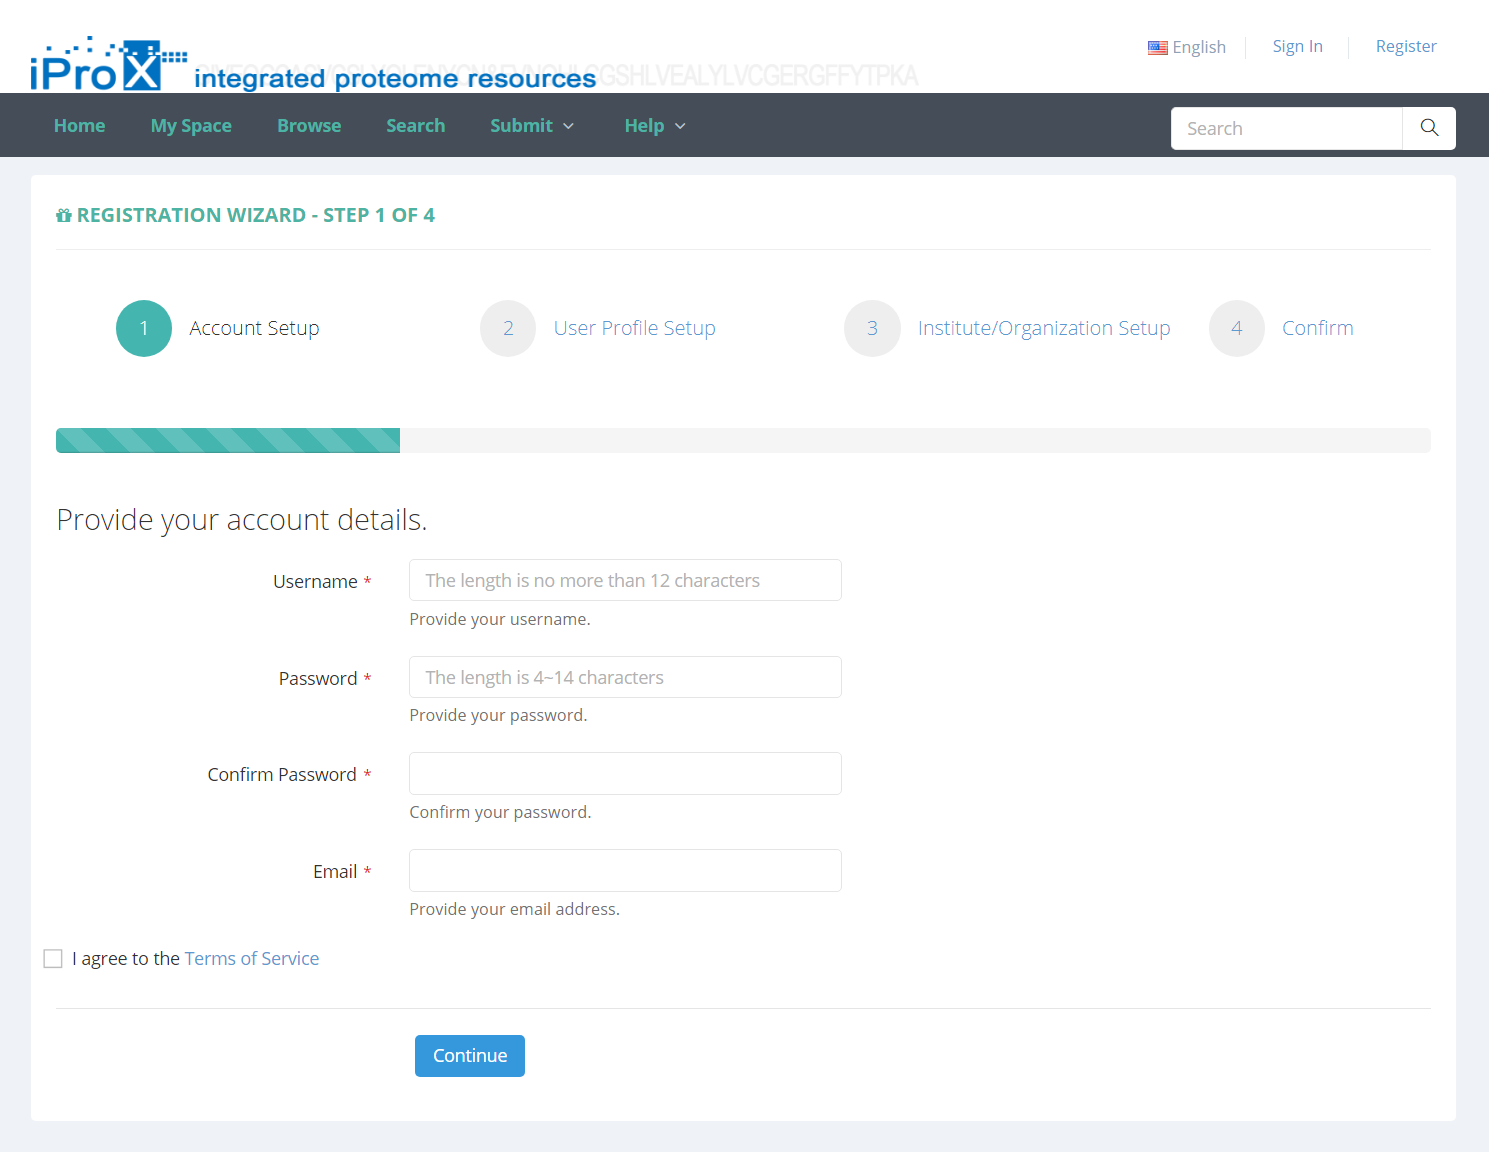
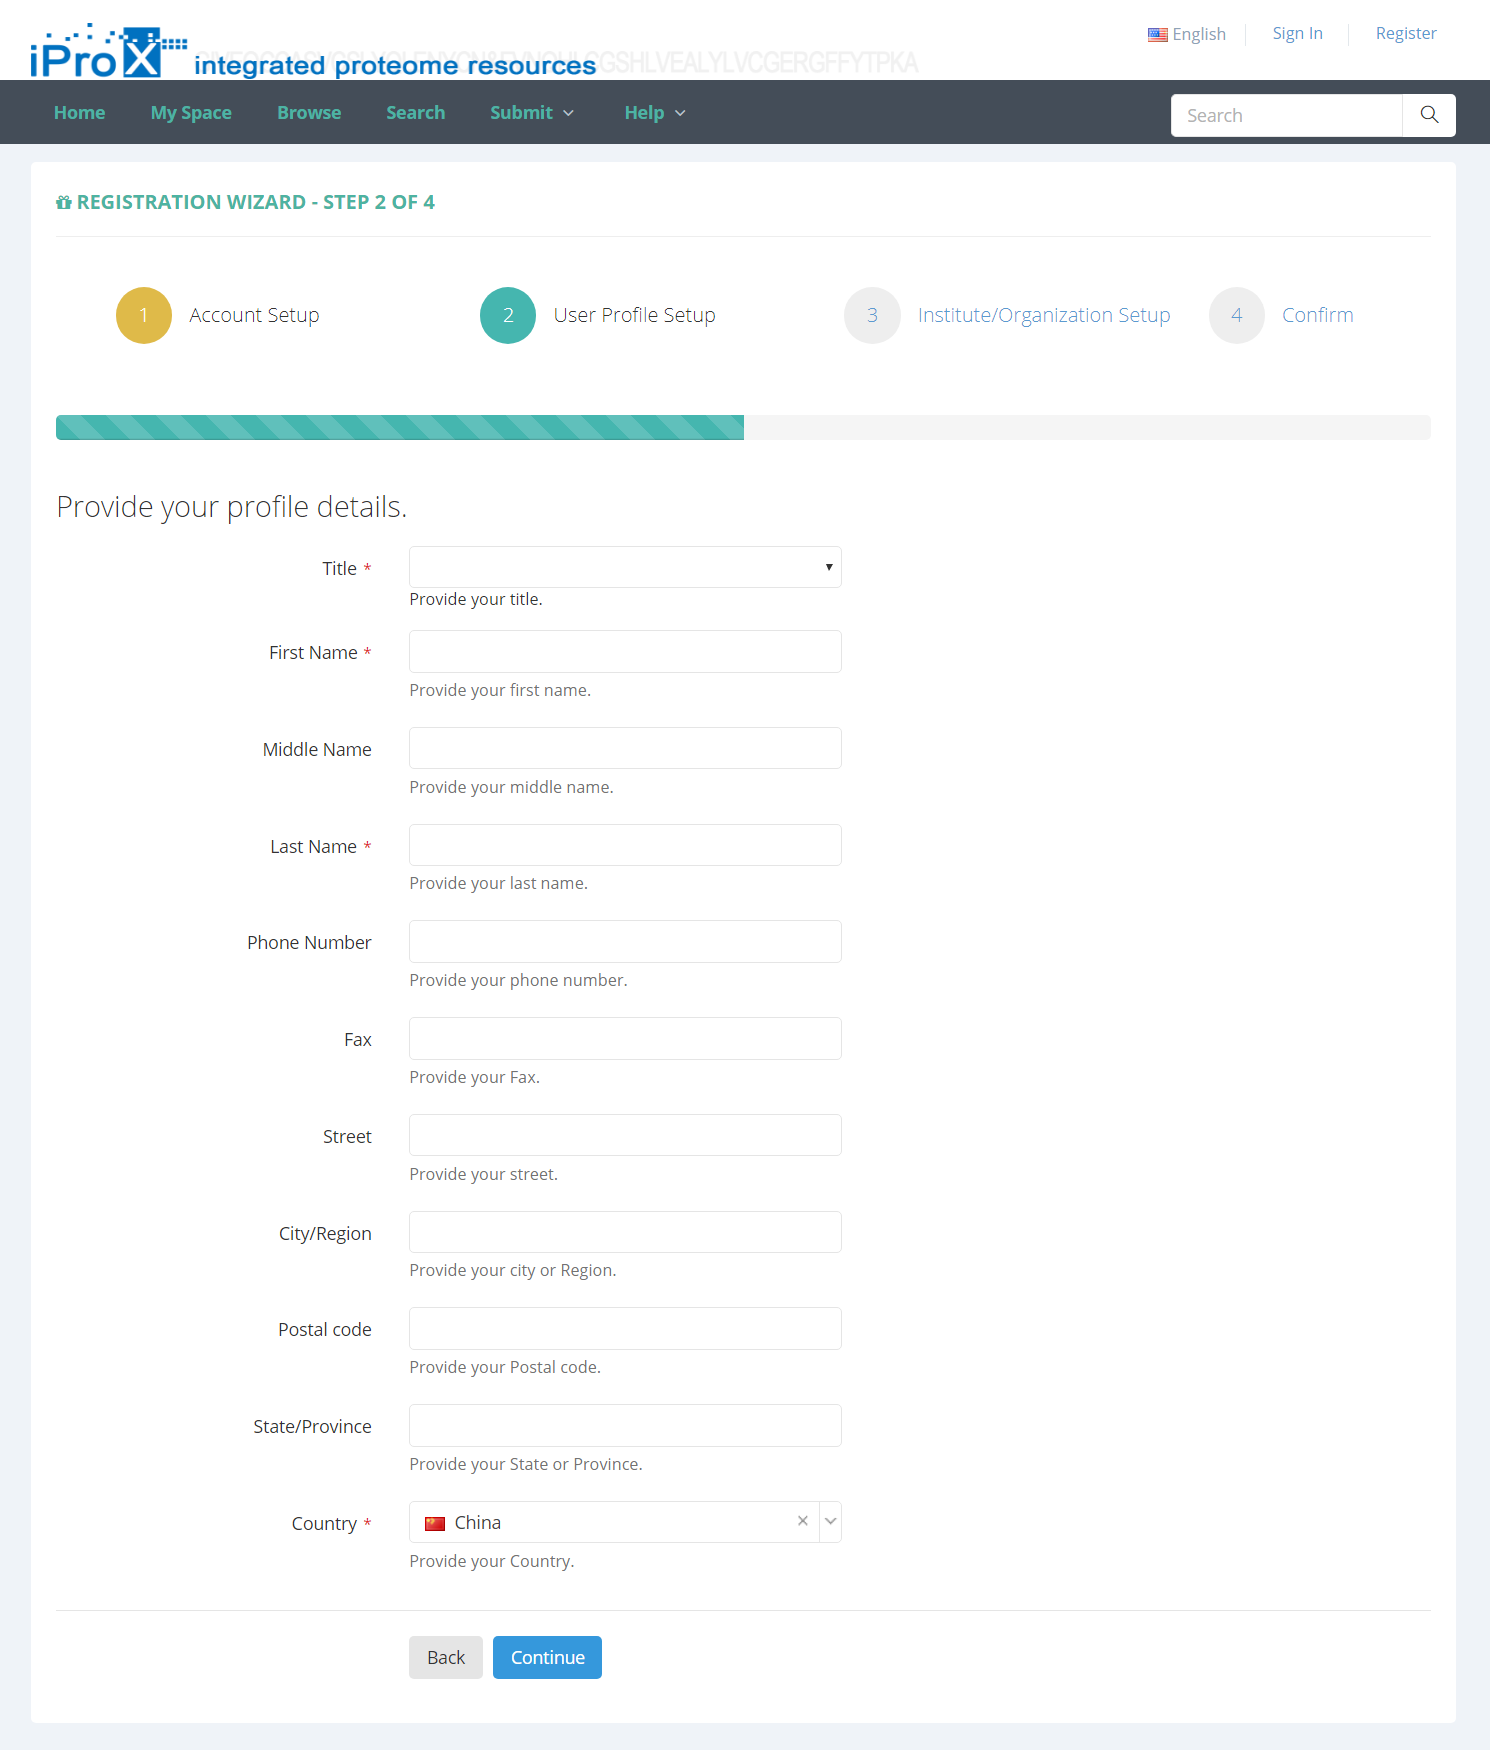
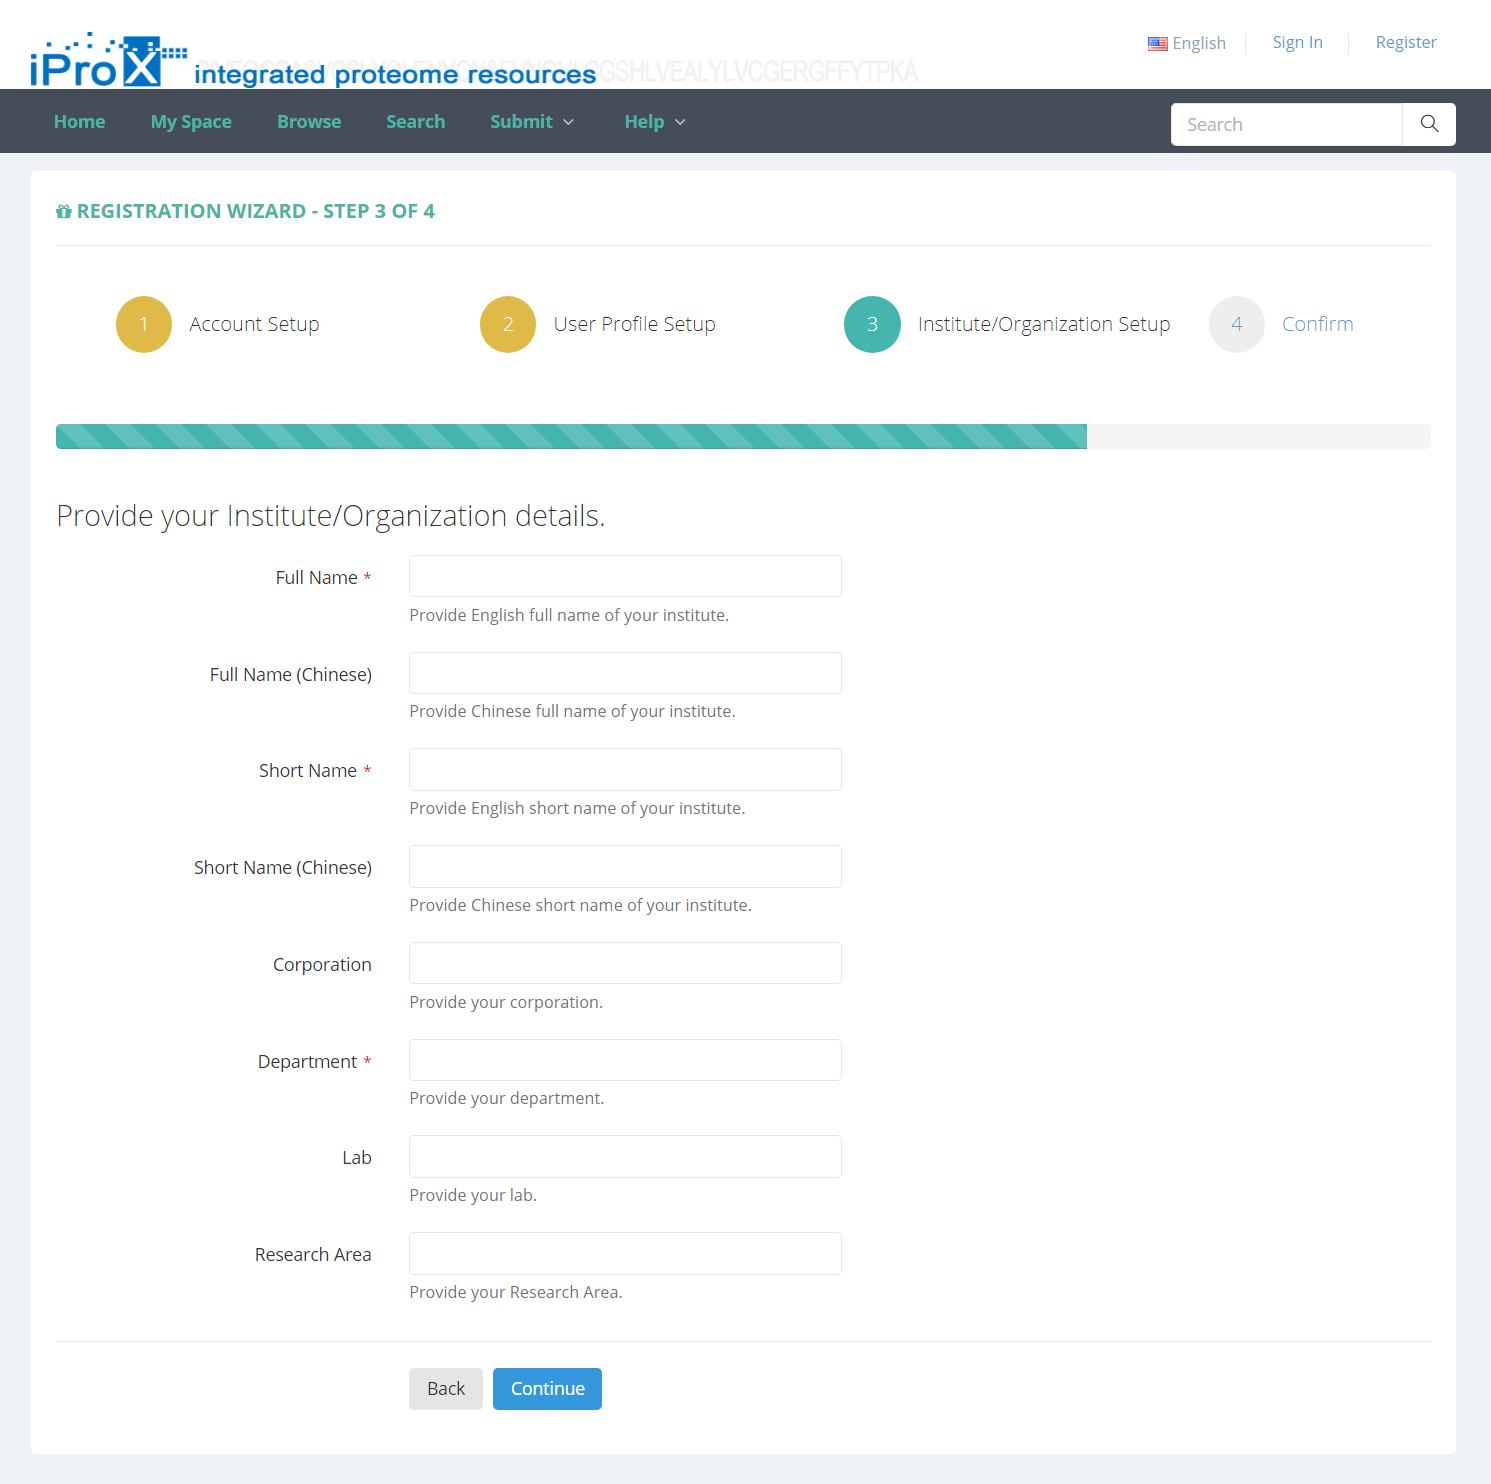
Figure 2. Enter register information.
Then, confirm your register information and click “Submit” button. A message with a verification link will be sent to your registered email address. Please check your email to activate your account in 48 hours.
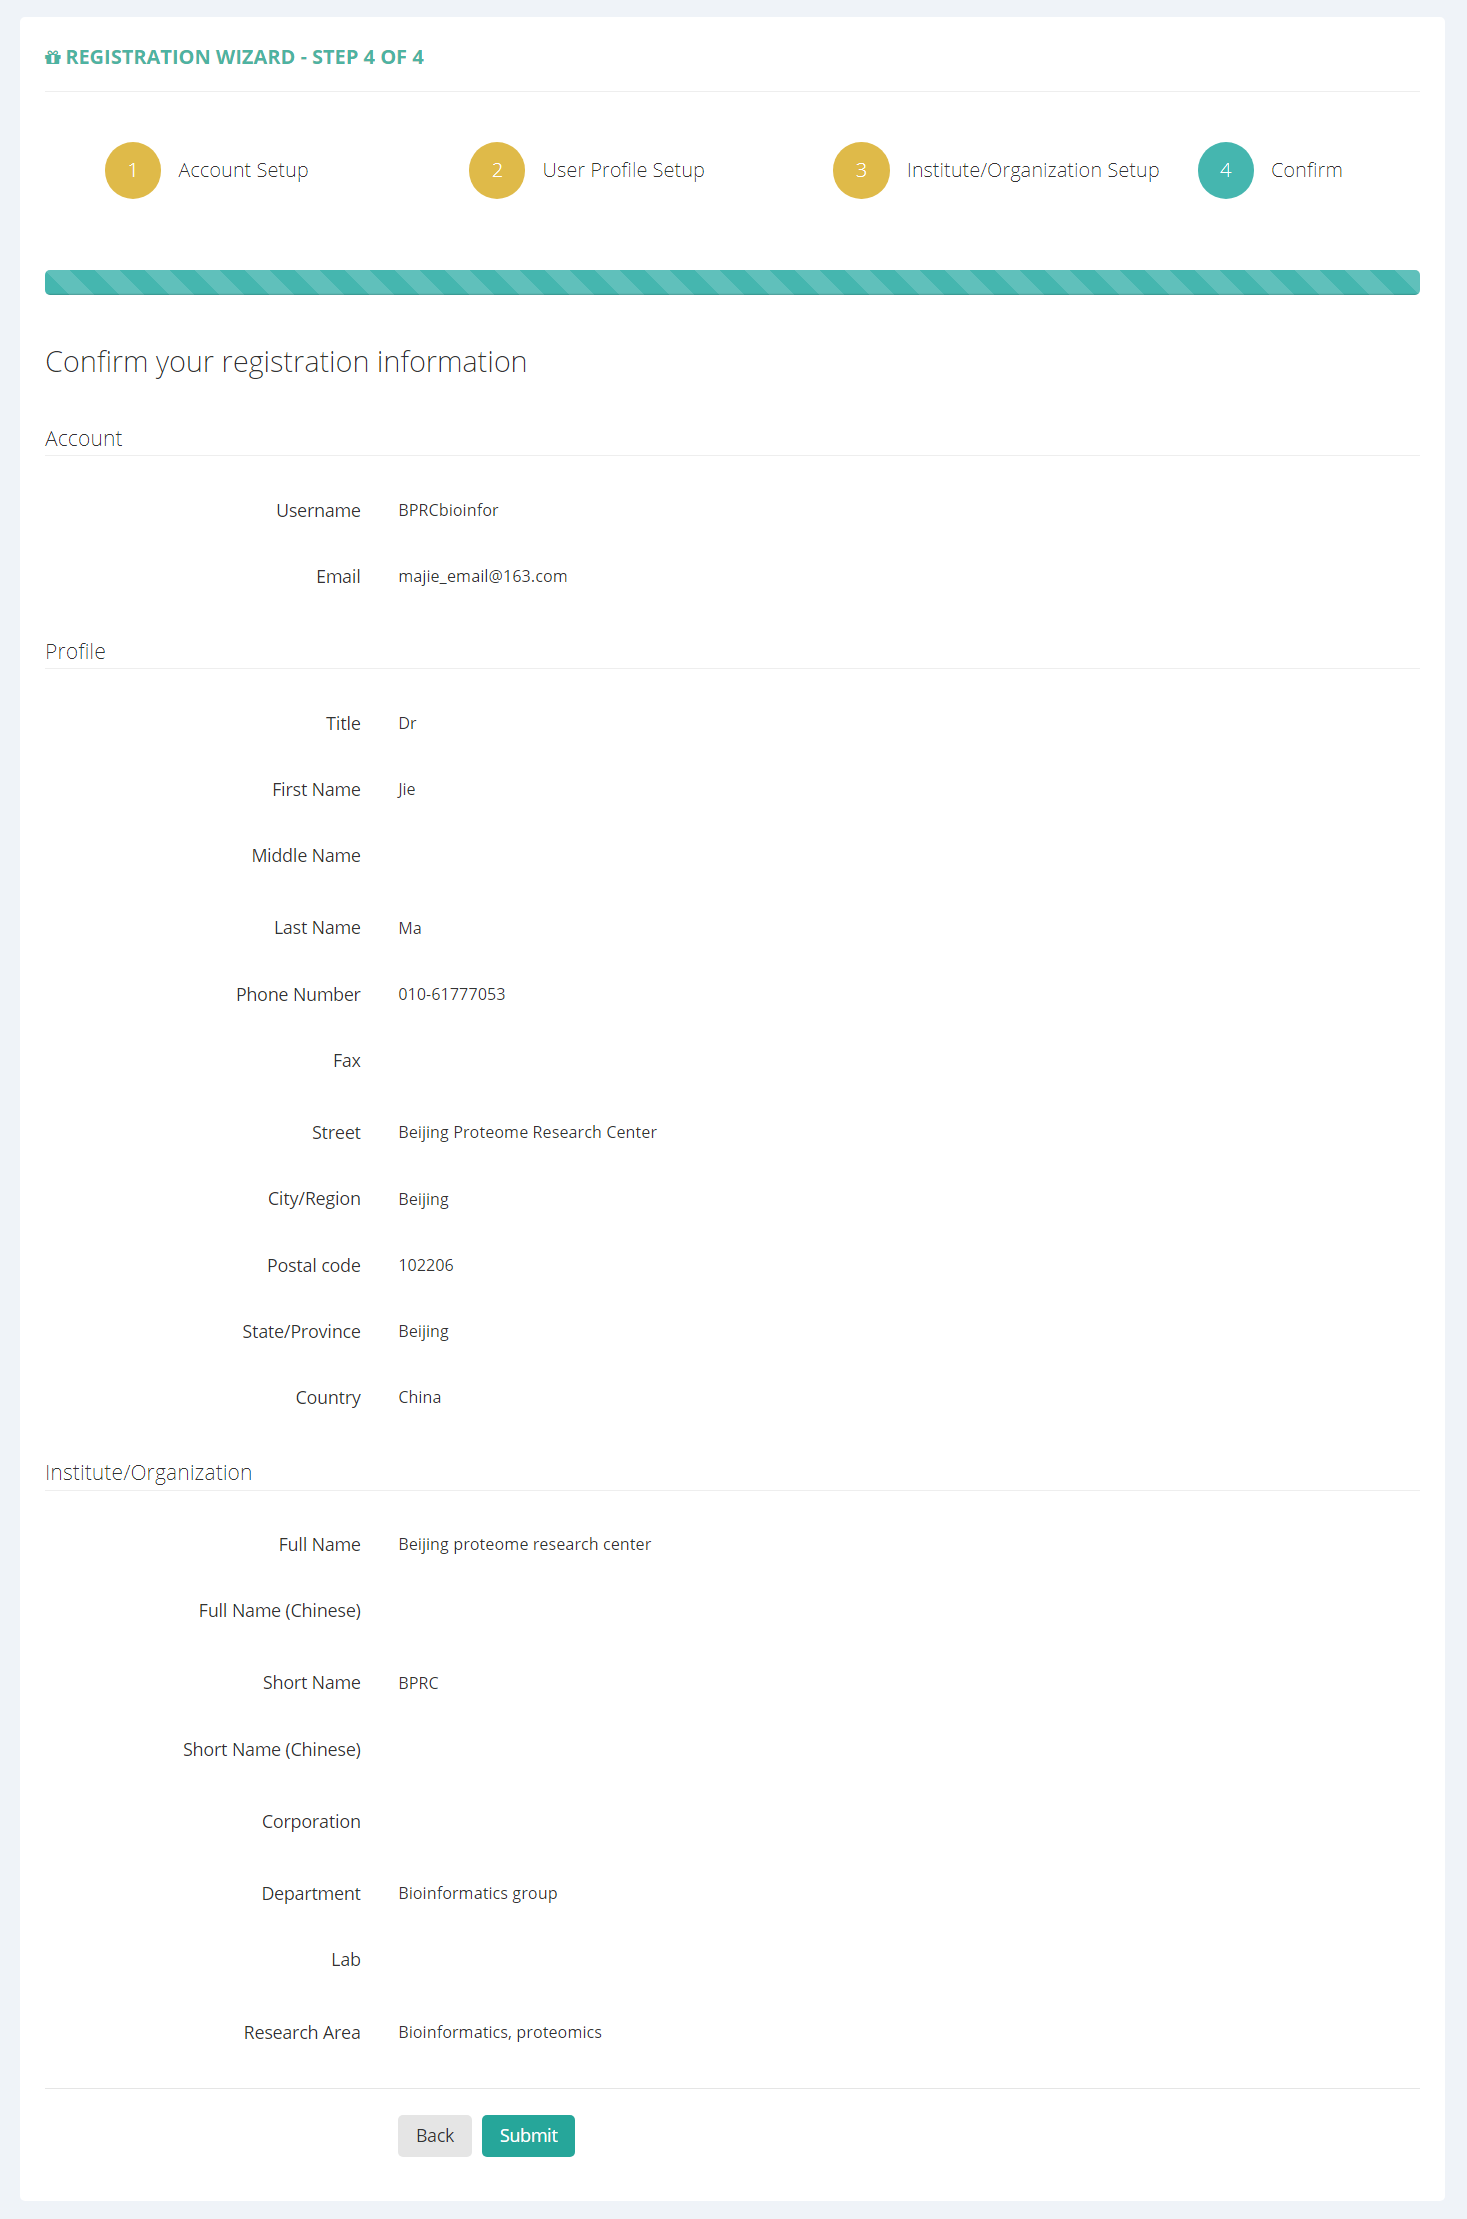
Figure 3. Confirm registration information.
4.2 Login
To login iProX, please click the “Sign in” ling on the homepage, and type your iProX user name and password, as well as the verification code, then click on the "Login" button.
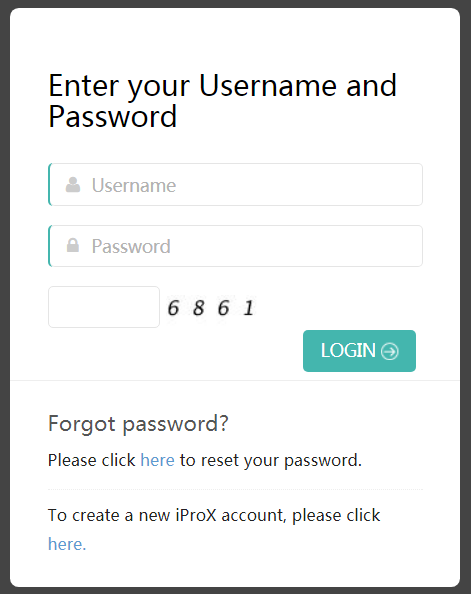
Figure 4. Login page.
4.3 Retrieve Password
If you have forgotten your password, please click “forget password” link in the login page. Enter the email you used for registration and click “Submit”, a message will be sent to the email address so that you can click the link in the email to reset the password.
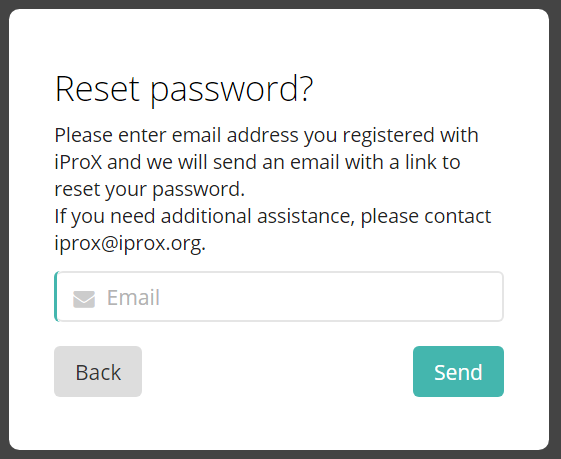
Figure 5. Retrieve password page.
4.4 Account Management
Move the mouse over the user name to drop down the account management menu, then you can modify your account information, change the password or log out.
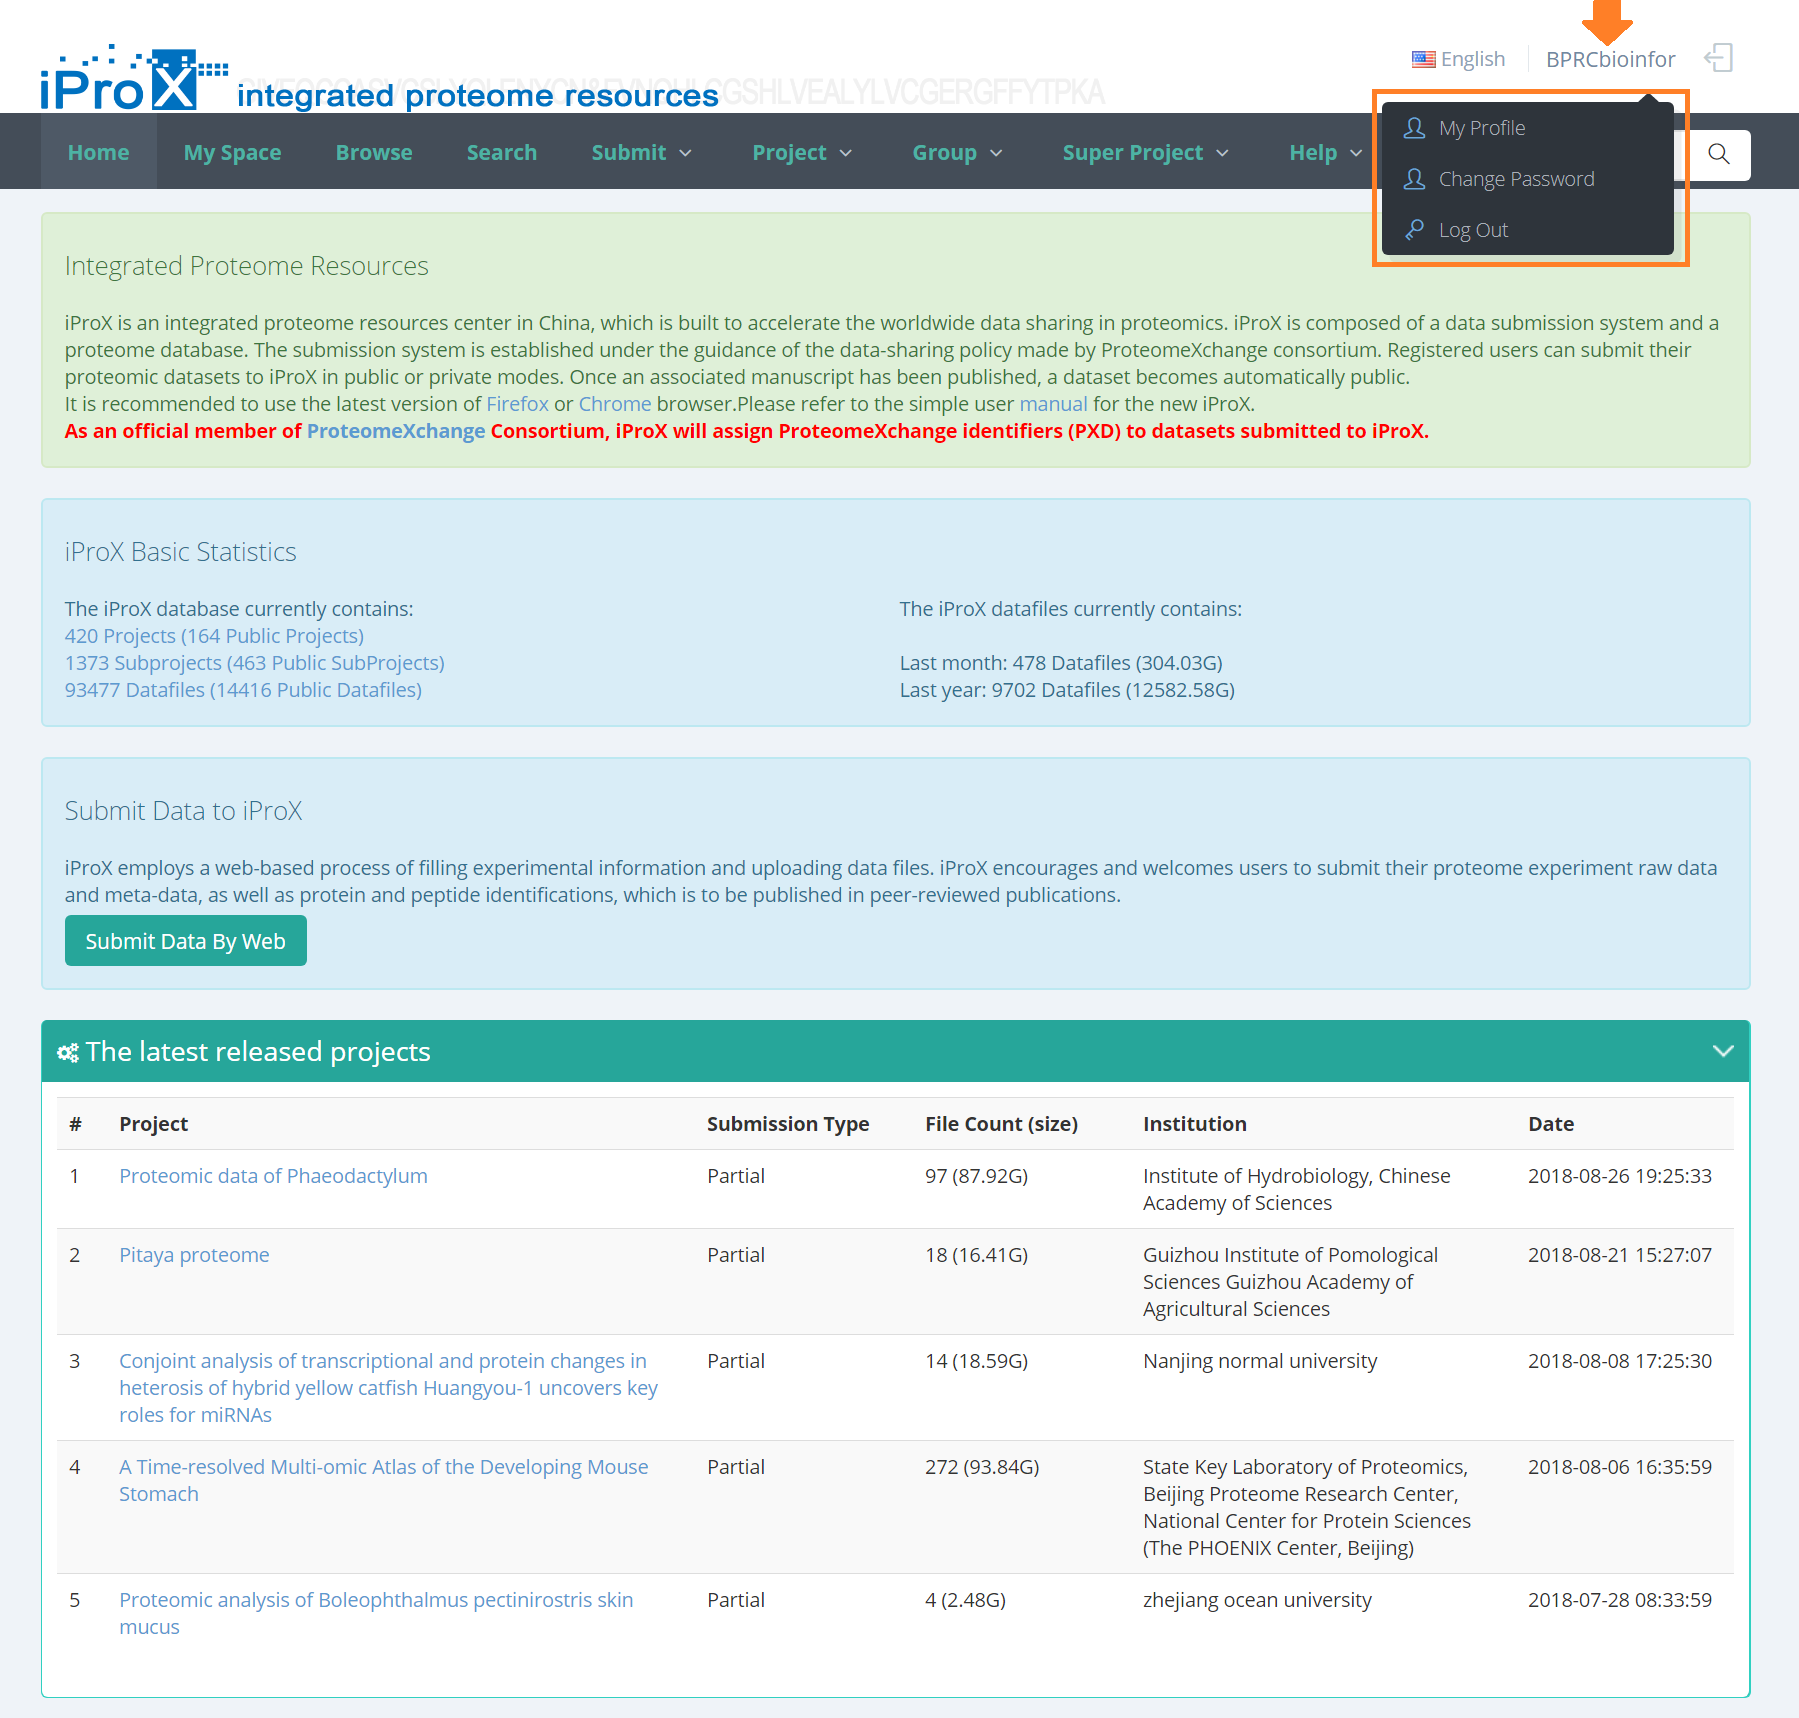
Figure 6. Account management menu.
5. Submit Data
iProX employs a web-based process of filling experimental information and uploading data files. A project in iProX is equivalent to a dataset in ProteomeXchange repository, and one or several subprojects can be set up under the project, representing the sub-dataset produced by different experiment.
Generally, there are four steps to complete data submission at iProX, create new project → add subproject(s) → uploading data files → submit dataset.
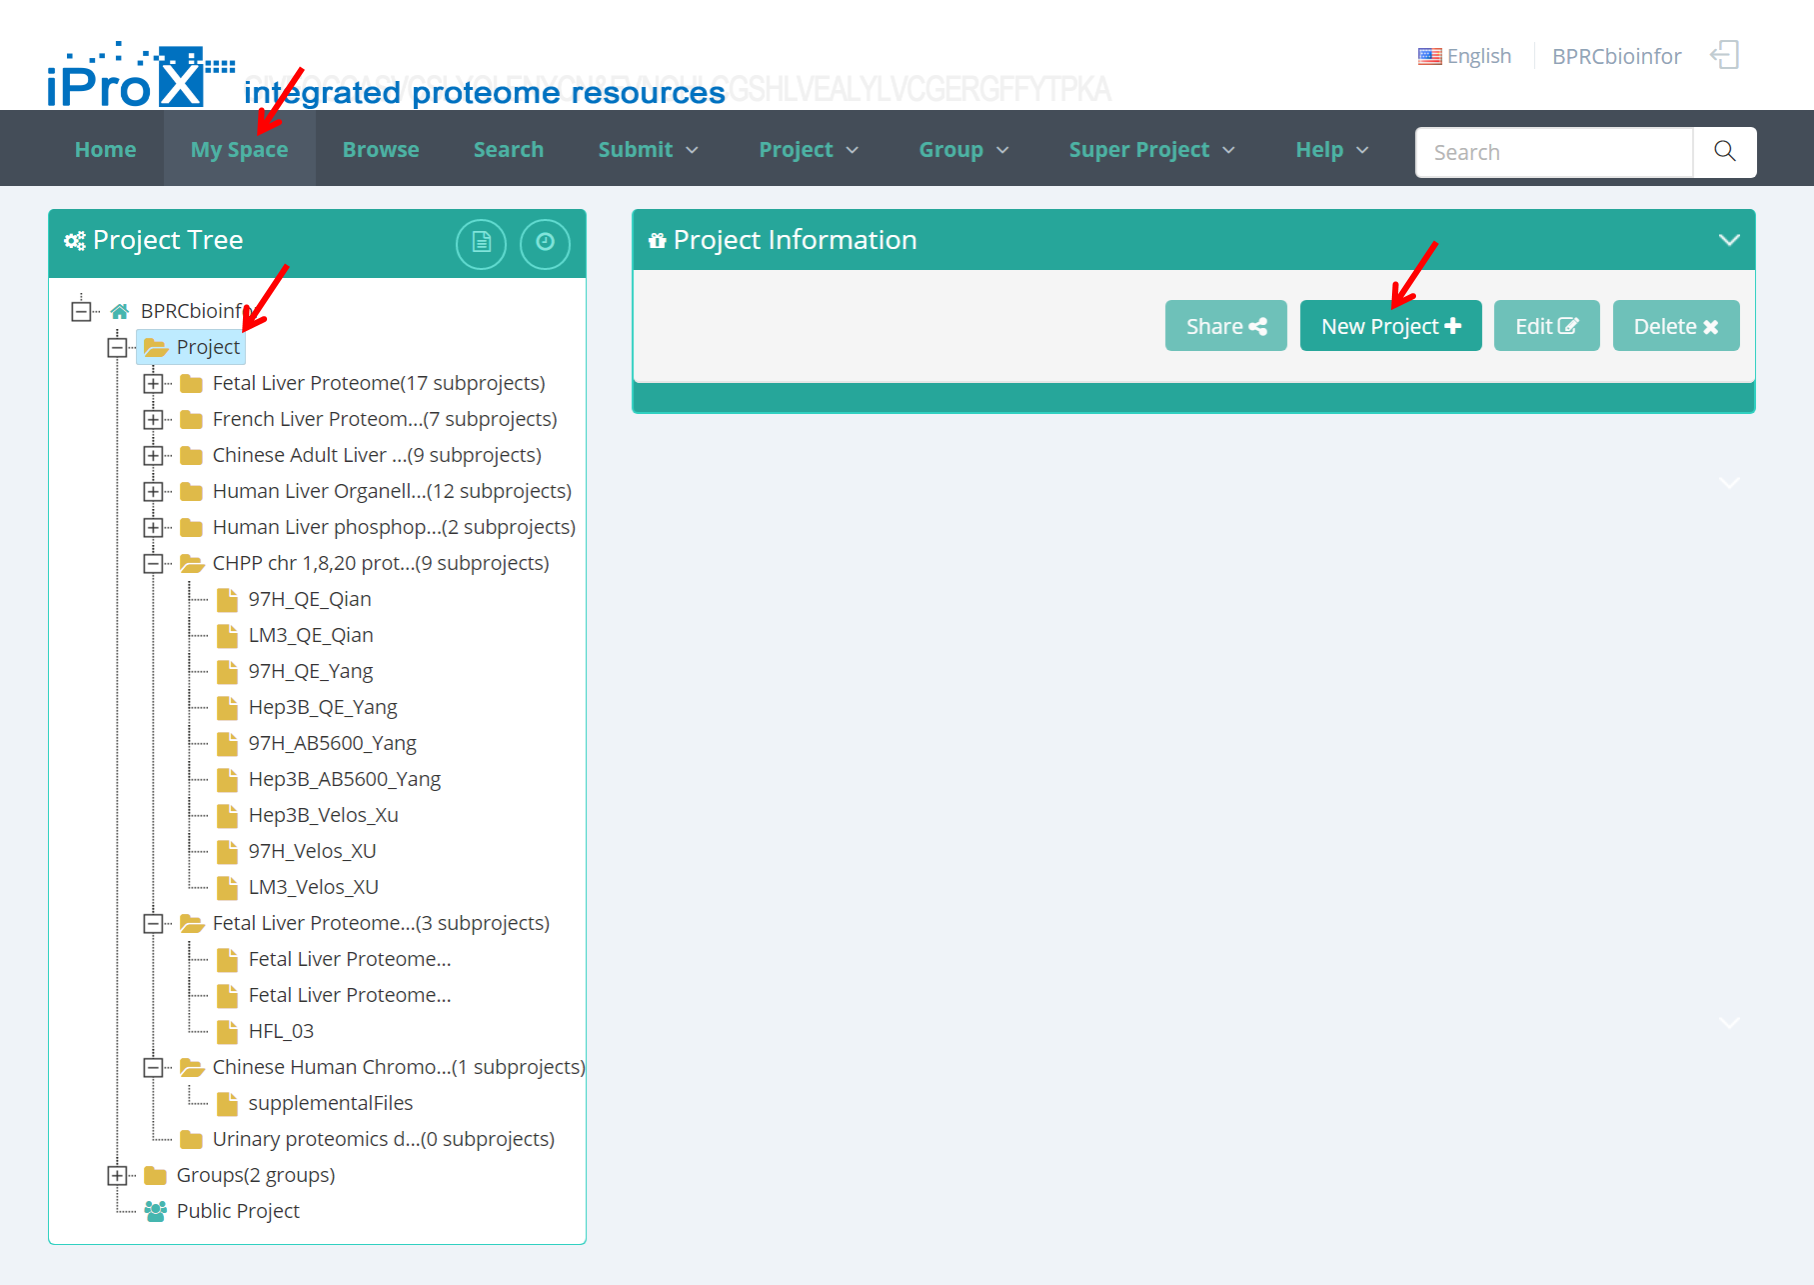
5.1 Create New Project
After login iProX, there are two ways to create a new project.
(1) Click "Project" → Select "New Project" (Figure 7-A).
(2) Click "My Space" and go to the project tree view → Select "Project" and click "New Project" button (Figure 7-B). Note: the “New Project” button appears only when the “Project” level is selected.
(A)
(B)
Figure 7. Add new project.
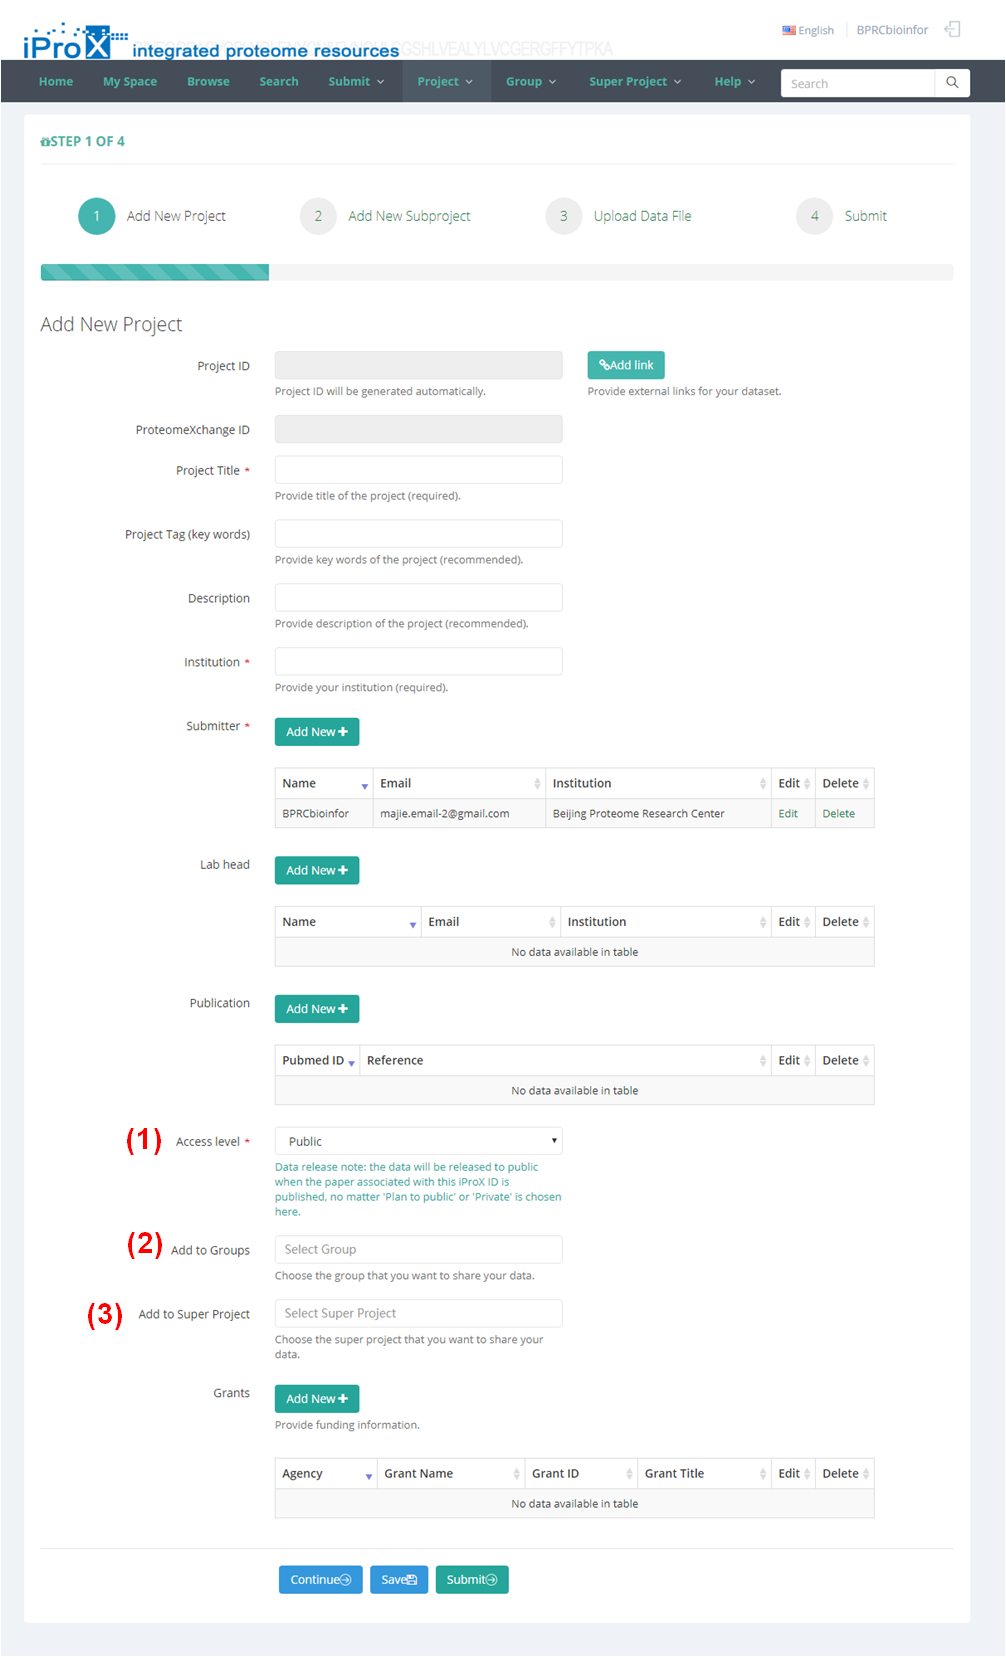
As shown in Figure 8, the detailed information about your project is asked to be provided here. The forms with "*" are required, and others are optional. It is recommended to give more details about your project, and this will help other people to learn more about your dataset.
There are some forms need pay special attention in this page.
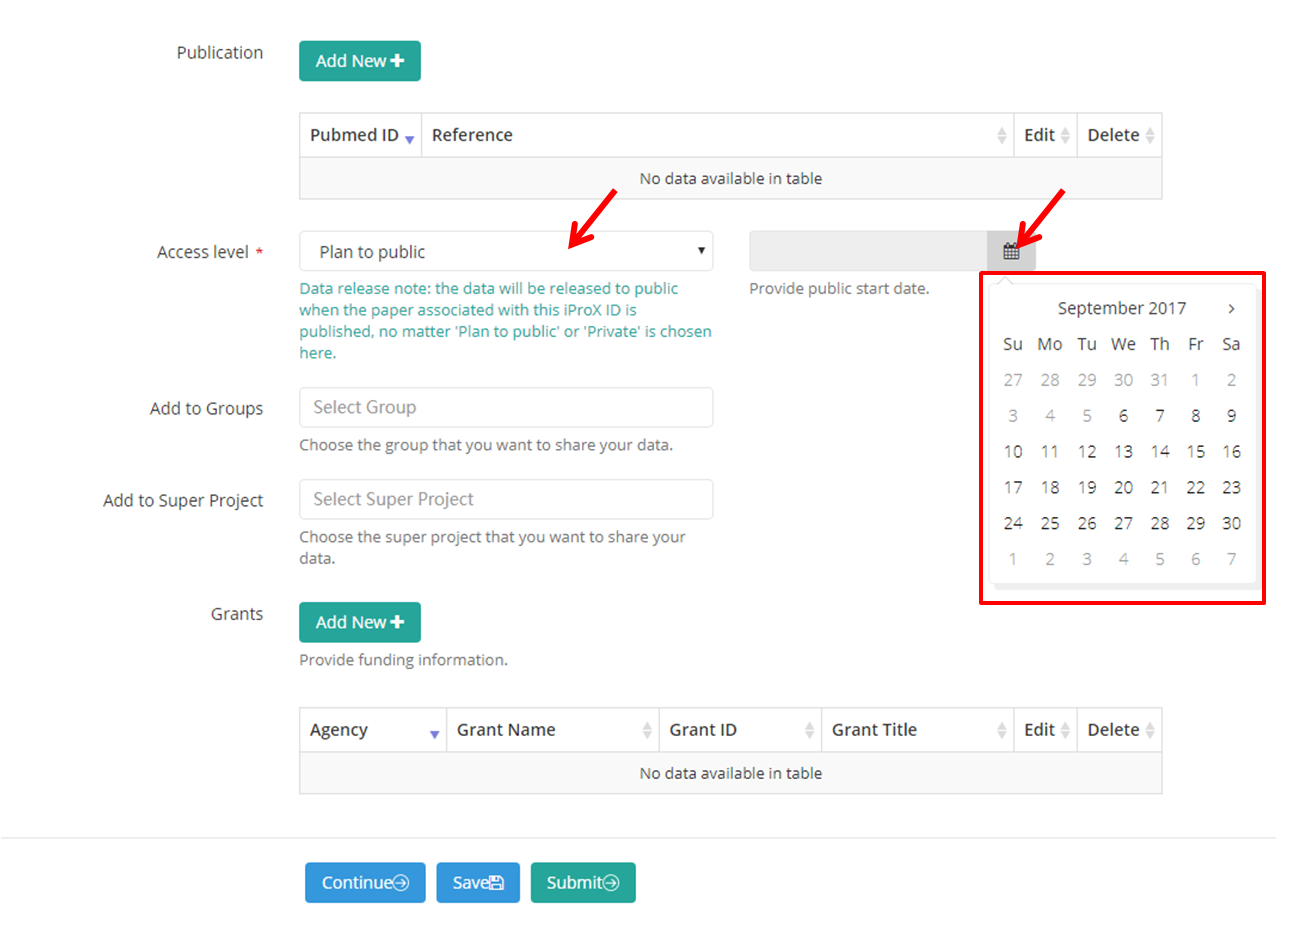
(1) “Access Level”. This form defines the access level of your dataset. There are three options in this form.
A. "Pulbic", means your project and its subproject(s) will open to public immediately after the submission is finished.
B. “To be public”, a date form will appear and you need to choose a date to release your dataset,
C. “private”, means the dataset will keep private until you modify this option.
Note: the data will be released to public when the paper associated with this iProX ID is published, no matter 'Plan to public' or 'Private' is chosen here.
(2) “Add to Group”. Here, you can choose the group(s) that you want to share your dataset. You can choose one or several groups in the drop down box, or just keep it in default. If a group is chosen, the project (and its subproject) will be shared with all members of the group. Then, they can browse the project and its subproject(s) and download datafiles, even if it is a "to be public" or “private” project. Please refer to Section 7.5 to find how to create your own group or to join other groups.
(3) “Add to Super Projects”. Here, you can choose the super project(s) that you want to share your dataset. You can choose one or several super projects in the drop down box, or just keep it in default. If a super project is chosen, the metadata of project (and its subproject) can be view from the datase list of this Super Project. Please refer to Section 7.6 to find how to create your super project or to join other super projects.
After filling out all information about the project, click “Continue” button to go to the next step.
(A)
(B)
Figure 8. Filling project information
5.2 Add Subproject
One or several subprojects can be set up under the project, representing the sub-datasets produced by different experiments, such as biological repeats, technical repeats, disease and control samples.
After filling out all information about the project, click “Continue” button and it will go to the subproject information page automatically. Also, you can add a subproject from the project tree view. As shown in Figure 9, select the project title in your project tree and click the "New Subproject +" button to add a new subproject within this project.
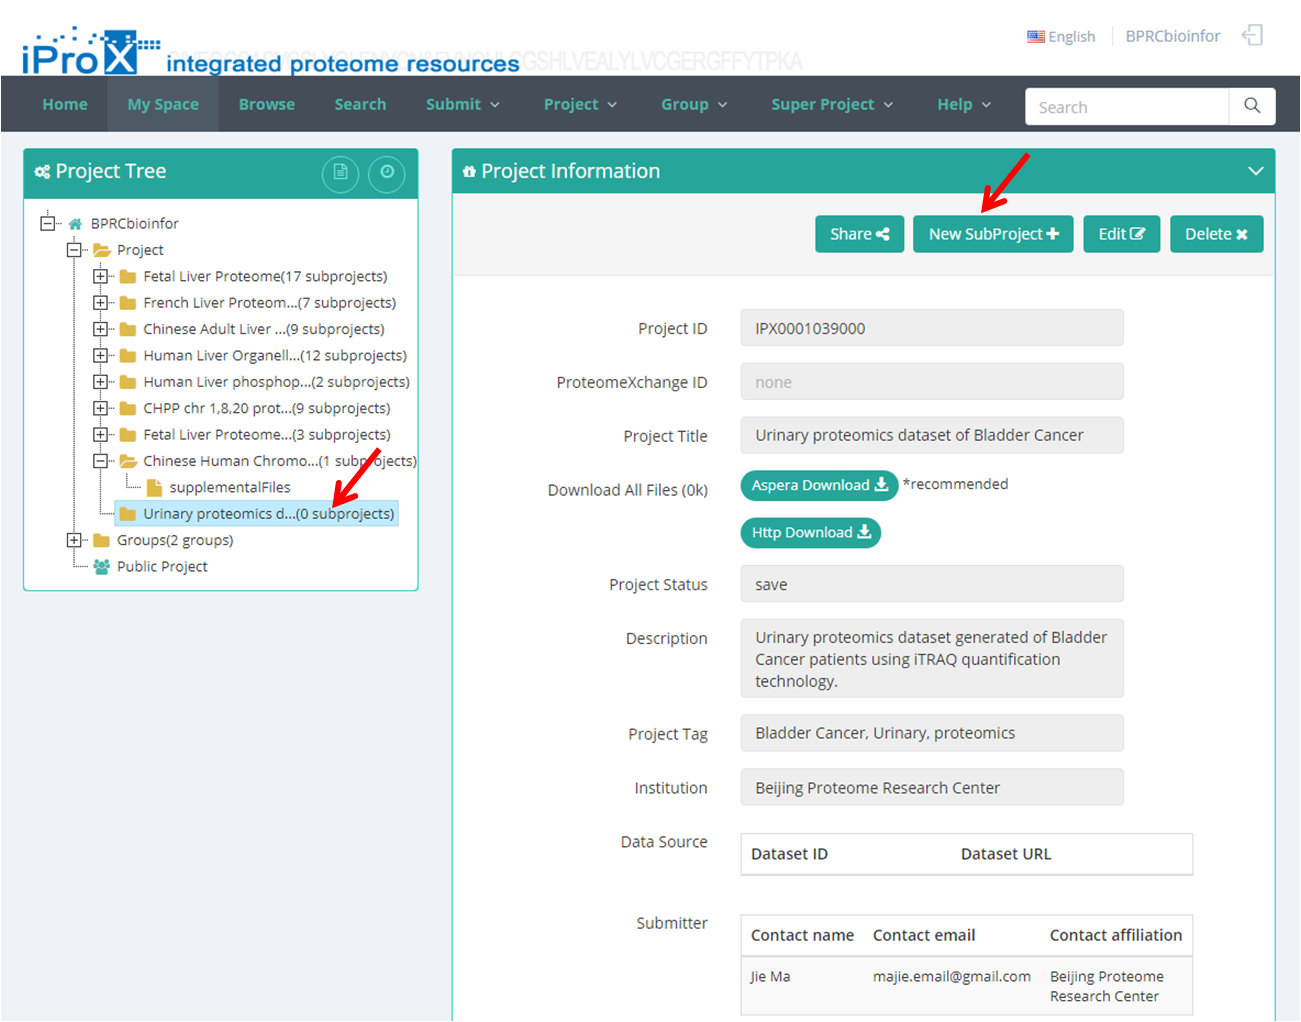
Figure 9. Add a subproject.
As shown in Figure 10, the detailed information about your experiment is asked to be provided in the subproject information page. The forms with "*" are required, and others are optional. It is recommended to give more details here.
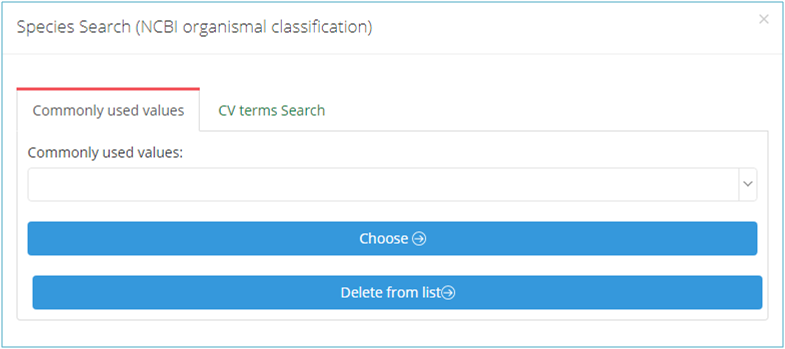
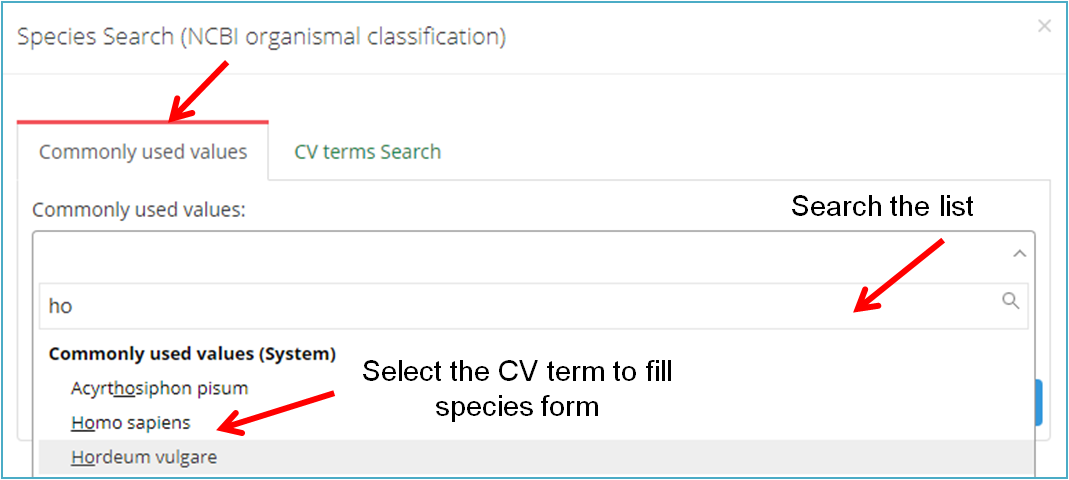
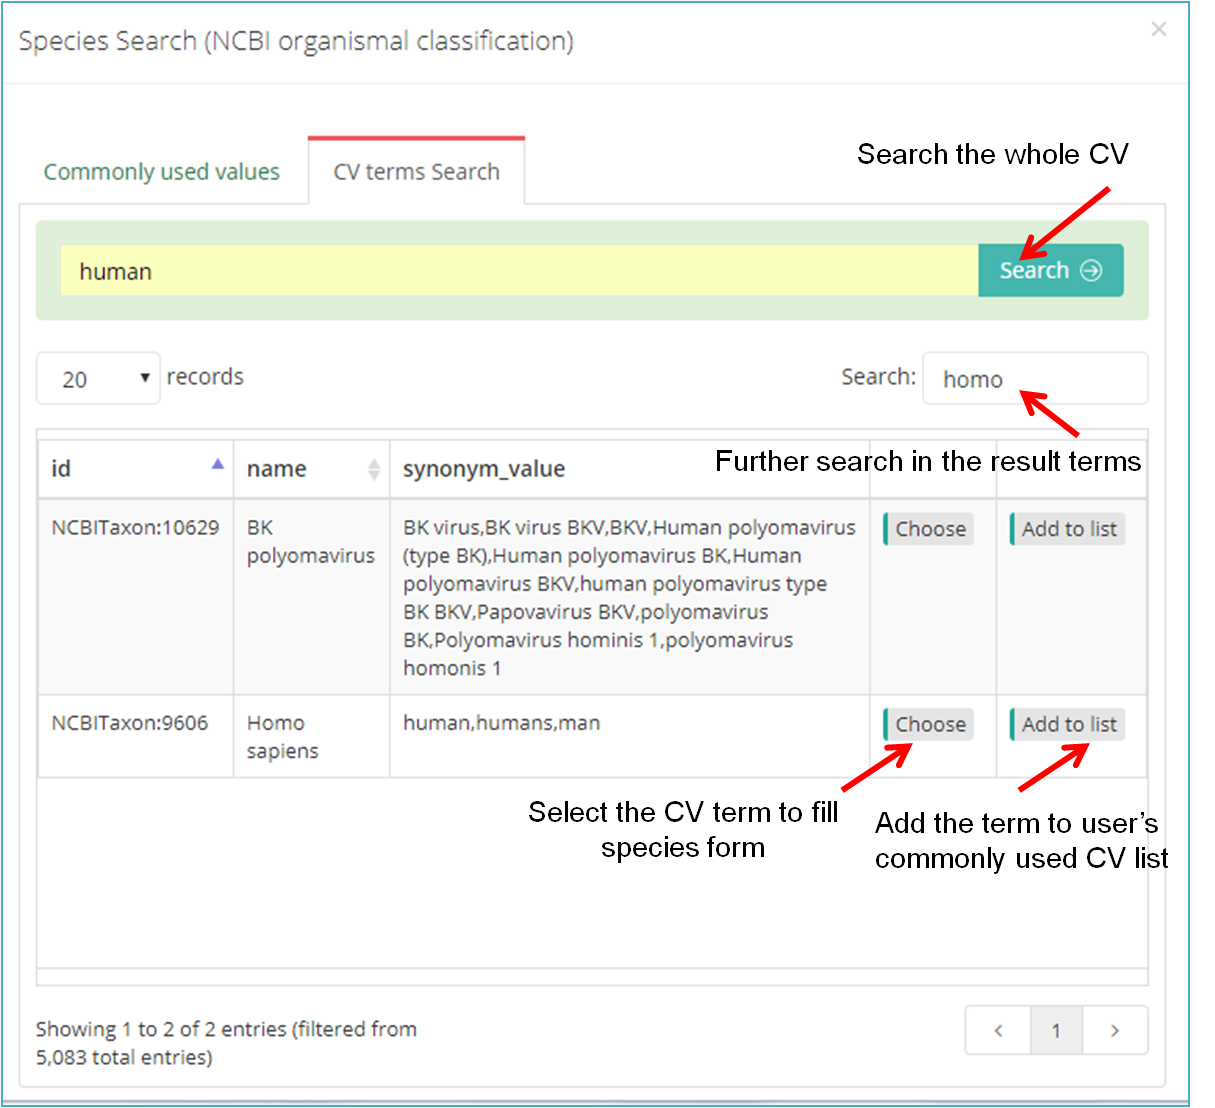
Some metadata need be filled with the pre-defined controlled vocabulary, including Species, Tissue, Cell Type, Disease, Instrument and so on. Click the "Choose" option to browse or search the CV terms in the pop-up dialog (Figure 11-A).
Generally, you can browse the "Commonly used values" (Figure 11-B), or click "CV terms search"(Figure 11-C) to find the term you wish to use. Also, you can add the searched term to your own list (Click "Add to list" in Figure 11-C), then it will be displayed in the lower part of the "Commonly used values" and can be selected from the "Commonly used values" next time.
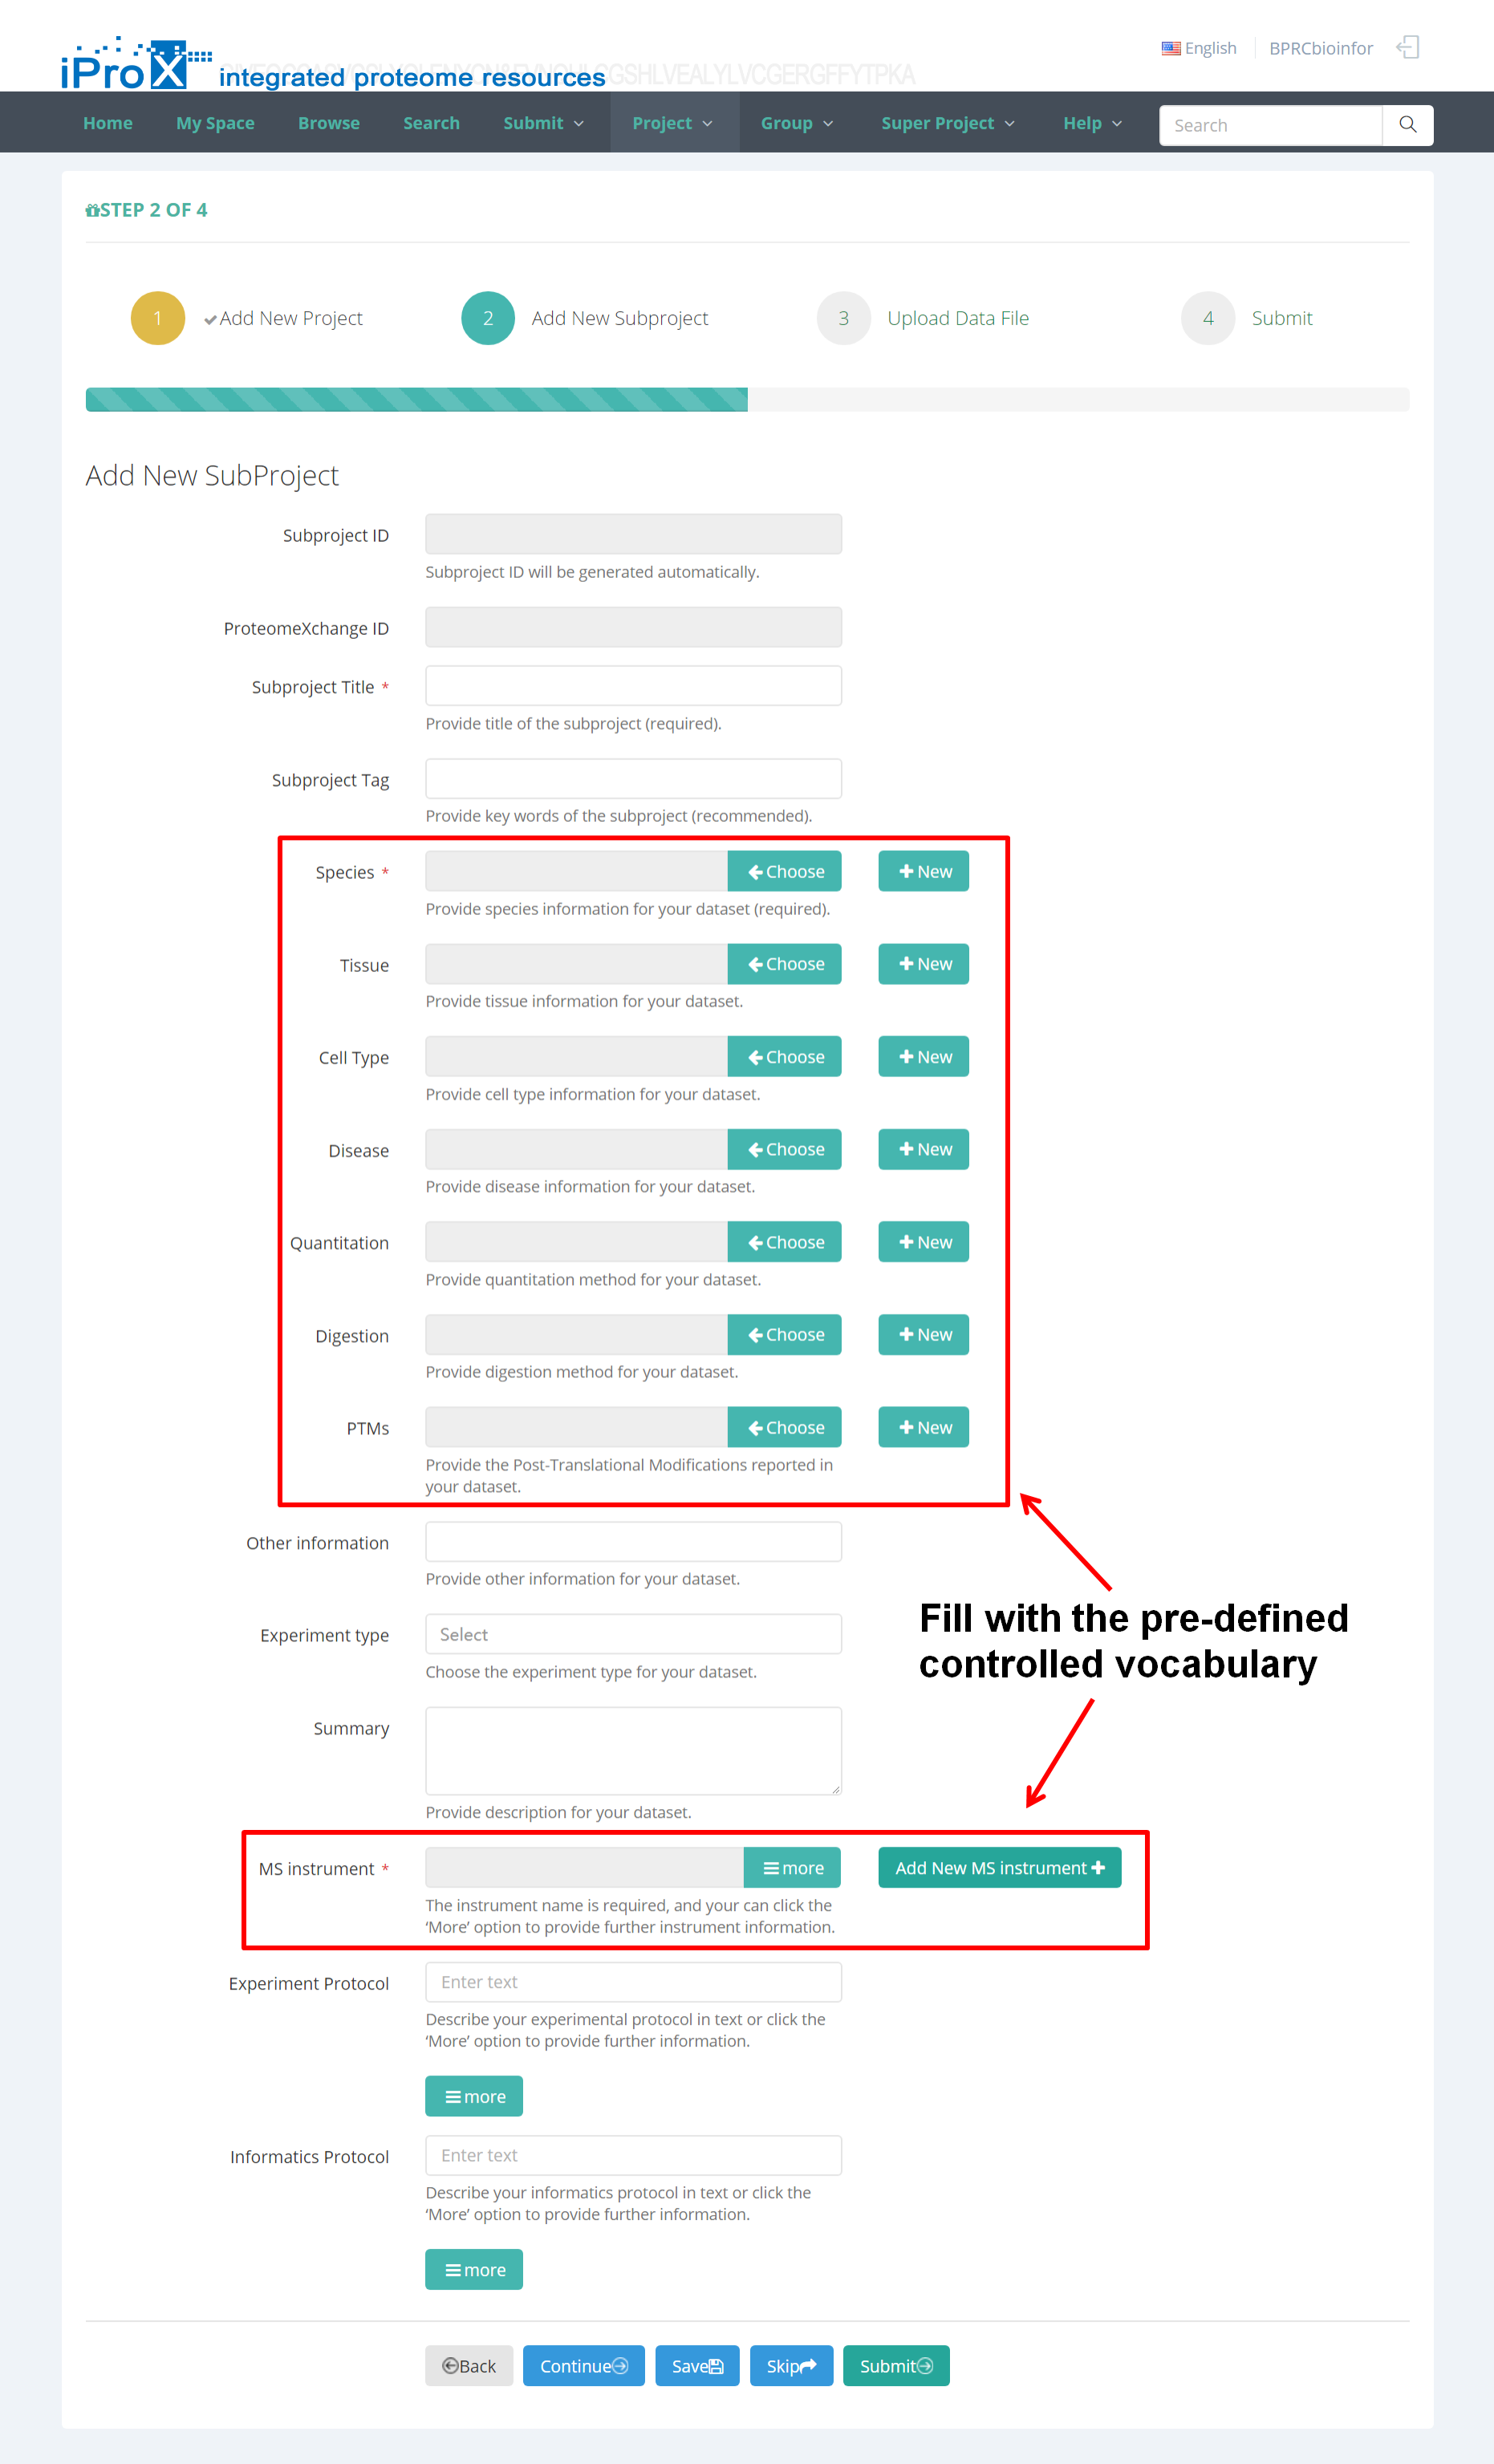
Figure 10. Subproject information page.
(A)
(B)
(C)
Figure11. Use Controlled Vocabulary (CV) terms to fill subproject information form.
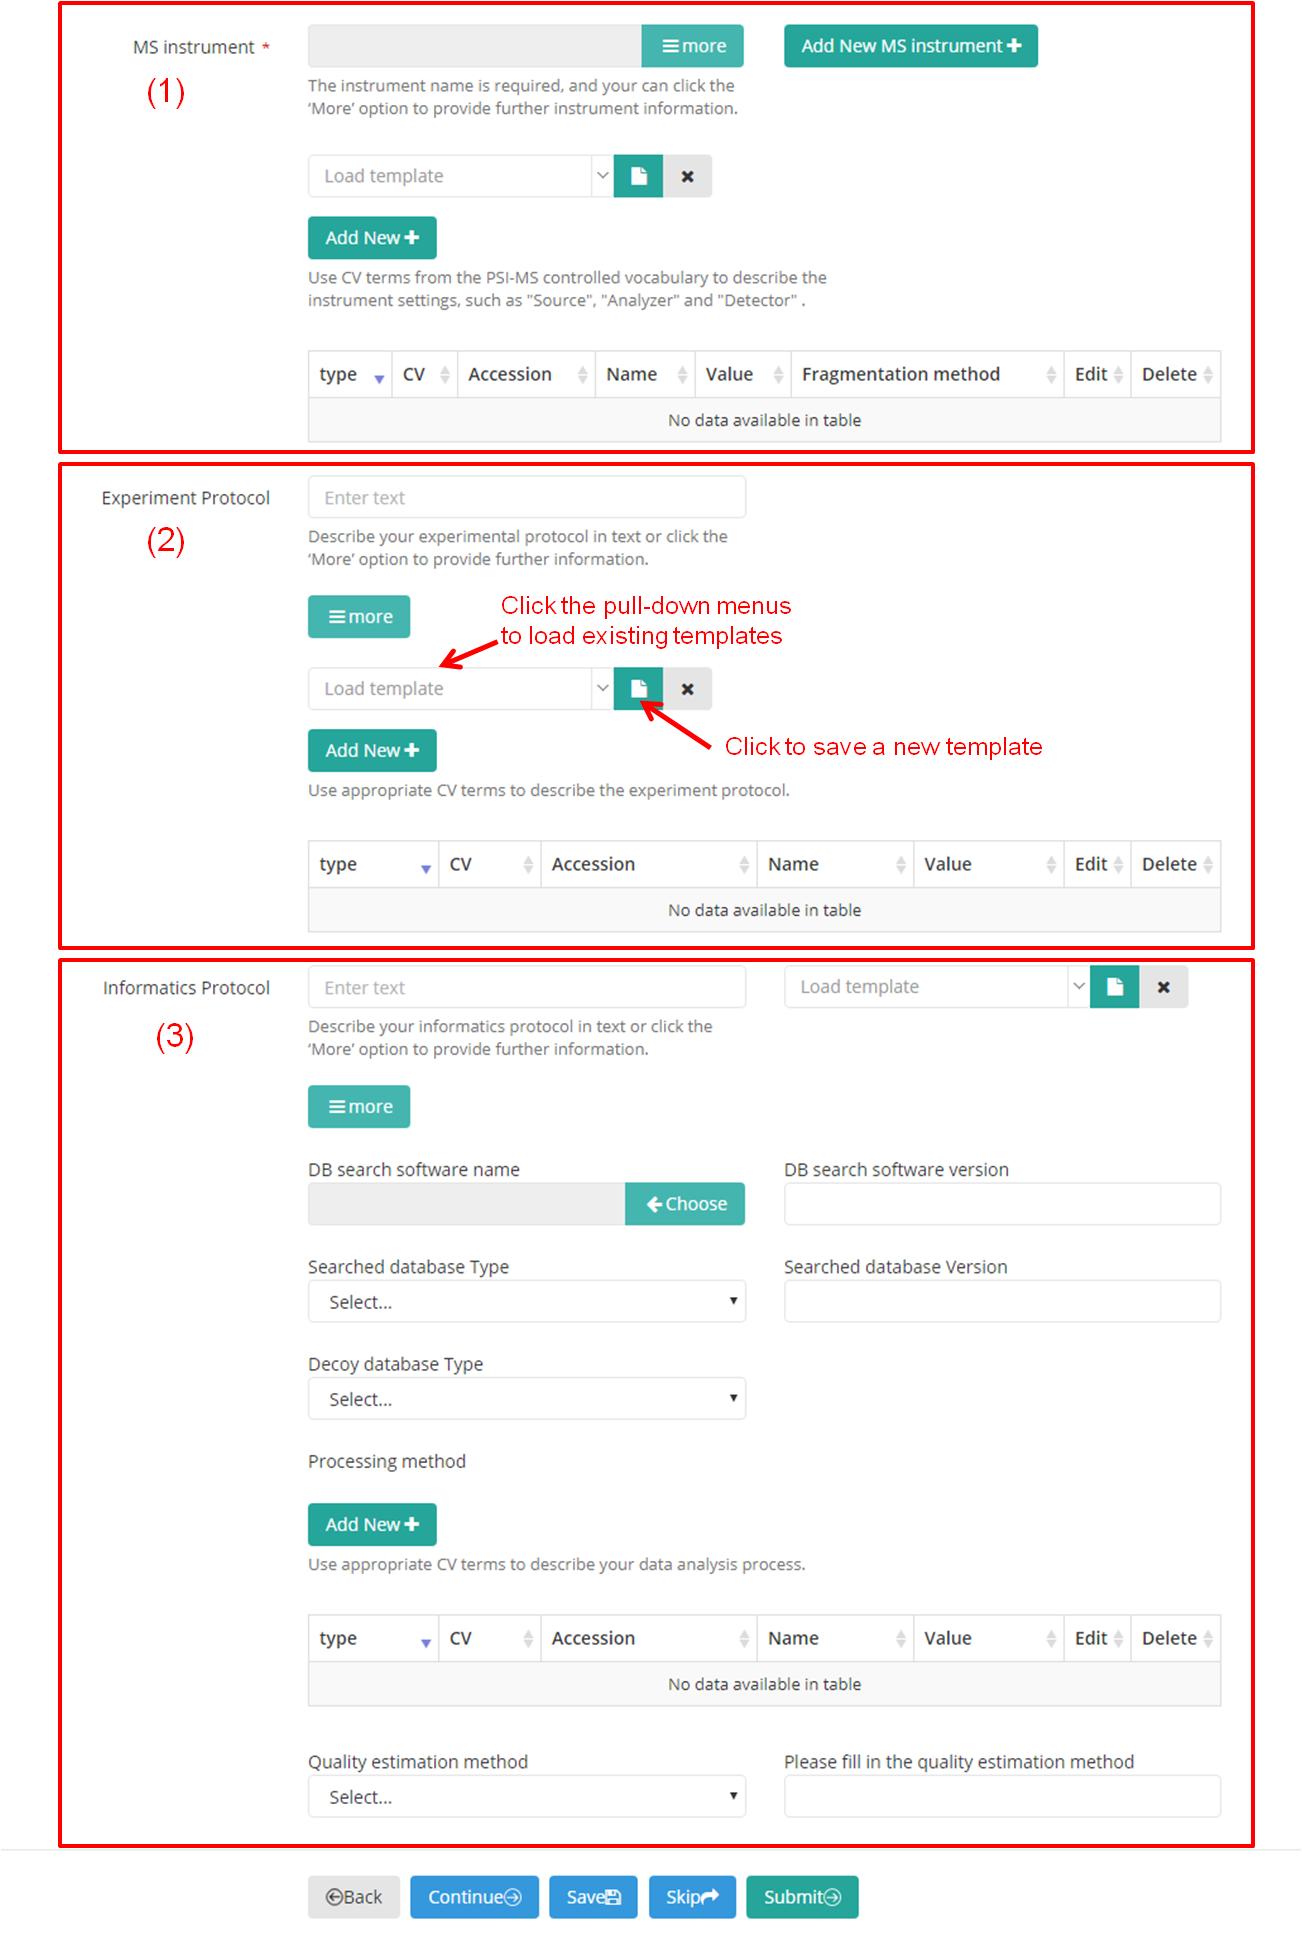
The instrument name ("MS Instrument") is requied and must be provided using the CV term. The "Experimet Protocol" and "Informatics Protocol" can be described in text. Further information can be provide for these items by click the ‘More’ option (Figure 12-A). You can use the pull-down menus to load existing templates, if applicable. Also, you can save all the information entered as a new template by clicking the "save" button.

(A)
(B)
Figure 12. Provide further information for some items of subproject.
5.3 Upload Data Files
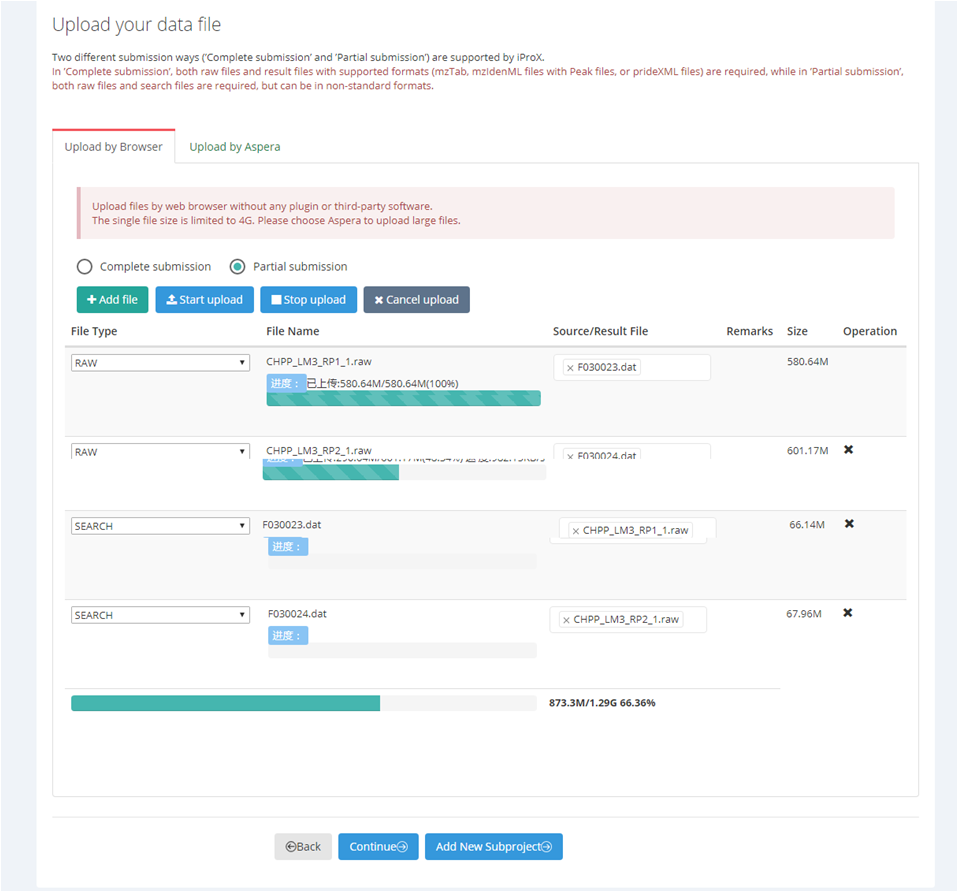
You can upload files to iProX by web browser or by Aspera. The single file size is limited to 4G for http uploading. Please choose Aspera to upload large files.
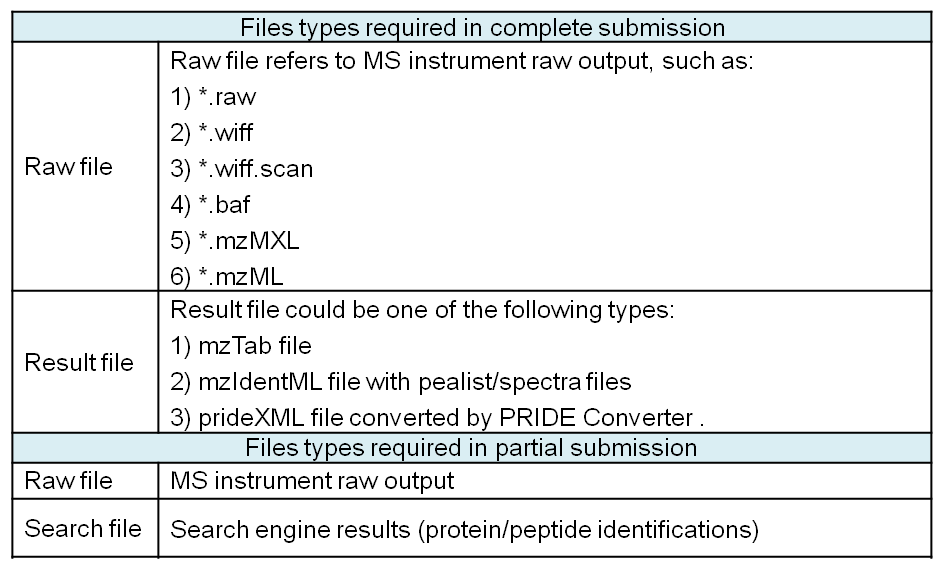
Two different submission ways ('Complete submission' and 'Partial submission') are supported by iProX. In ’Complete submission’, both raw files and result files with supported formats (mzTab, mzIdentML files with Peak files, or prideXML files) are required, while in ’Partial submission’, both raw files and search files are required, but can be in non-standard formats. The detailed file types supported by two submission ways are listed in Table 1.
Table 1. The file types supported by 'Complete submission' and 'Partial submission'.
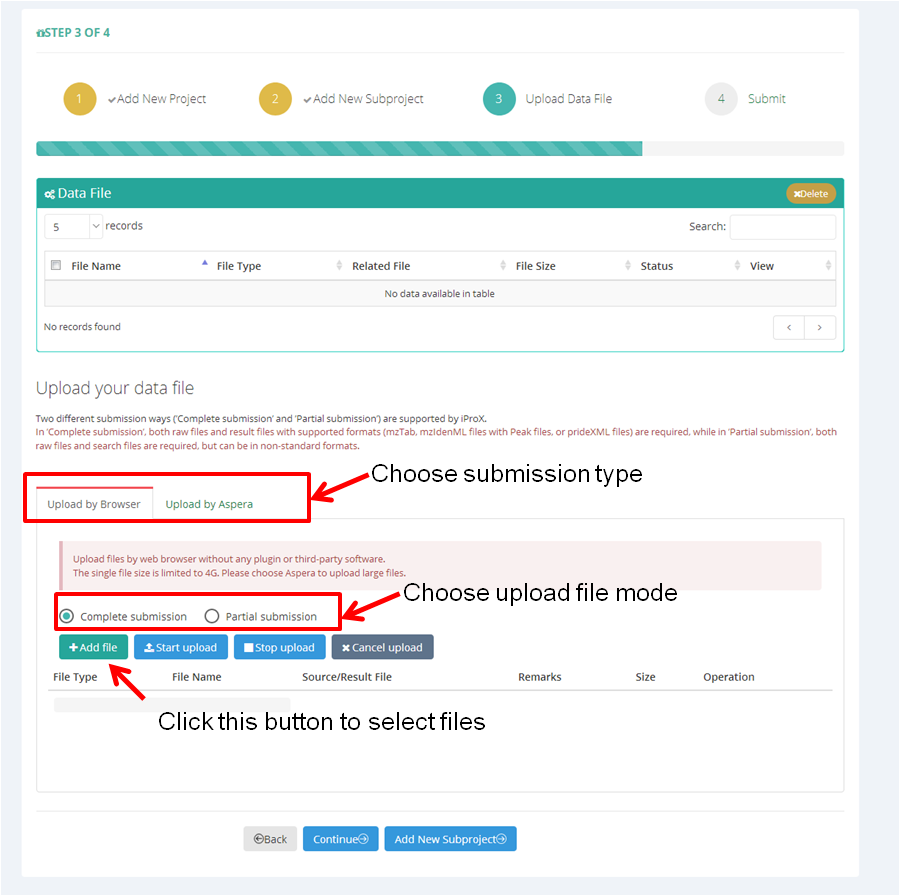
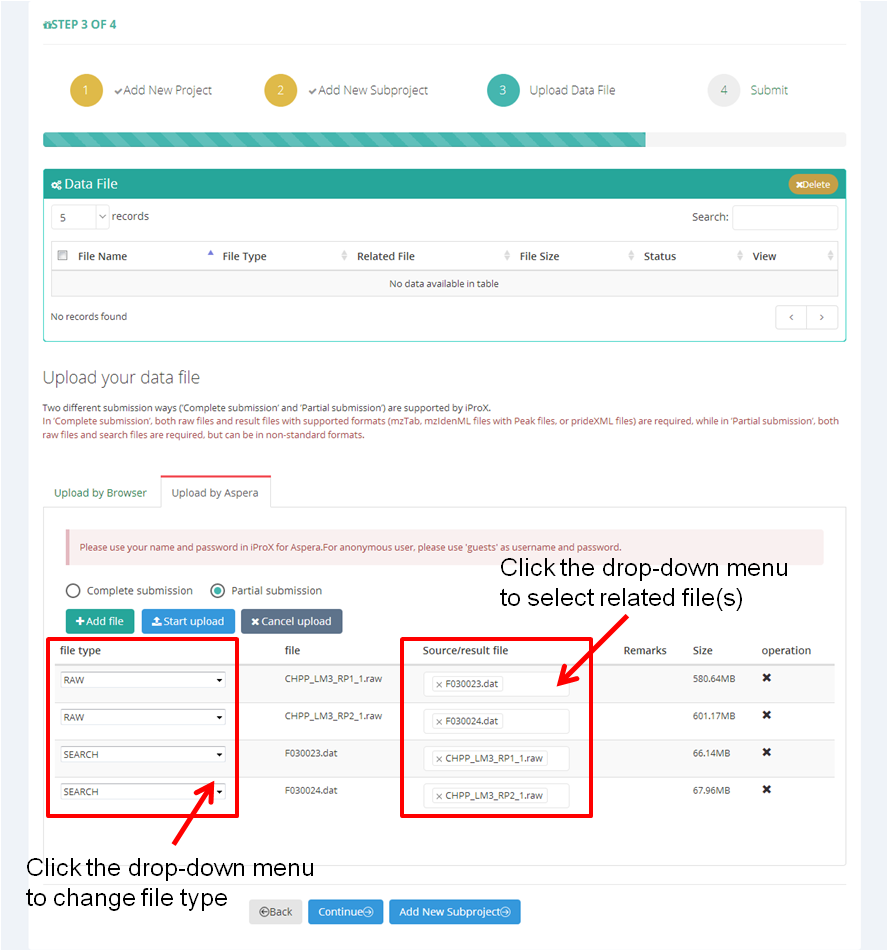
As shown in Figure 13-A, first, you should choose the submission type ('Complete submission' or 'Partial submission') and upload file mode ('by Browser' or 'by Aspera').
Then click "+ Add file" button to select files you want to upload, multiple local files can be selected at once. The file type will be annotated automatically based on the suffix name, and you can change the type by clicking the drop-down menu (Figure 13-B). Also, you can assign the relationships within the selected files ("Source/result file" in Figure 13-B).
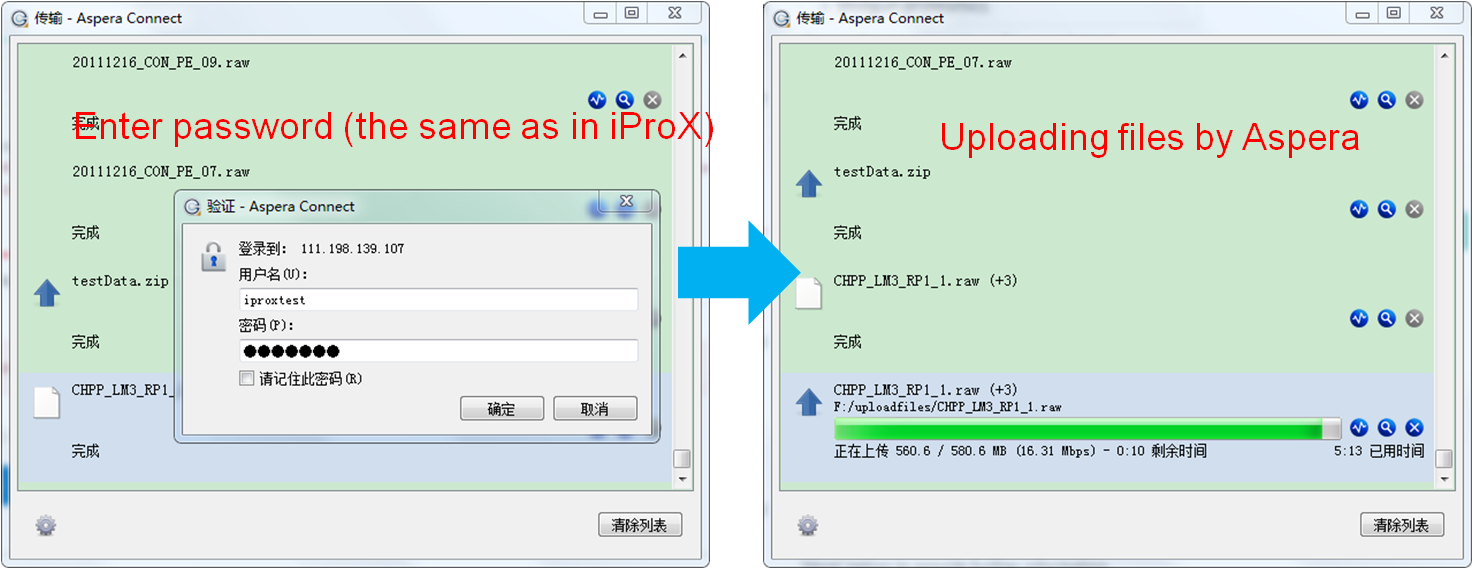
Before uploading the data files, you should check whether all necessary files are included and their types and relationships are correct. Then click the "Start upload" button to start uploading files. Figure 14-A (web browser) and Figure 14-B (Aspera) show the uploading process of two modes.
(A)
(B)
Figure 13. Choose submission type and select data files.
(A)
(B)
Figure 14. Uploading files by web or by Aspera.
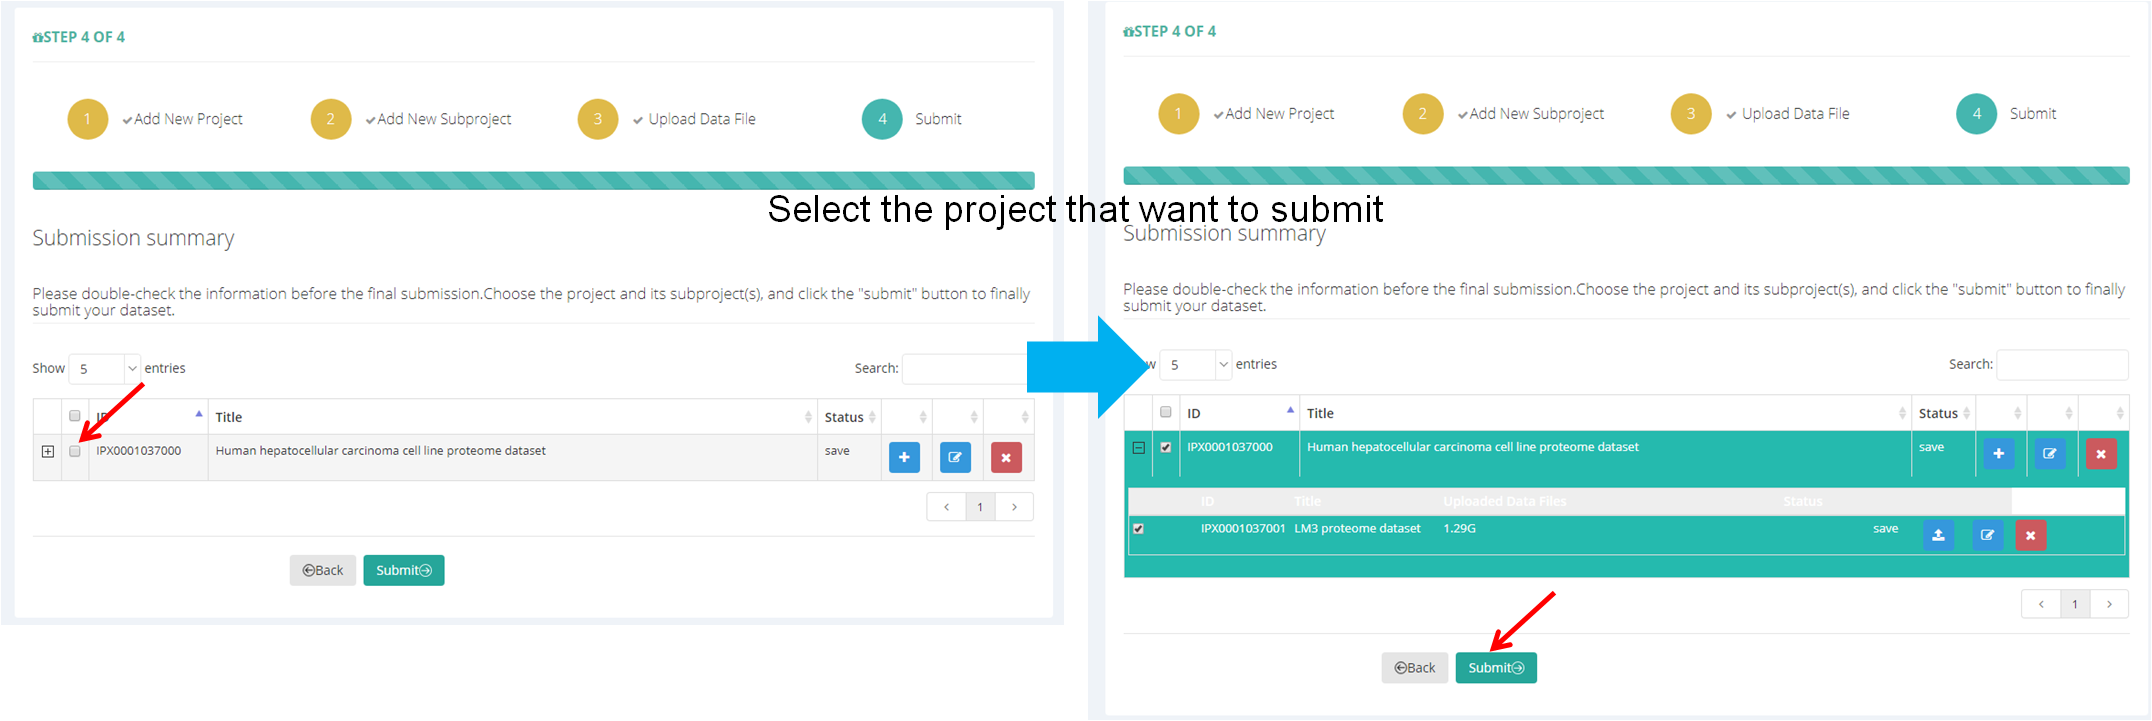
5.4 Submit dataset
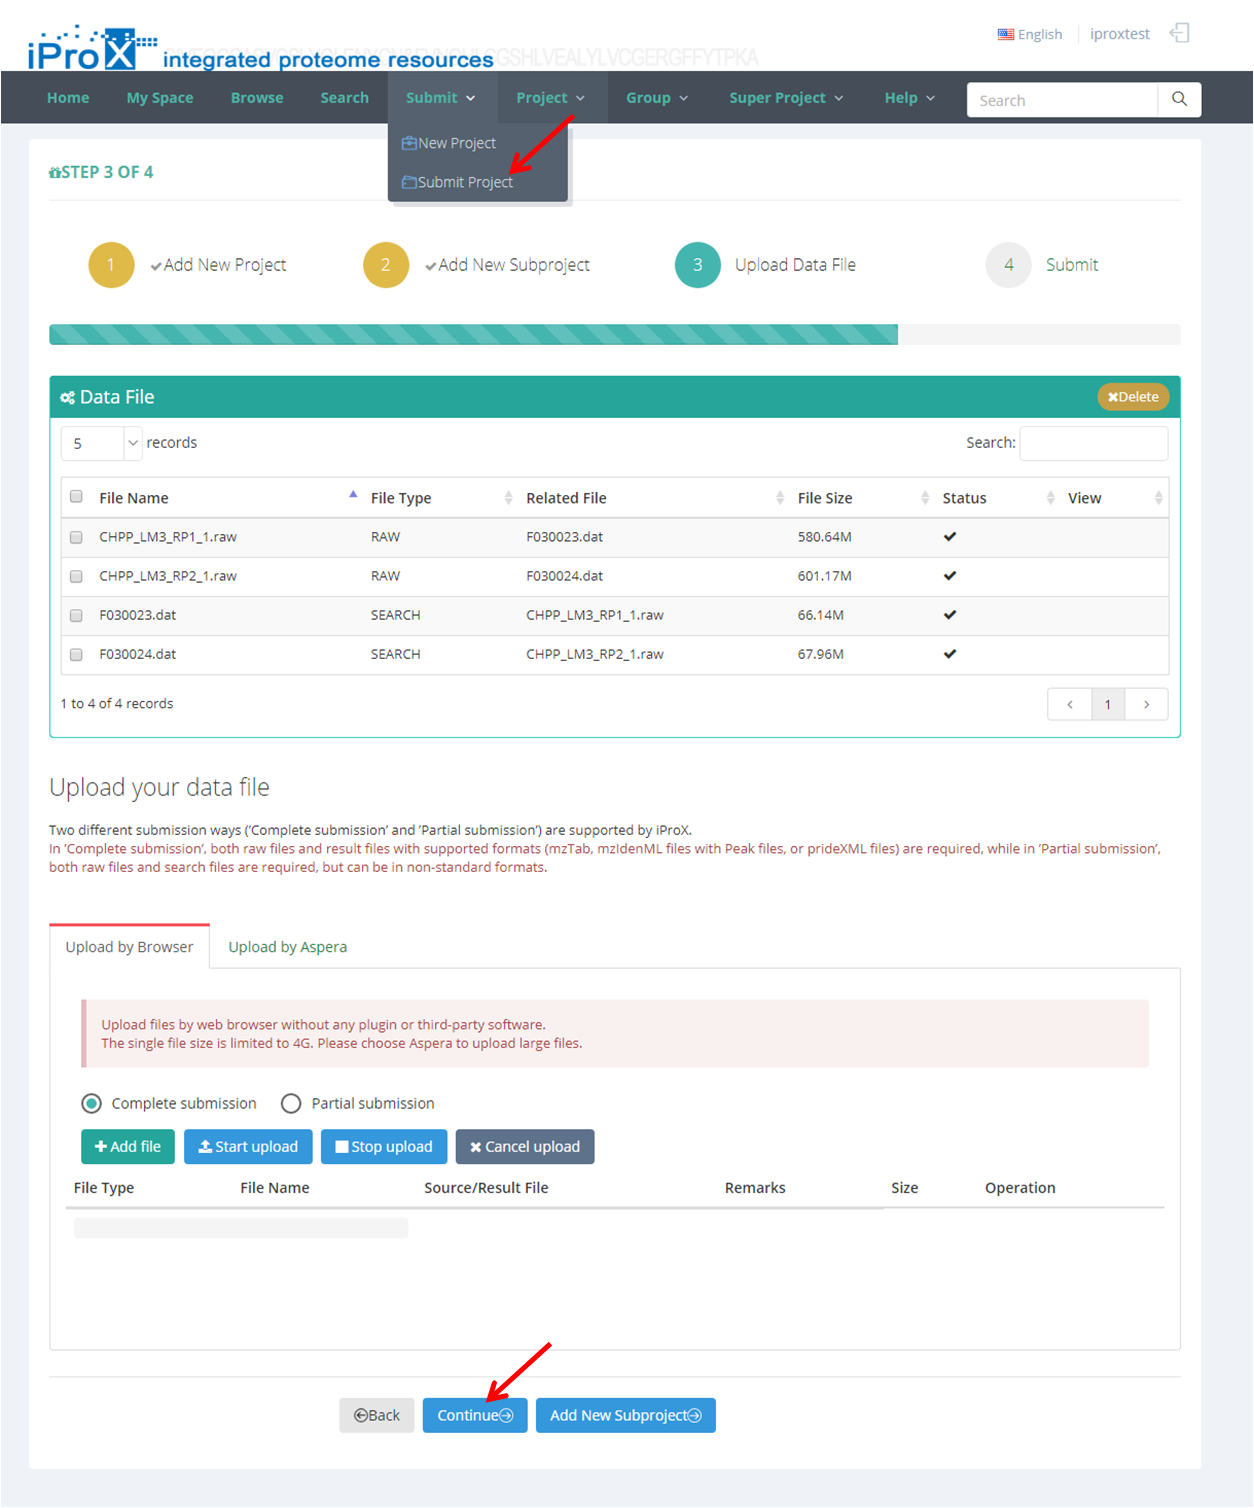
After all files are uploaded successfully, click the "Continue" button or click "Submit"→"Submit Project" (Figure 15-A) and go to the dataset submit page (Figure 15-B). Select the project and its subproject(s) that you want to submit, and click the "Submit" button, then the dataset will be submit to iProX finally. And the curator of iProX will check your submission immediately.
Note: Please double-check all the information before the final submission.
(A)
(B)
Figure 15. Submit dataset.
6. Share dataset
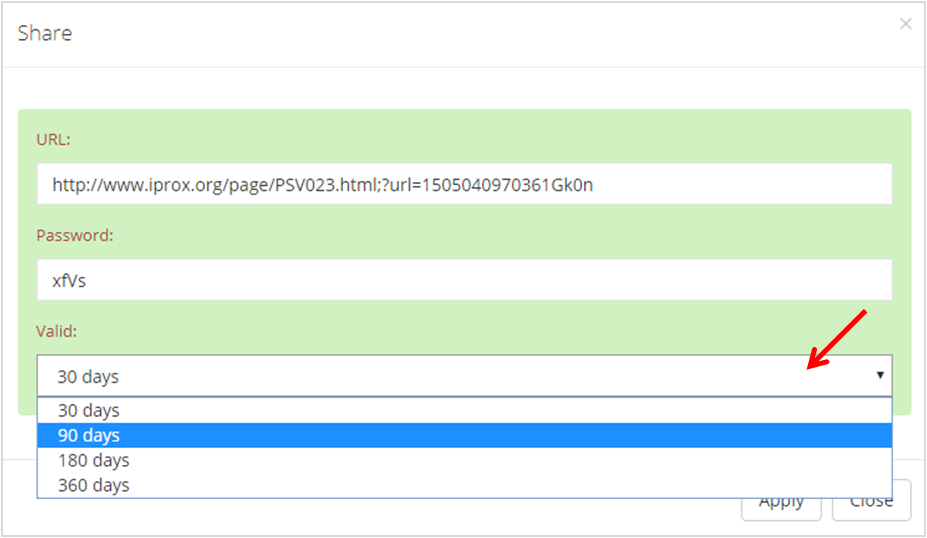
In iProX, users can create a sharing URL with a password for peer-review for their private datasets, and the valid time is limited to 30 days, 90 days, 180 days or 360 days.
As shown in Figure 16-A, choose the private project in "My Space" ("project tree" of the user) and click the "share" button. Then, a share URL with its password is generated in the pop-up dialog, and user can also choose the valid time of the share link in this box (Figure 16-B).
(A)
(B)
Figure 16. Create share URL for private dataset.
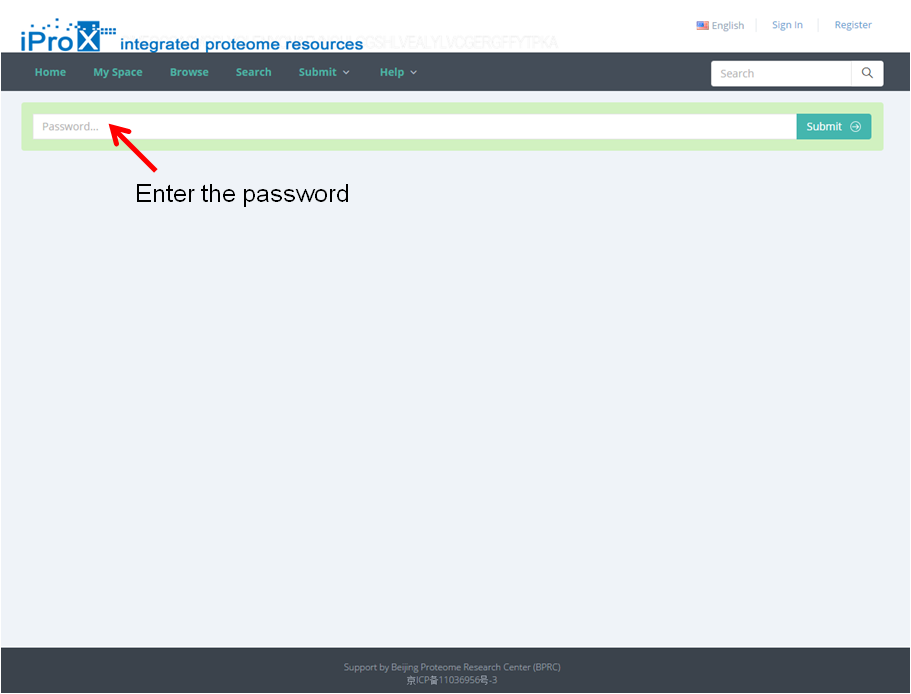
Copy and paste the link into the browser (Figure 17-A), enter the password, and you can access the shared project (Figure 17-B). All data files of this project can be download by clicking "Aspera Download" or "Http download" button on this page (red box in Figure 17-B). Then click the subproject title and the subproject information is shown (Figure 17-B), and the data files of this subproject can be download here (at the bottom of this page).
(A)
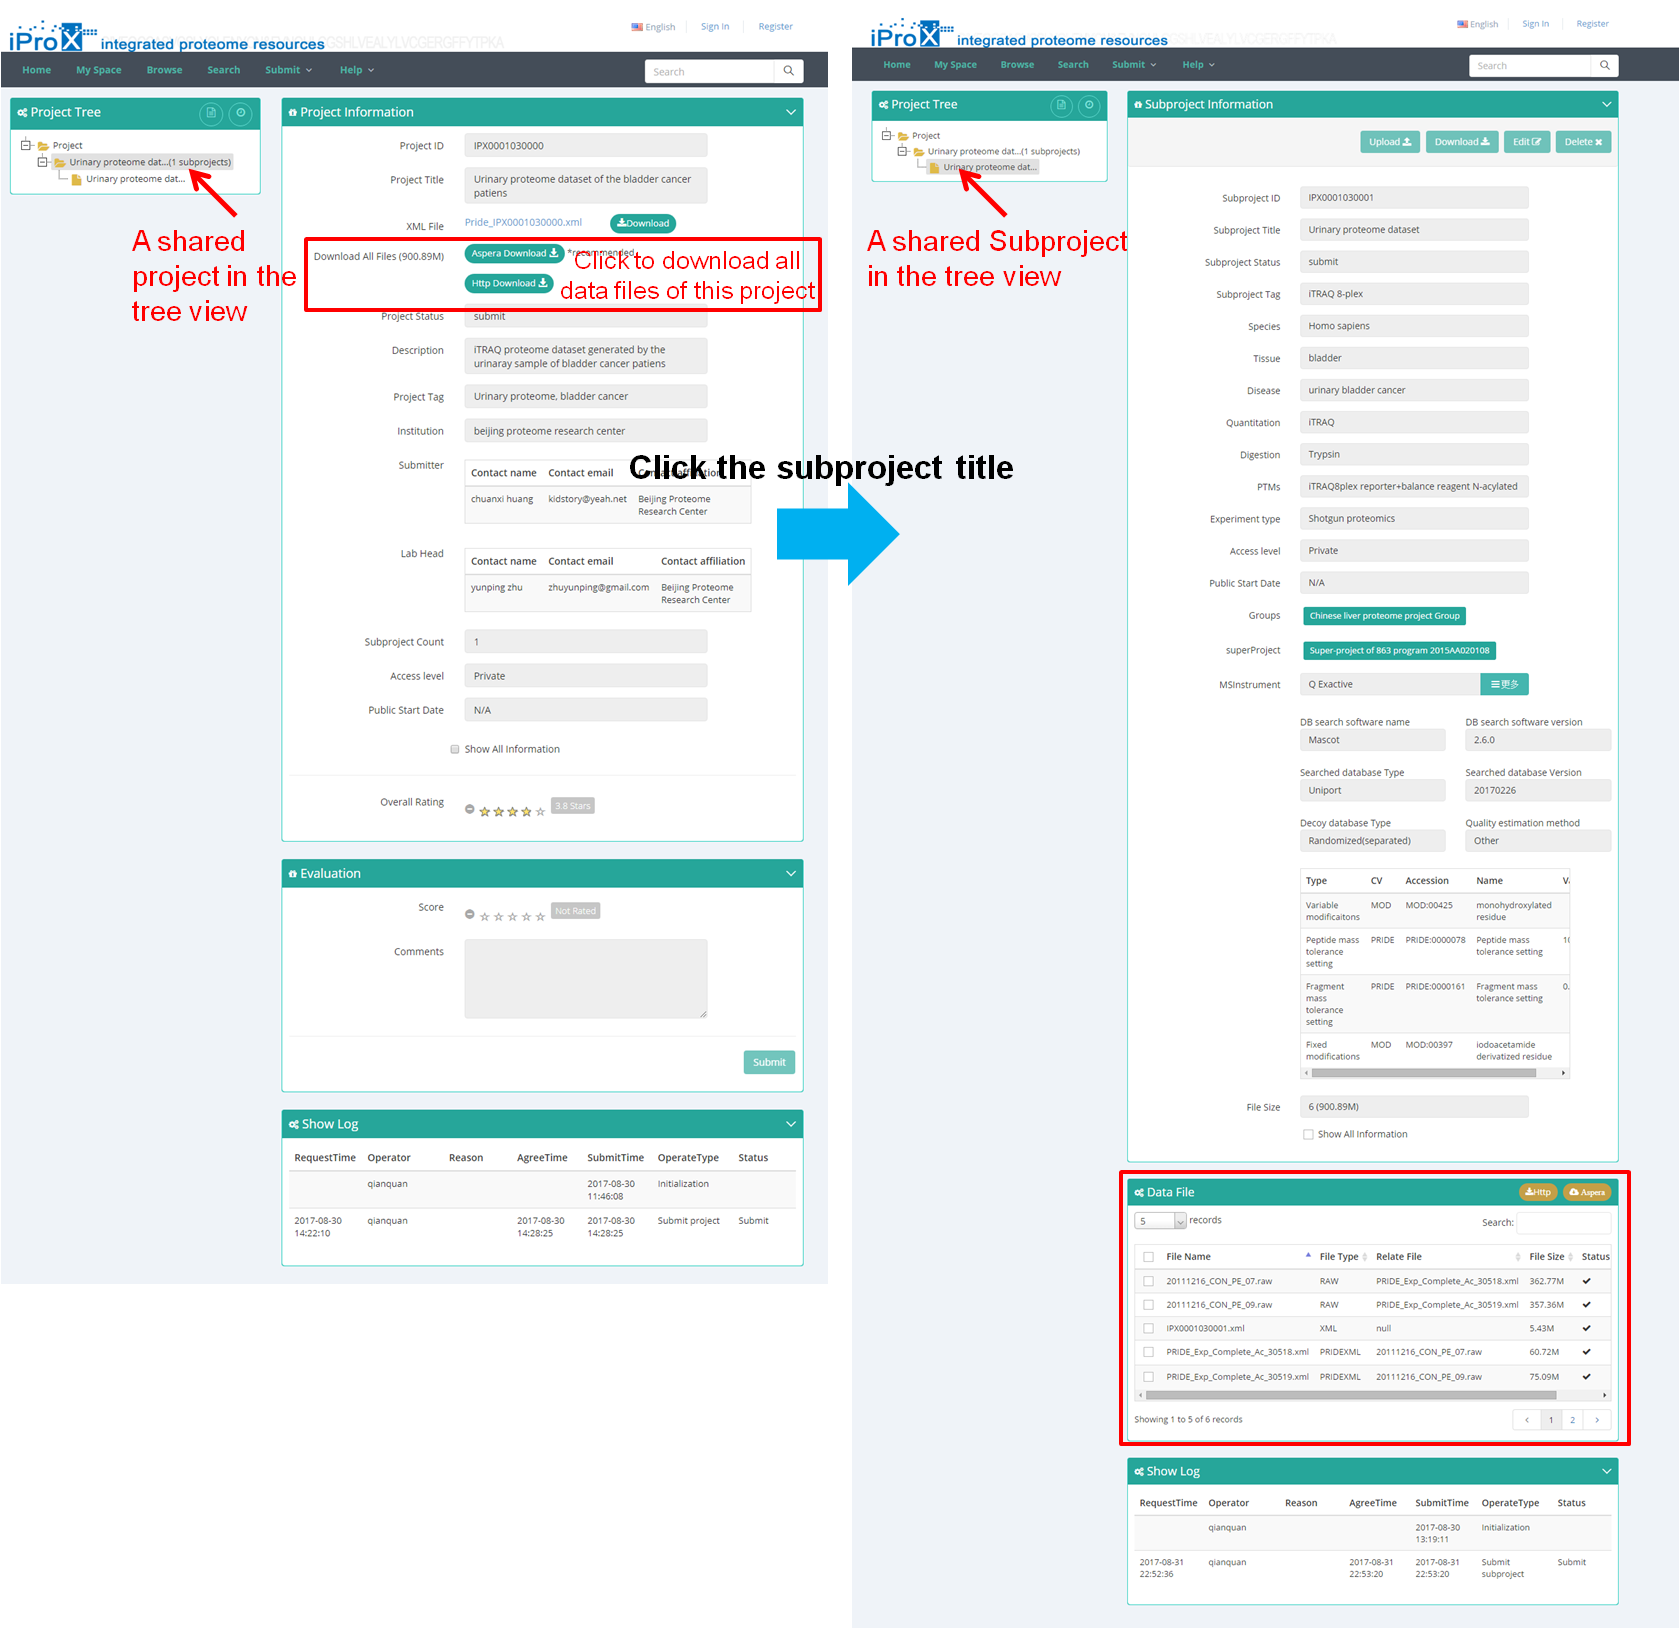
(B)
Figure 17. Access of shared dataset in iProX.
7. Browse and search dataset in iProX
7.1 Browse dataset
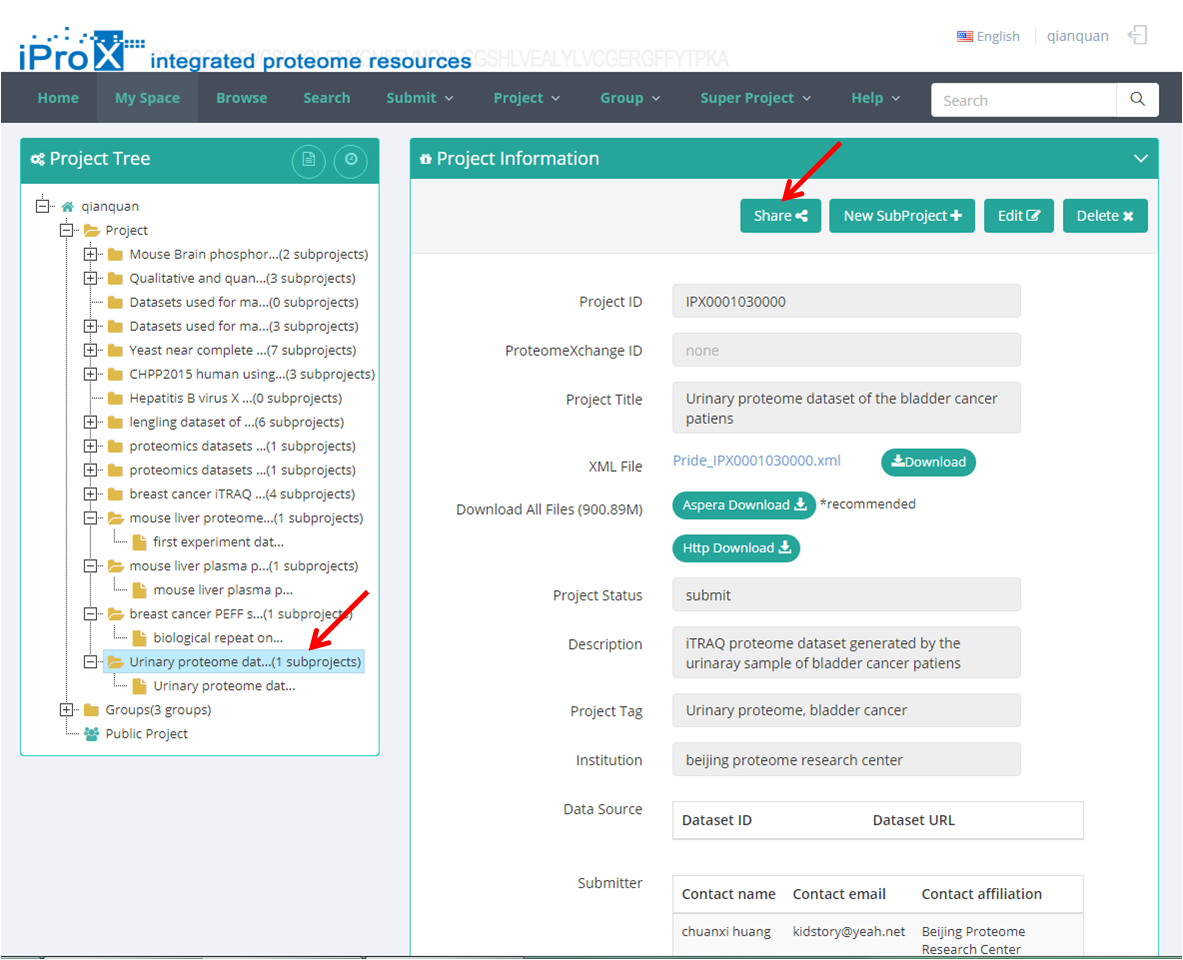
Data in iProX can be browsed by different dataset type (Project, Subproject and Super Project, Figure 18-A) or by different sample types (Figure 18-B).
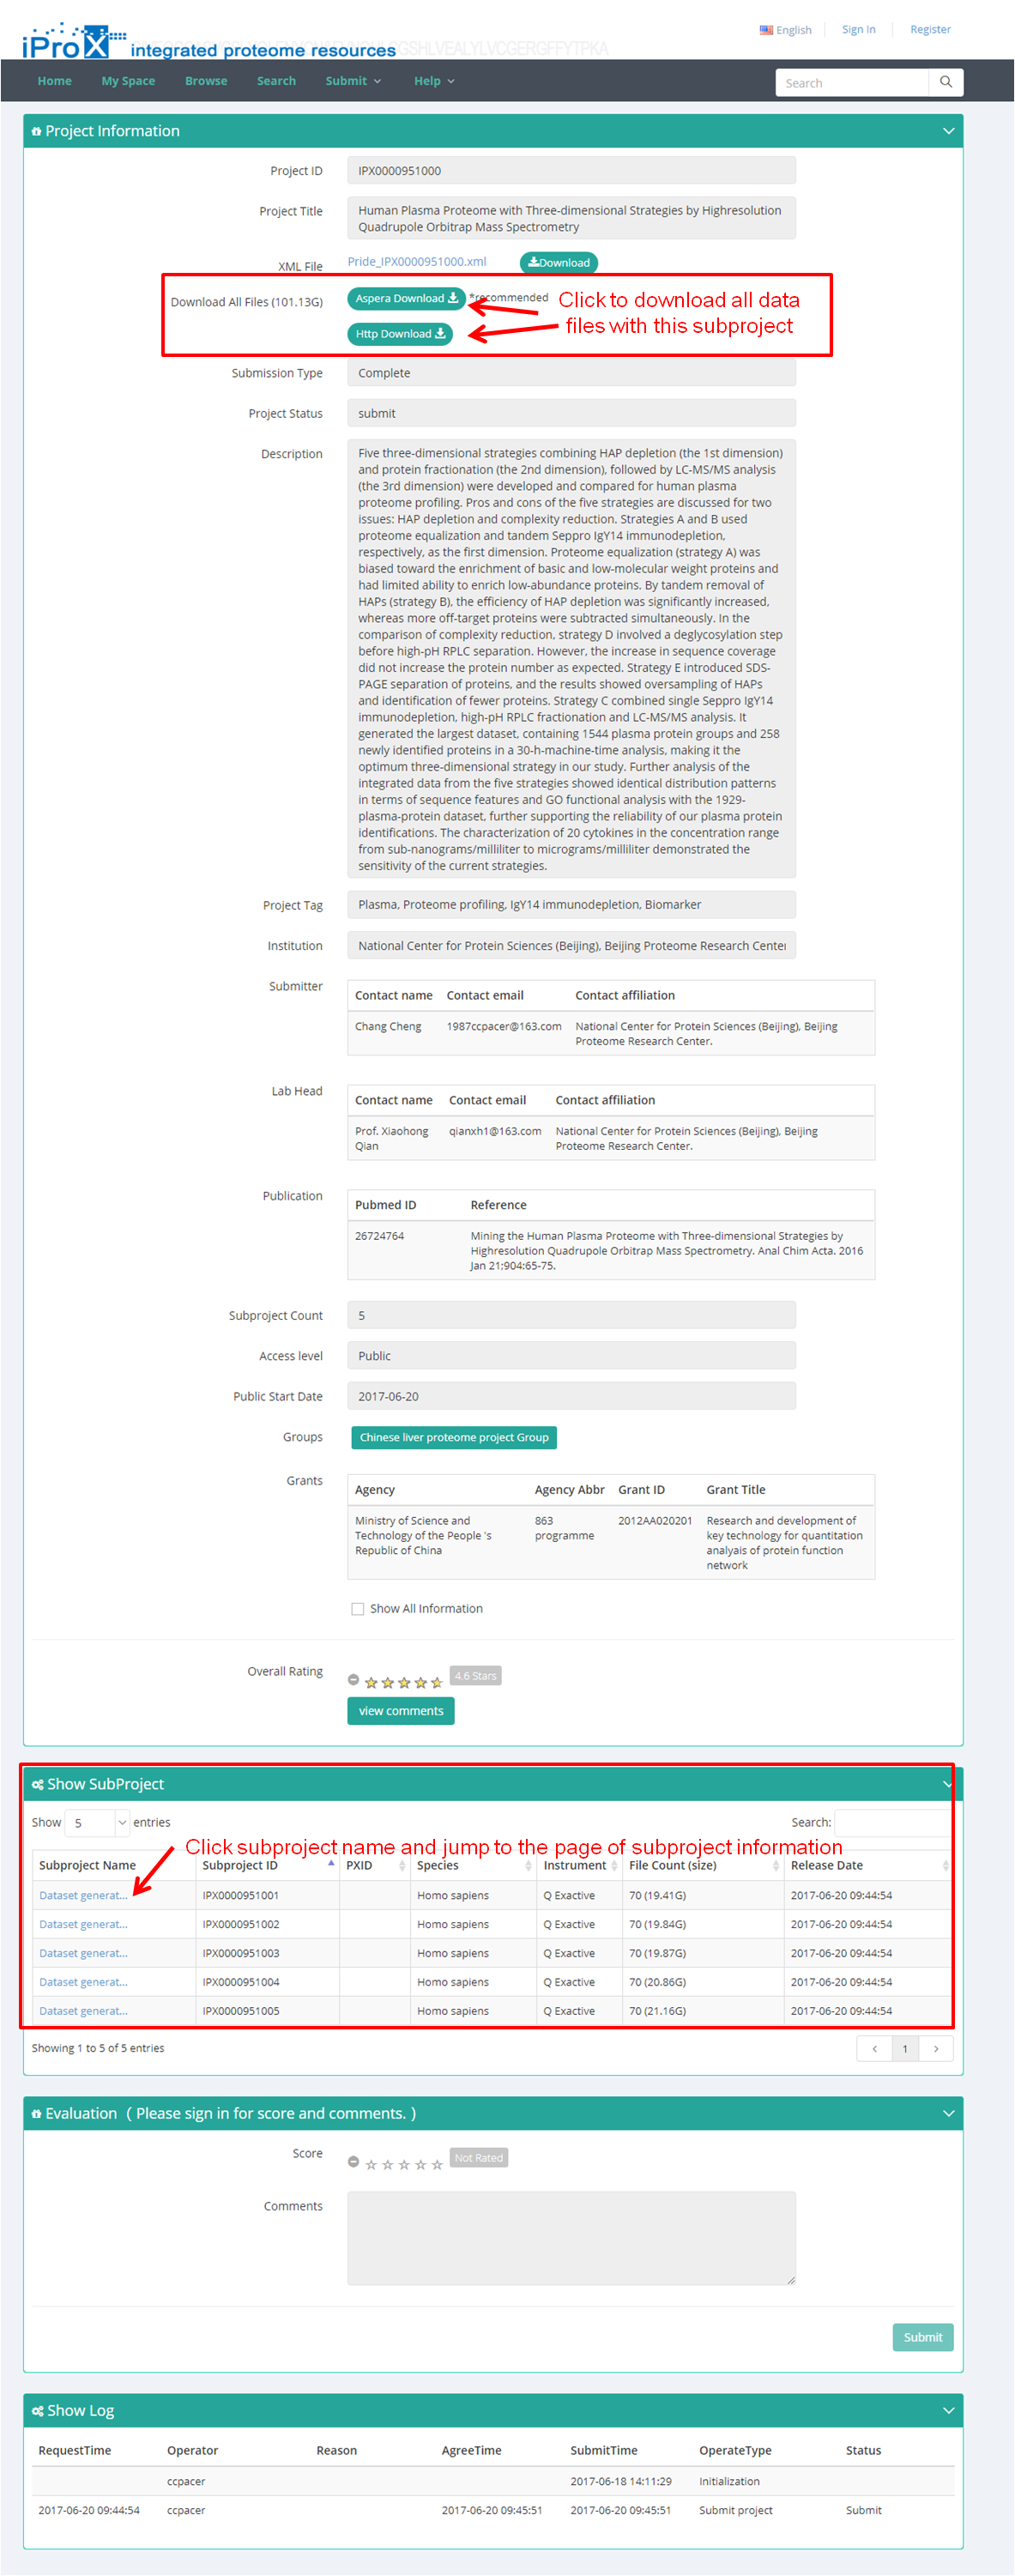
Take project IPX0000951000 as an example dataset at iProX. Figure 18-A shows the overview of this project. All data files of this project can be download by clicking "Aspera Download" or "Http download " button on this page (Figure 18-A). Five subprojects are shown at the bottom of this page (red box in Figure 18-A).
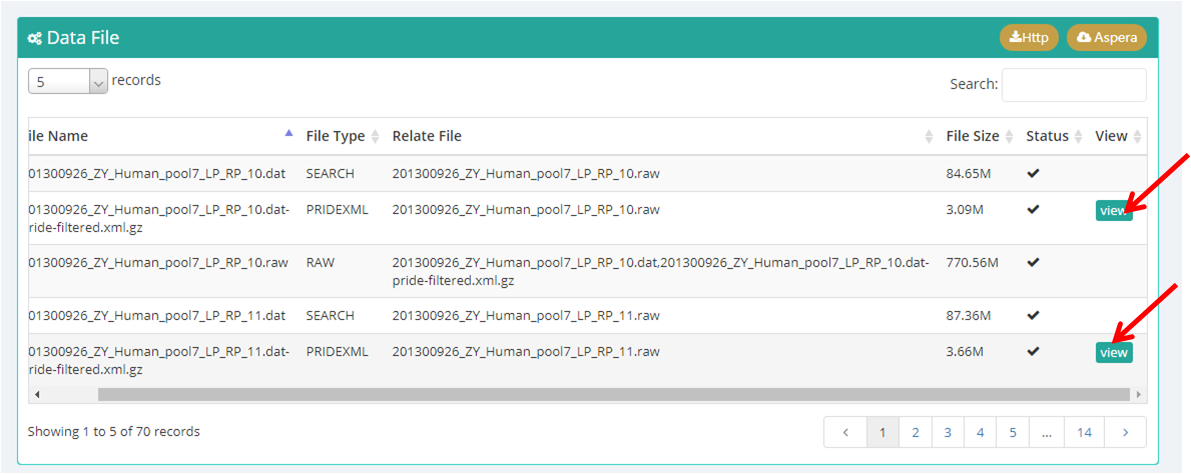
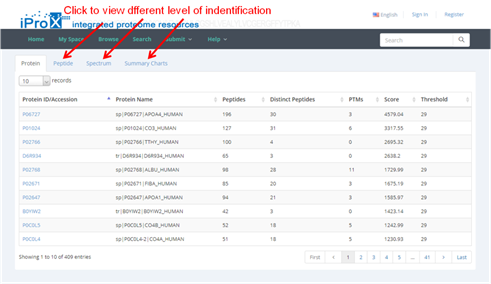
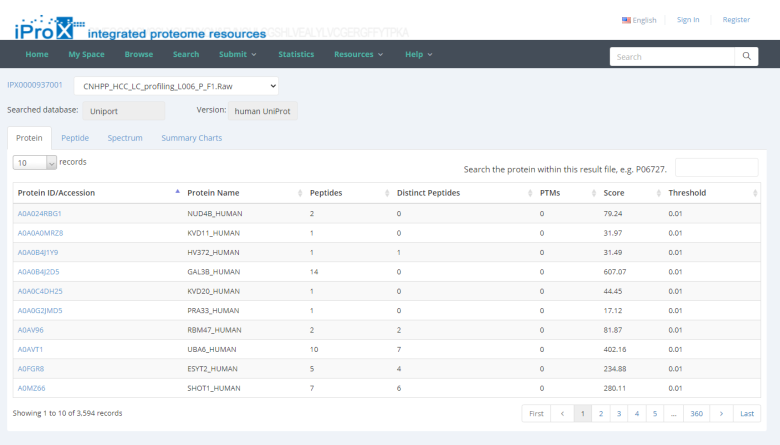
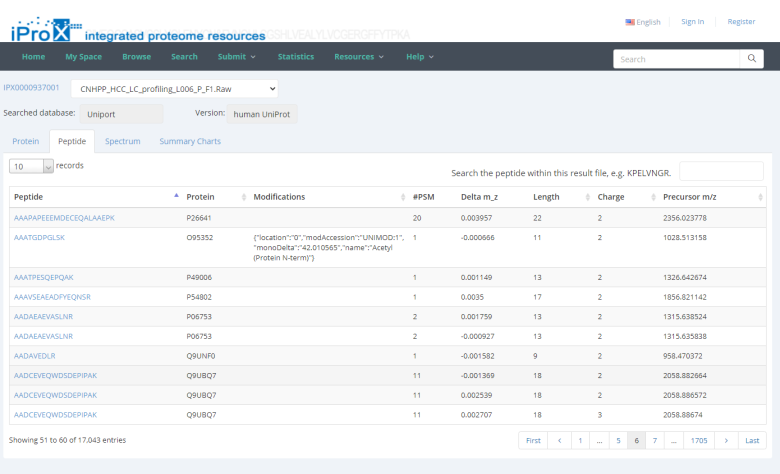
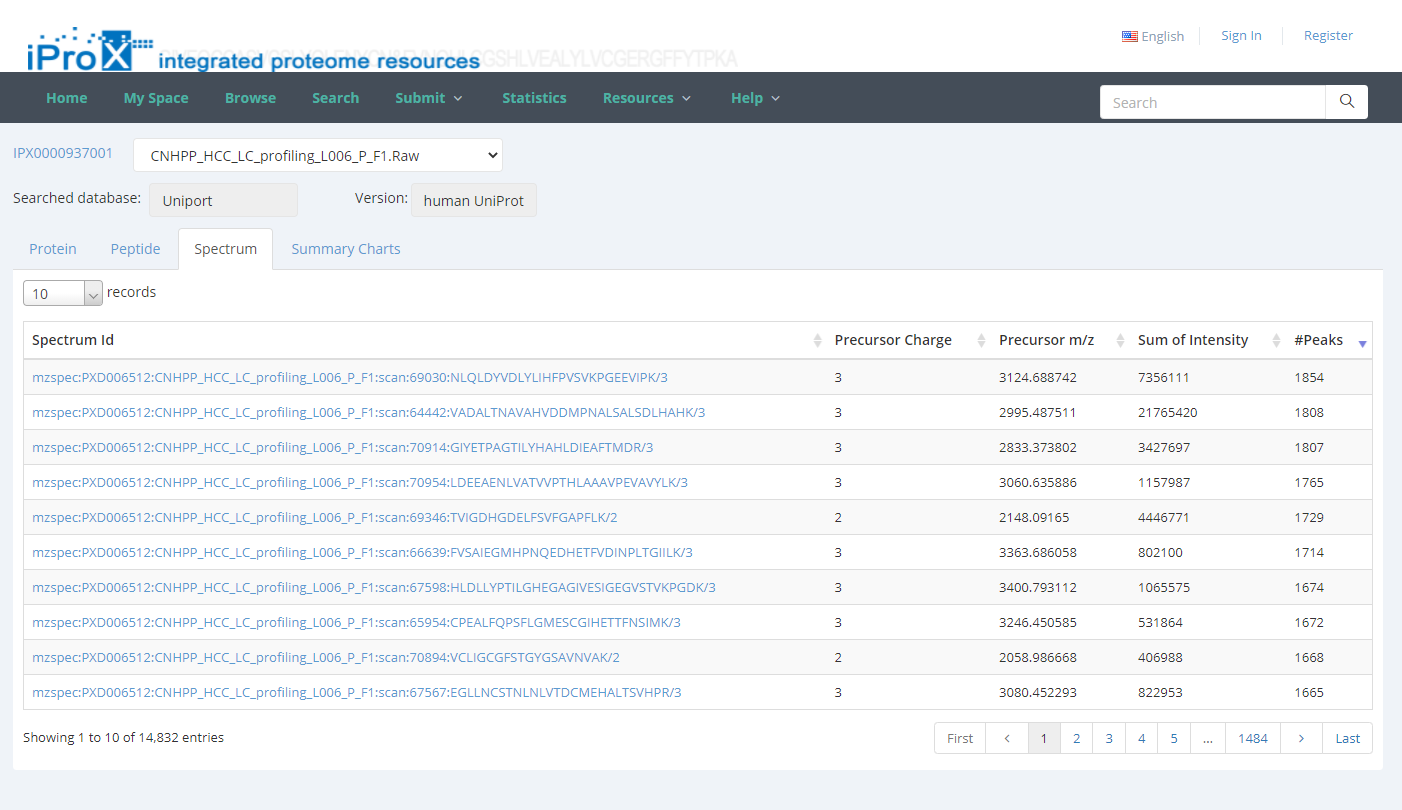
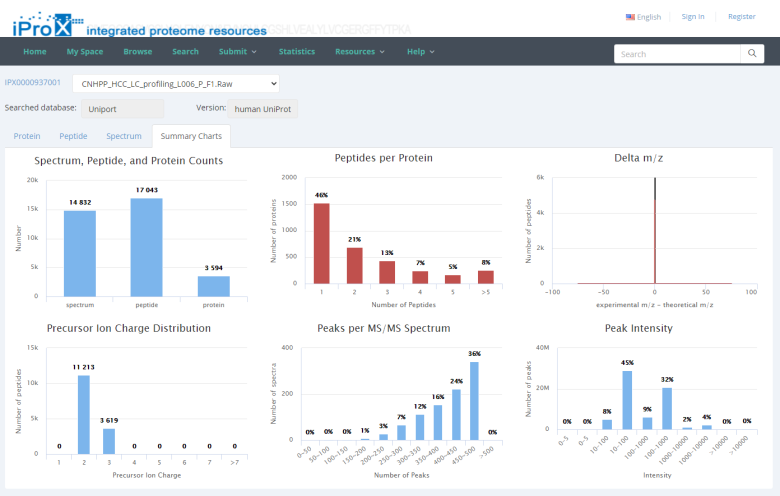
Taking the first subproject IPX0000951001 as an example, click the subproject name and jump to the page of subproject information. Figure 18-B shows the overview of this subproject. All data files are shown in the bottom of this page (red box in Figure 18-B), select one or several files and click the "http" or "Aspera" option can download the files in two different ways. Also, click the "view" button (Figure 18-C) can view the protein and peptide identifications of the result files with standard format (Figure 18-D).
(A)

(B)
(C)
(D)
Figure 18. Overview of project IPX0000951000 and subproject IPX0000951001.
7.2 Download dataset
All released datasets in iProX are freely accessible to the public.
Generally, there are two ways to download the datasets. As shown in Figure 18-A, all data files of a project can be download by clicking "Aspera Download" or "Http download " button on the project information page. Or user can select one or several files on the subproject information page and click the "http" or "Aspera" button for downloading (Figure 18-B). Once the client of Aspera software is stalled, it will be started automatically. The http download pages may be blocked by the browser, please configure the web browser to allow pop-up windows. Usually, a "Pop-up blocked" warning will be shown for the first time downloading, click this pop-up dialog and choose the "Always allow pop-ups from https://www.iprox.org" setting (Figure 19). For more details please refer to https://www.isc.upenn.edu/how-to/configuring-your-web-browser-allow-pop-windows.

Figure 19. Configure the web browser to allow pop-ups from iProX.
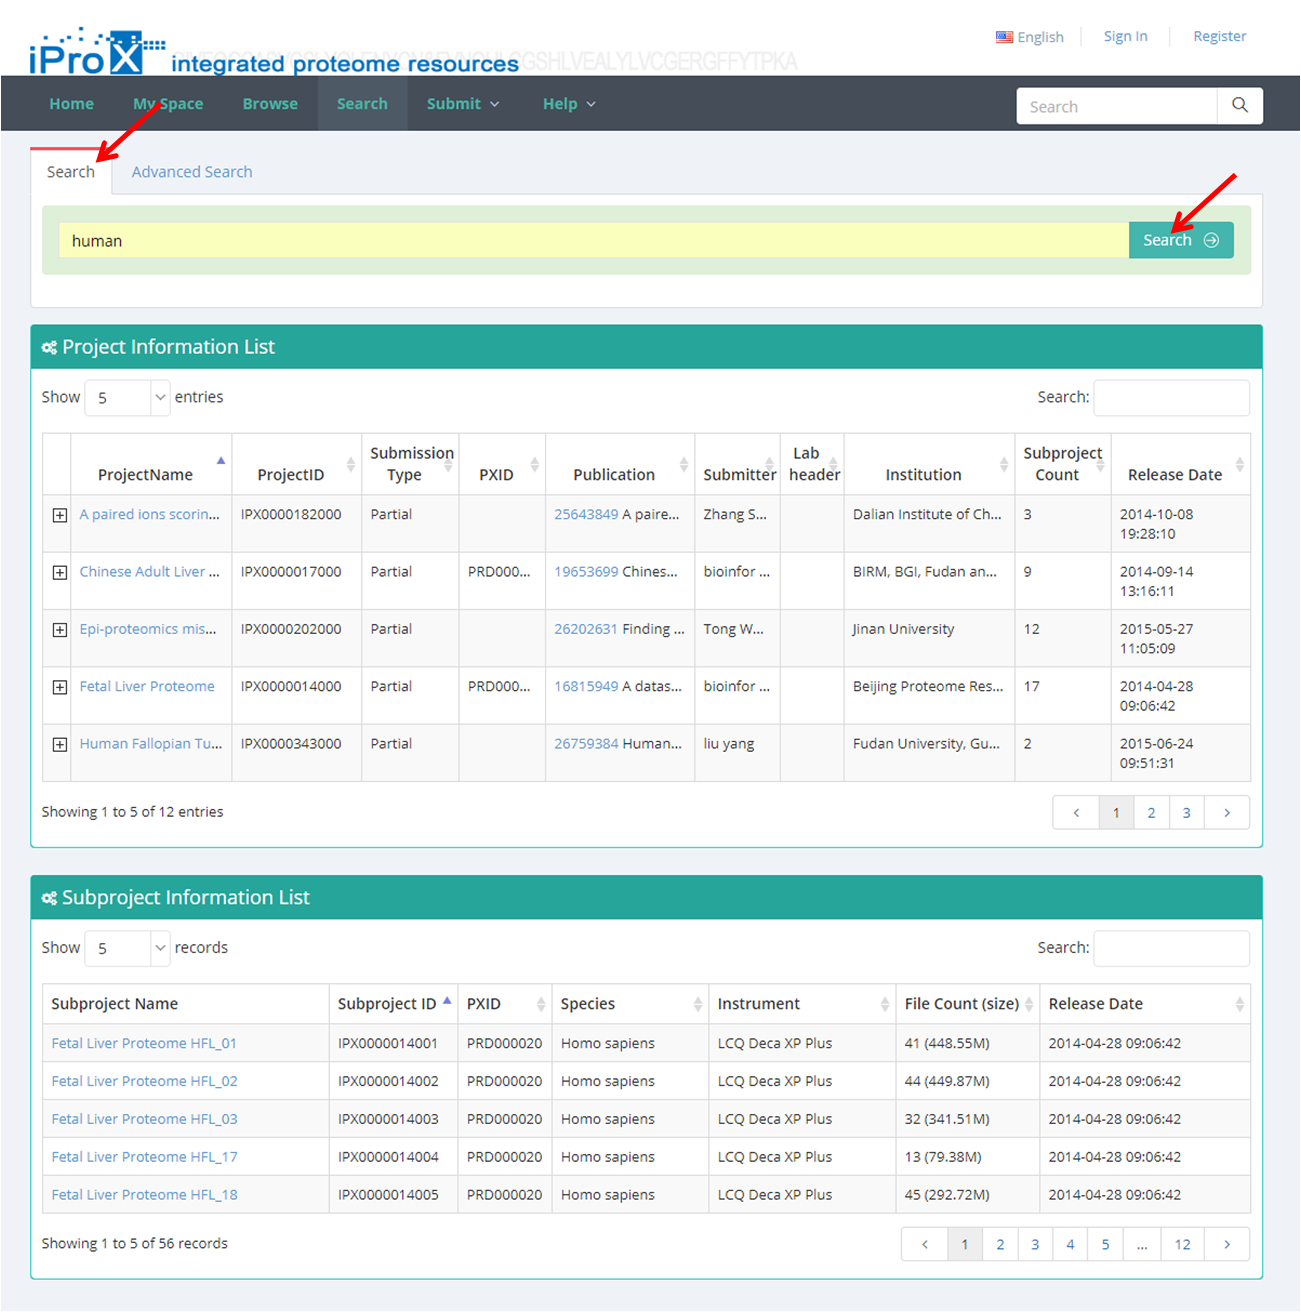
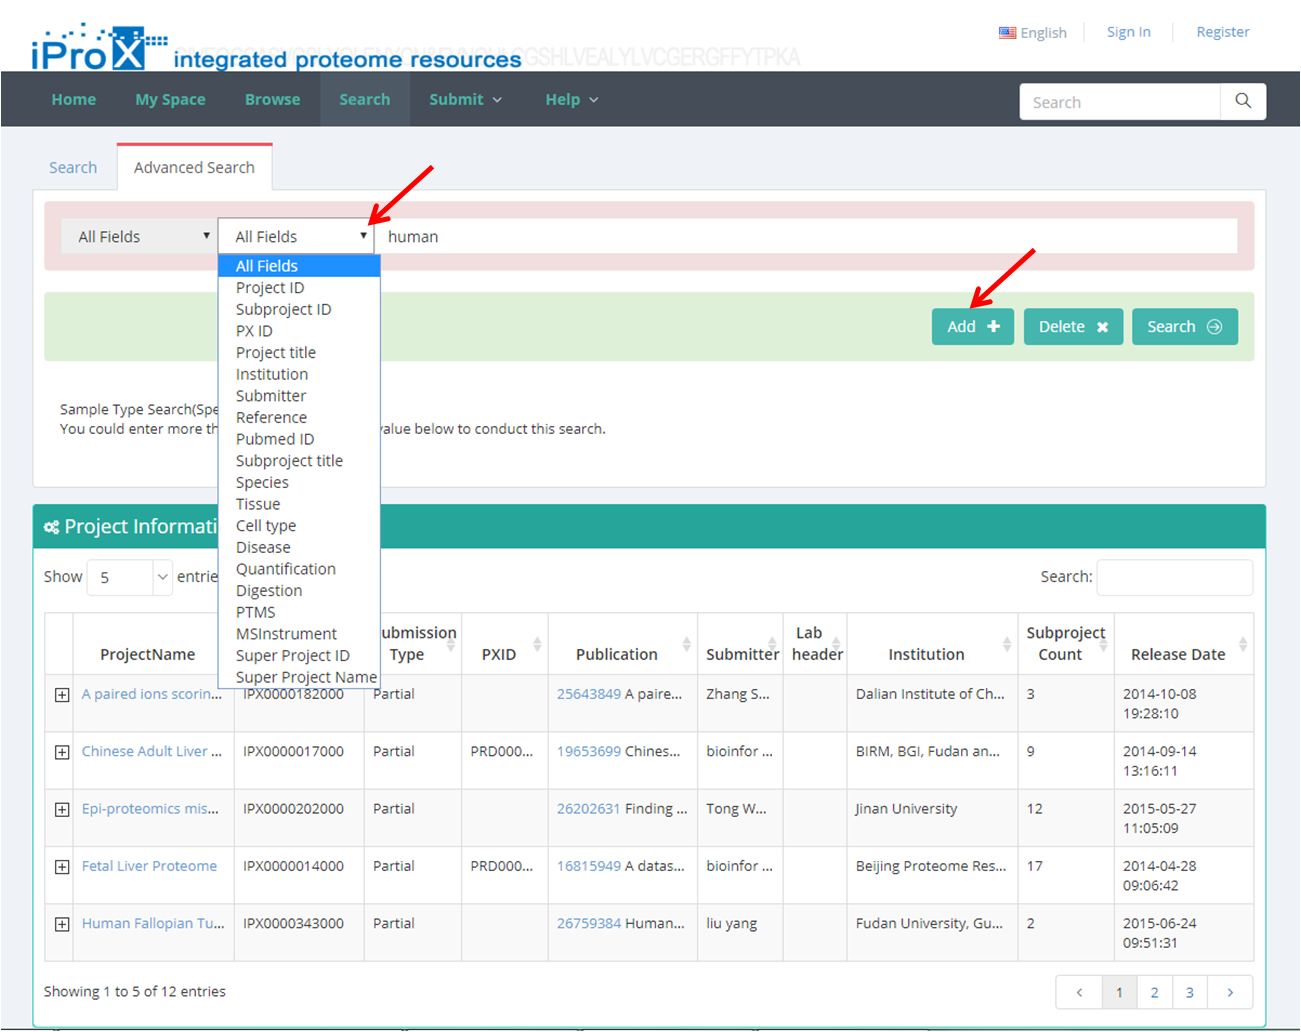
7.3 Search dataset
Both general search (Figure 20-A) and advanced search (Figure 20-B) are implemented in iProX. The searched results will be shown in different dataset categories, including project, subproject and super project.
(A)
(B)
Figure 20. The general search and advanced search in iProX.
7.4 Message module
As shown in Figure 21, click the button next to the username and you can find the message module in iProX. There are two sections in this module, and you can switch between them by clicking the name.
In the "MESSAGE" section, user can receive the messages from iProX, which can help user to track the status of their dataset and application in iProX. When the user's application (i.e. submit a project, create a new group) has been approved or rejected, a message will be sent to user's email box as well as to the "MESSAGE" section.
For group creator/manager and super project creator/manager in iProX, other users' applications to join your group/ super project will be sent to the "APPLY" section, and you can accept or reject the applications here.
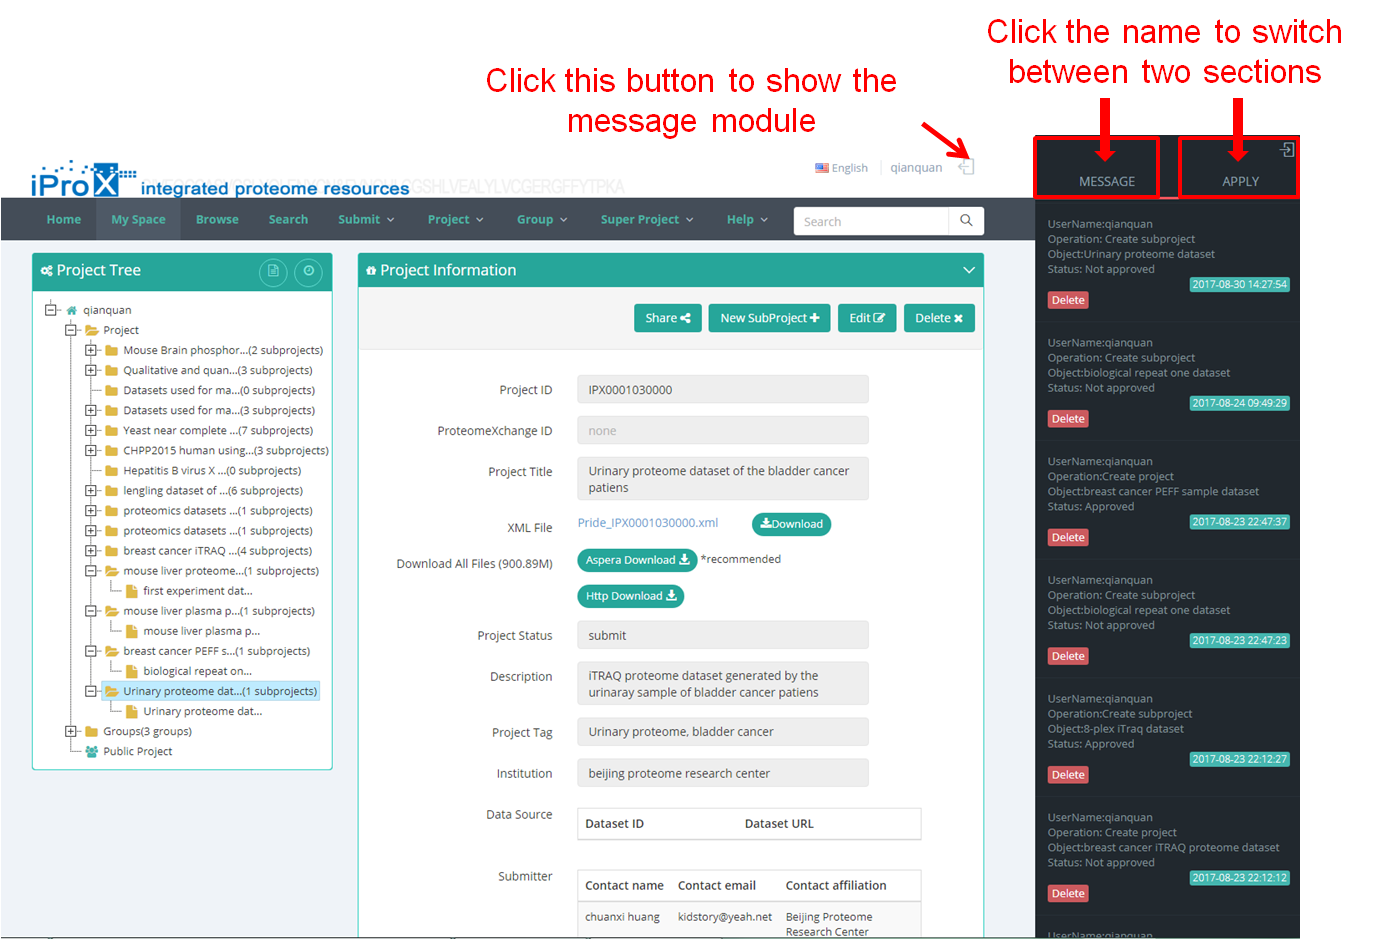
Figure 21. Overview of the message module in iProX.
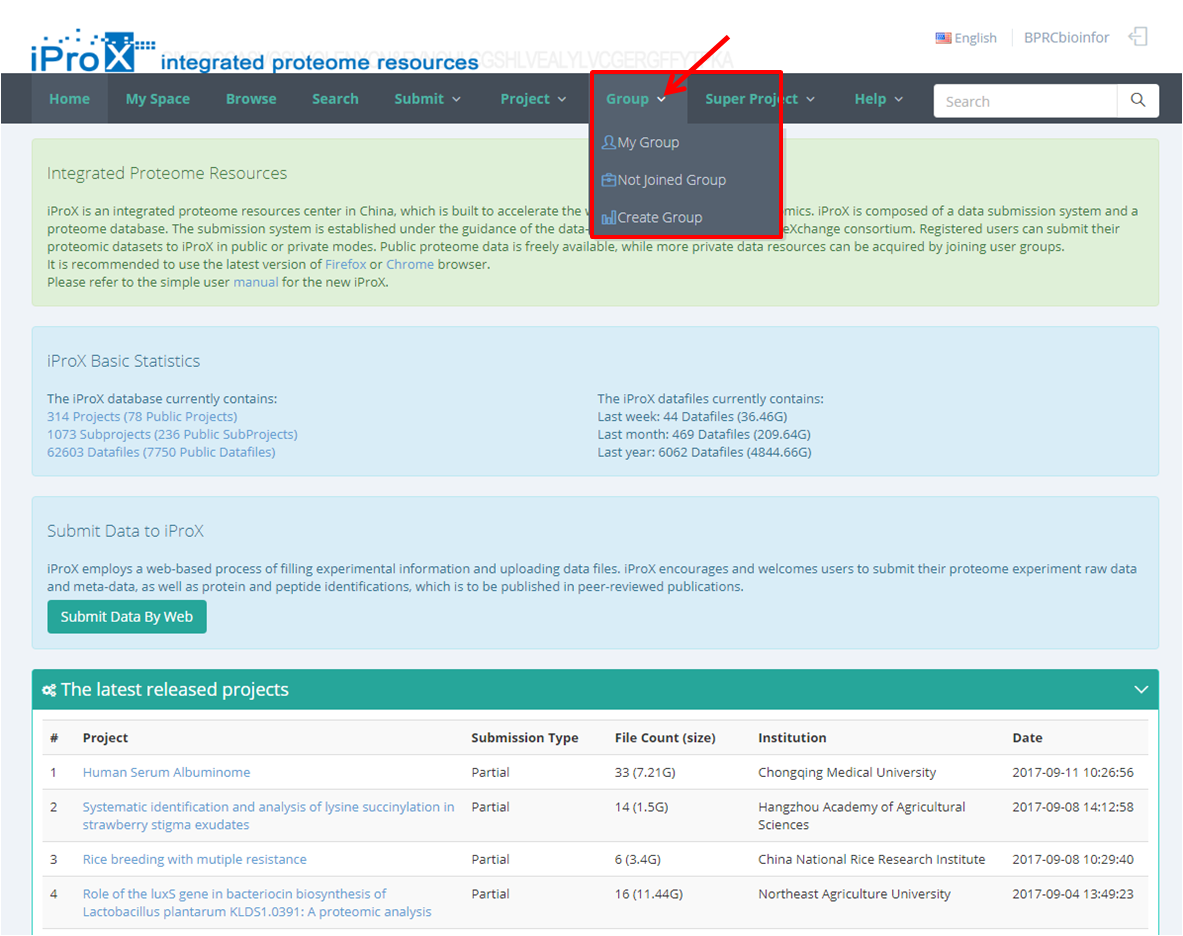
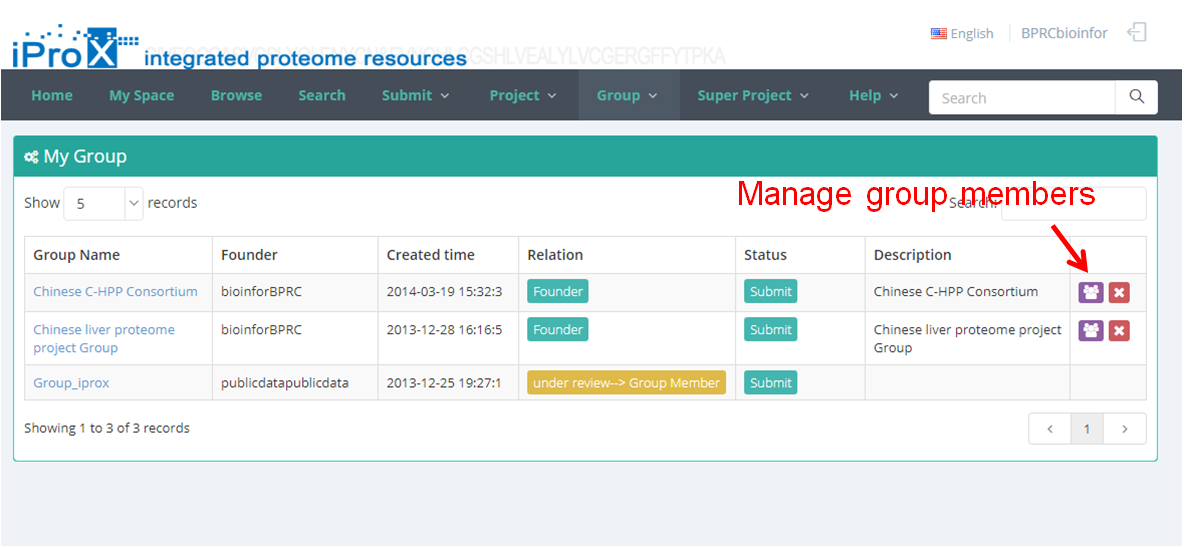
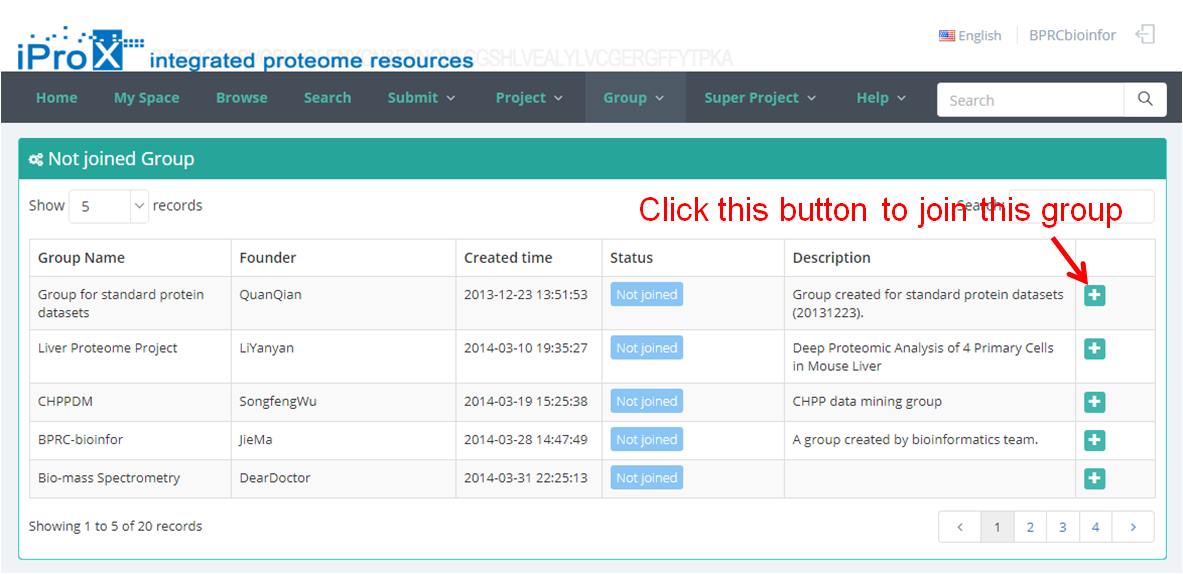
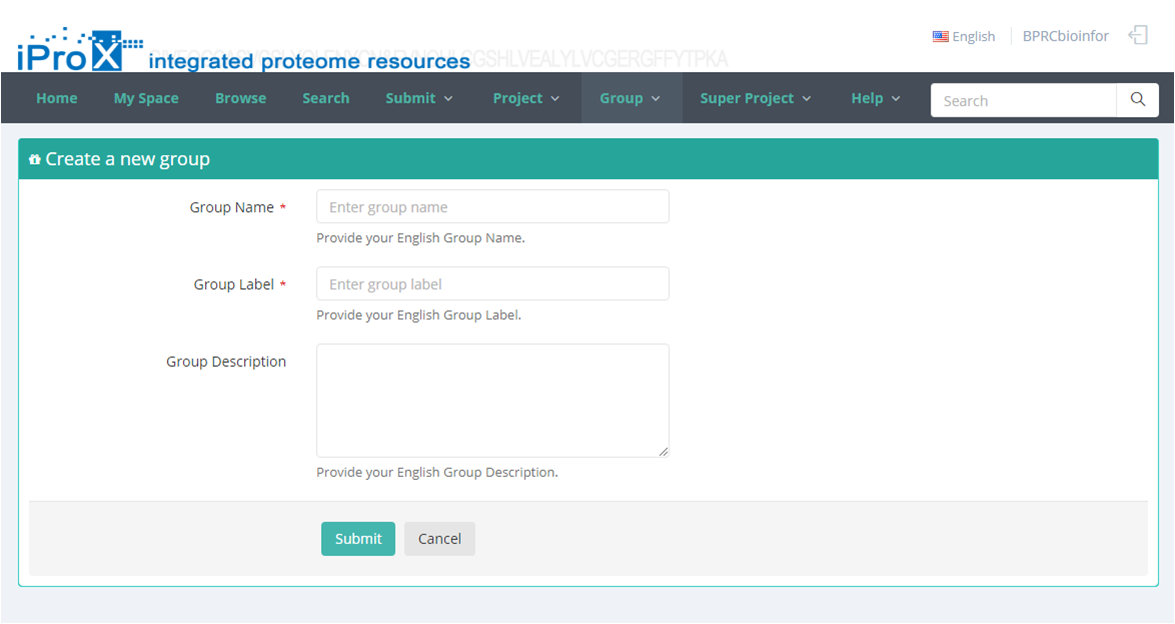
7.5 Group module
The group function in iProX is useful for collaborative research. Users can share their data within the specific group(s) on project filling page (section 5.2).
Click the "Group" button and you can find three sections of group module (Figure 22-A). In "My Group" section, you can browse all the groups that you have created or joined (Figure 22-B). In "Other Group" section, you can browse other groups in iProX and apply to join these groups (Figure 22-C). In "Create Group" section, you can create a new group (Figure 22-D). The application to join an existing group should be approved by the creator/manager of this group, while the application to create a new group should be approved by the curator of iProX.
(A)
(B)
(C)
(D)
Figure 22. Overview of the functions of group module in iProX.
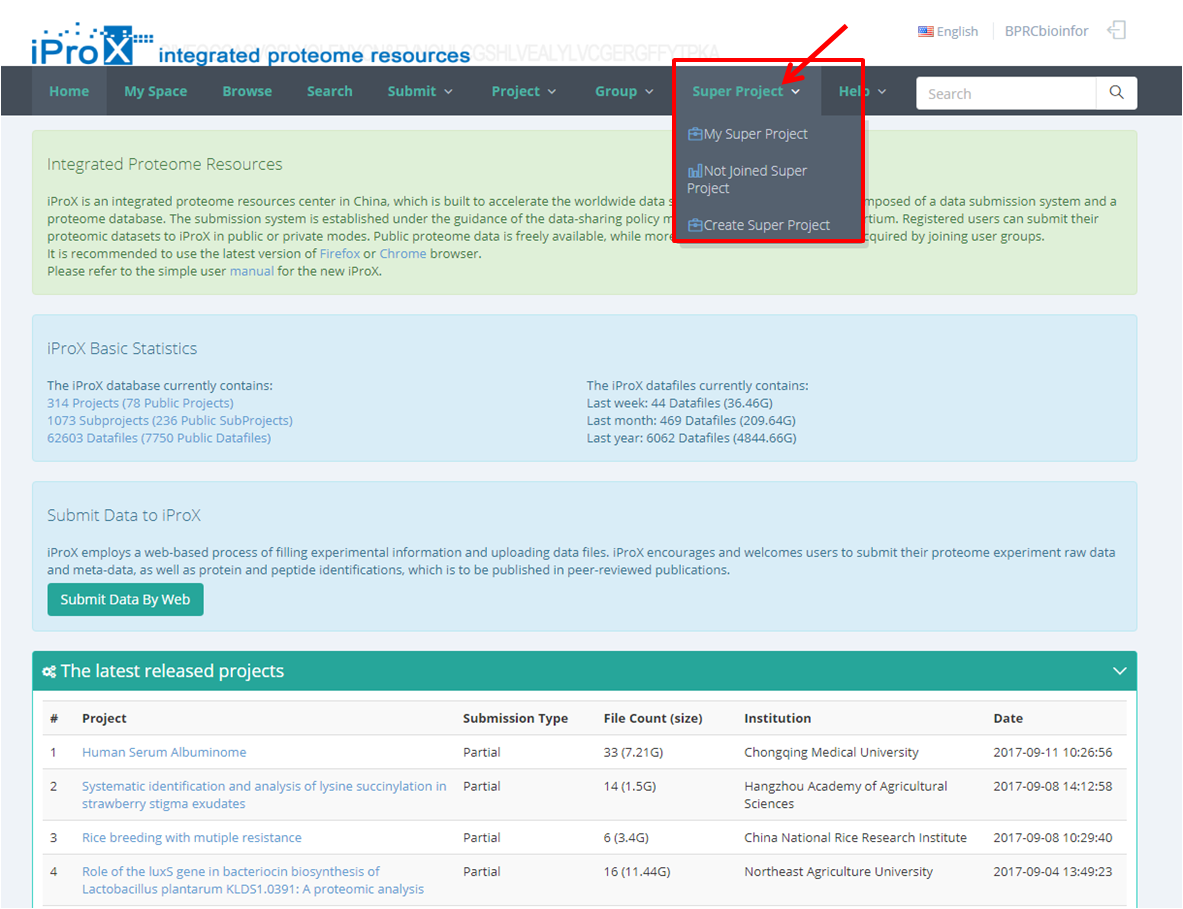
7.6 Super project module
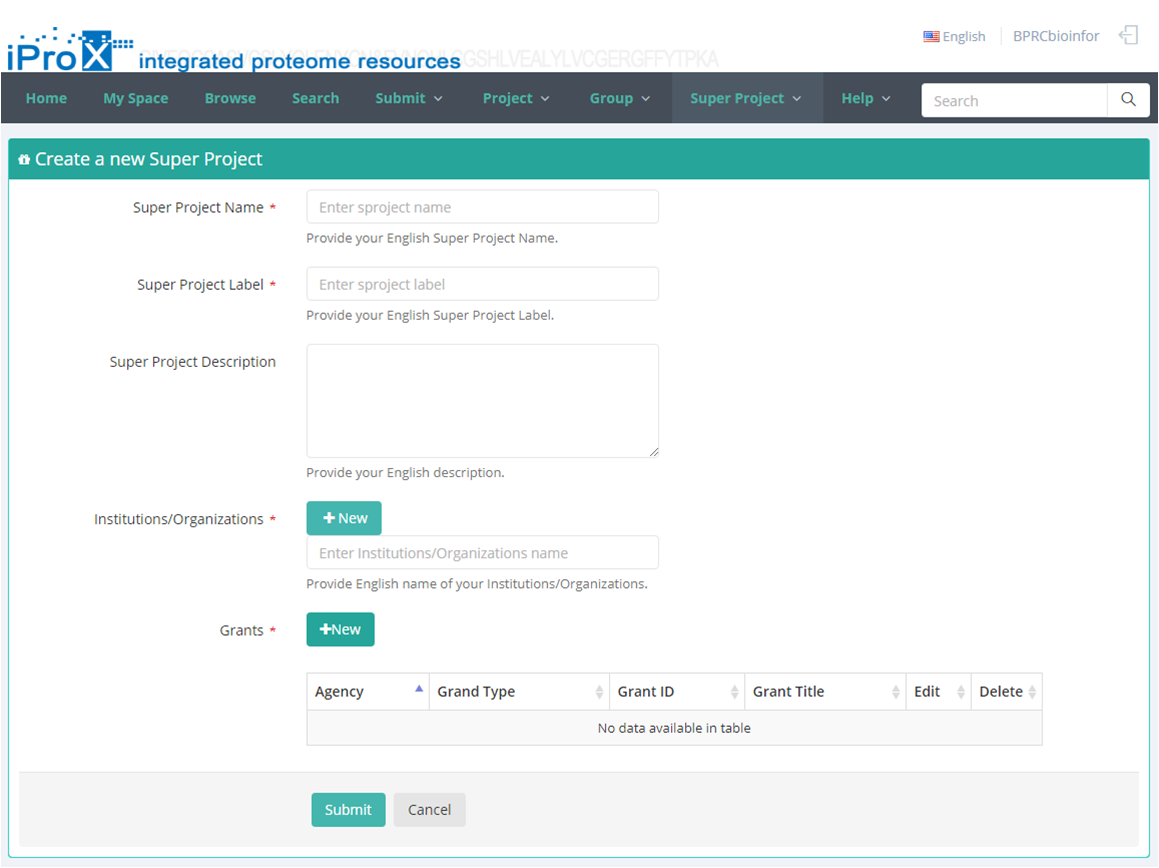
The super project function in iProX is developed to support the big project that involves cooperation of multiple research teams. At least a specific funding information (i.e. NSFC project) is required, when the user apply to create a super project. And the iProX curator will check the funding manually.
After become the member of a super project, user can share the data within this super project on project filling page (section 5.2). The super project information and the metadata of its project(s) can be browsed by public.
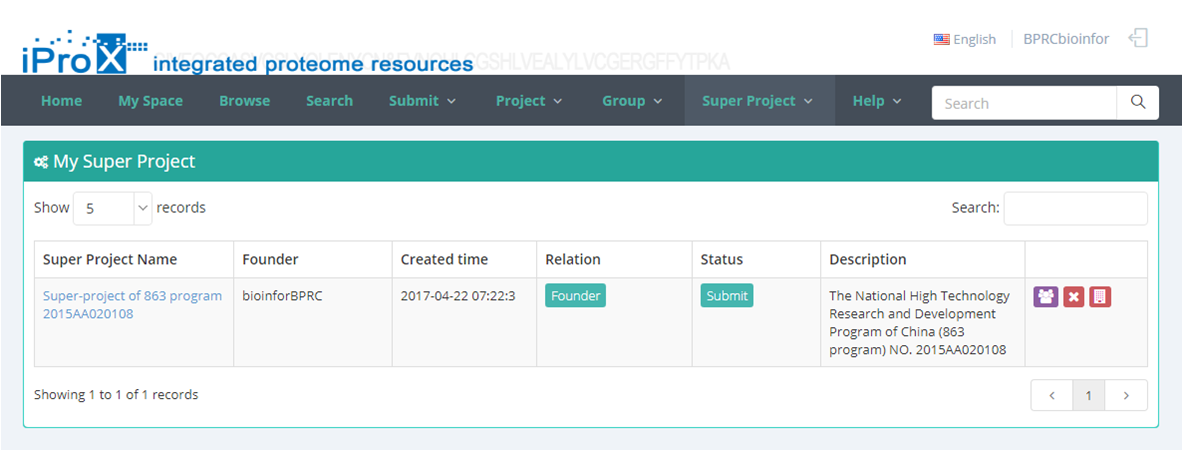
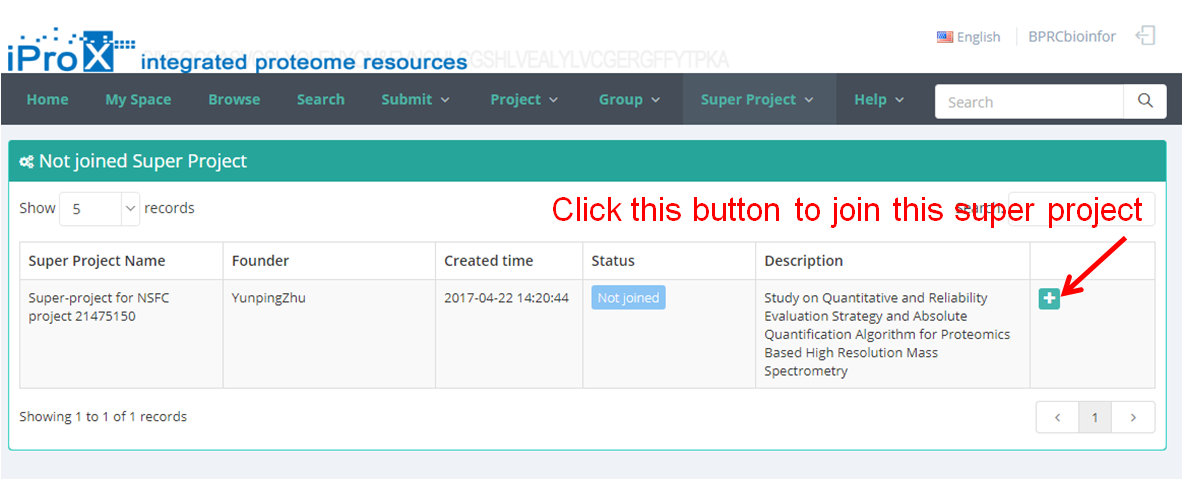
As shown in Figure 23-A, click the "Super Project" button and you can find three sections of super project module. In "My Super Project " section, you can browse all the super projects that you have created or joined (Figure 23-B). In "Other Super Project" section, you can browse other super projects in iProX and apply to join these super projects (Figure 23-C). In "Create Super Project" section, you can create a new super project (Figure 23-D). The application to join an existing super project should be approved by the creator/manager of this super project, while the application to create a new super project should be approved by the curator of iProX.
(A)
(B)
(C)
(D)
Figure 23. Overview of the functions of super project module in iProX.
8. The new functional modules
8.1 Universal spectrum identifier search
The ability to refer to specific spectra of high importance and cite data in published manuscripts was done one by implementing a new standardized Universal Spectrum Identifier proposed by PX.
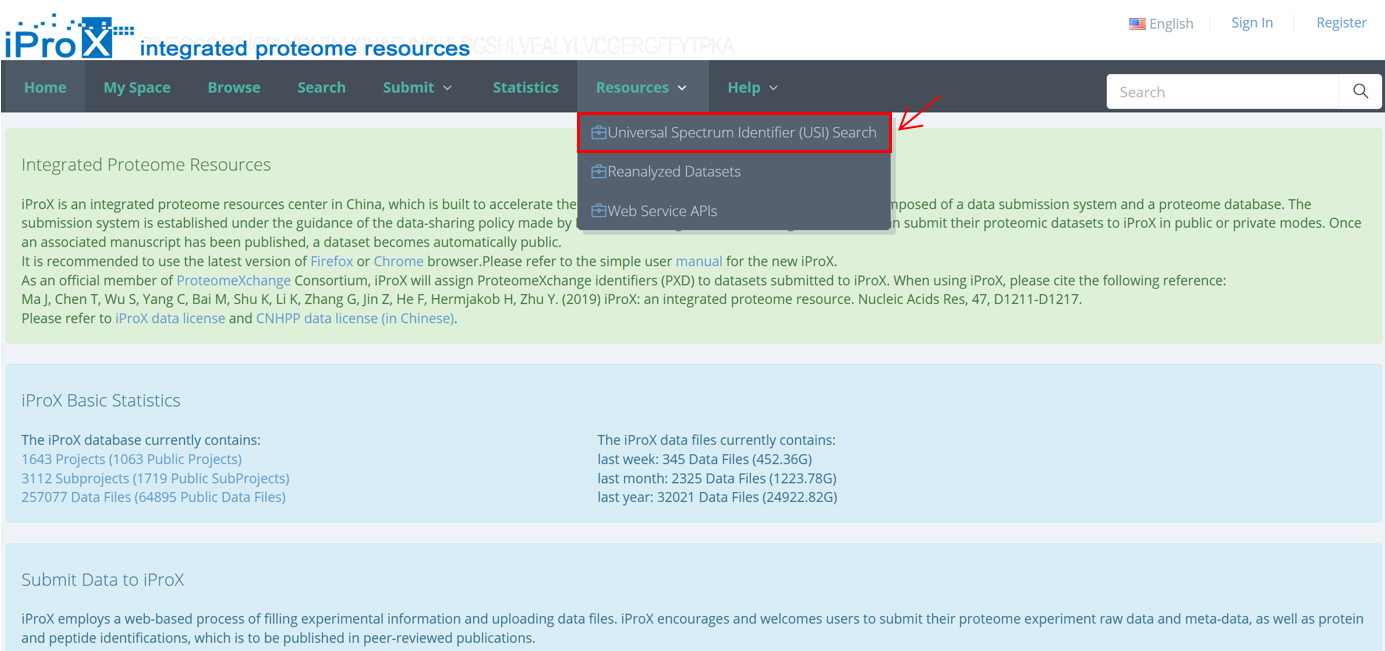
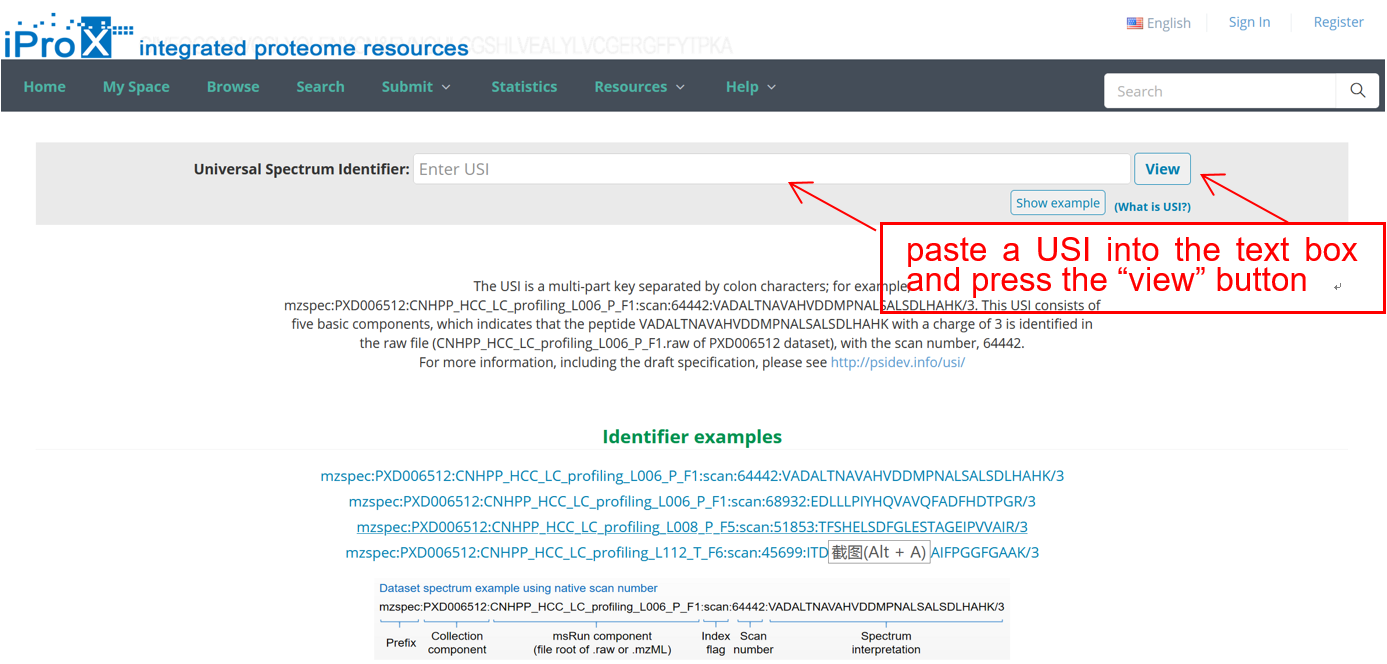
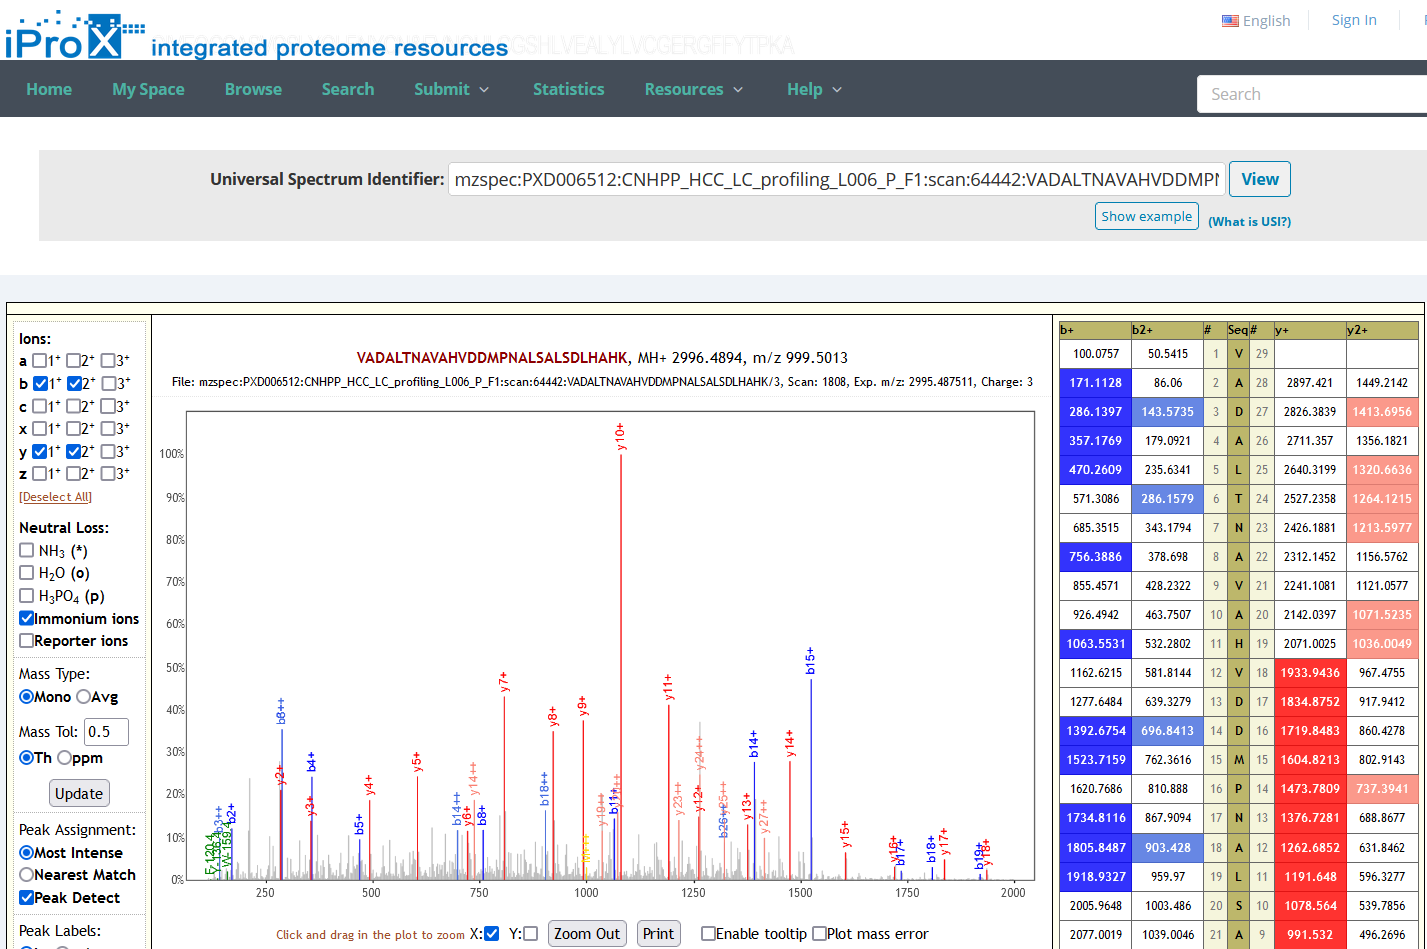
As shown in Figure 24-A, click the “Resources” menu on the iProX main page and select the sub-menu “Universal Spectrum Identifier (USI) Search”. Then you can access the USI search page (Figure 24-B). On the page, you can paste a USI into a text box and press the “view” button to lookup the spectrum. The lookup result returned from the Elastic Search engine is visualized with an embedded Lorikeet spectrum viewer in the page (Figure 24-C).
(A)
(B)
(C)
Figure 24. Universal Spectrum Identifier (USI) Search.
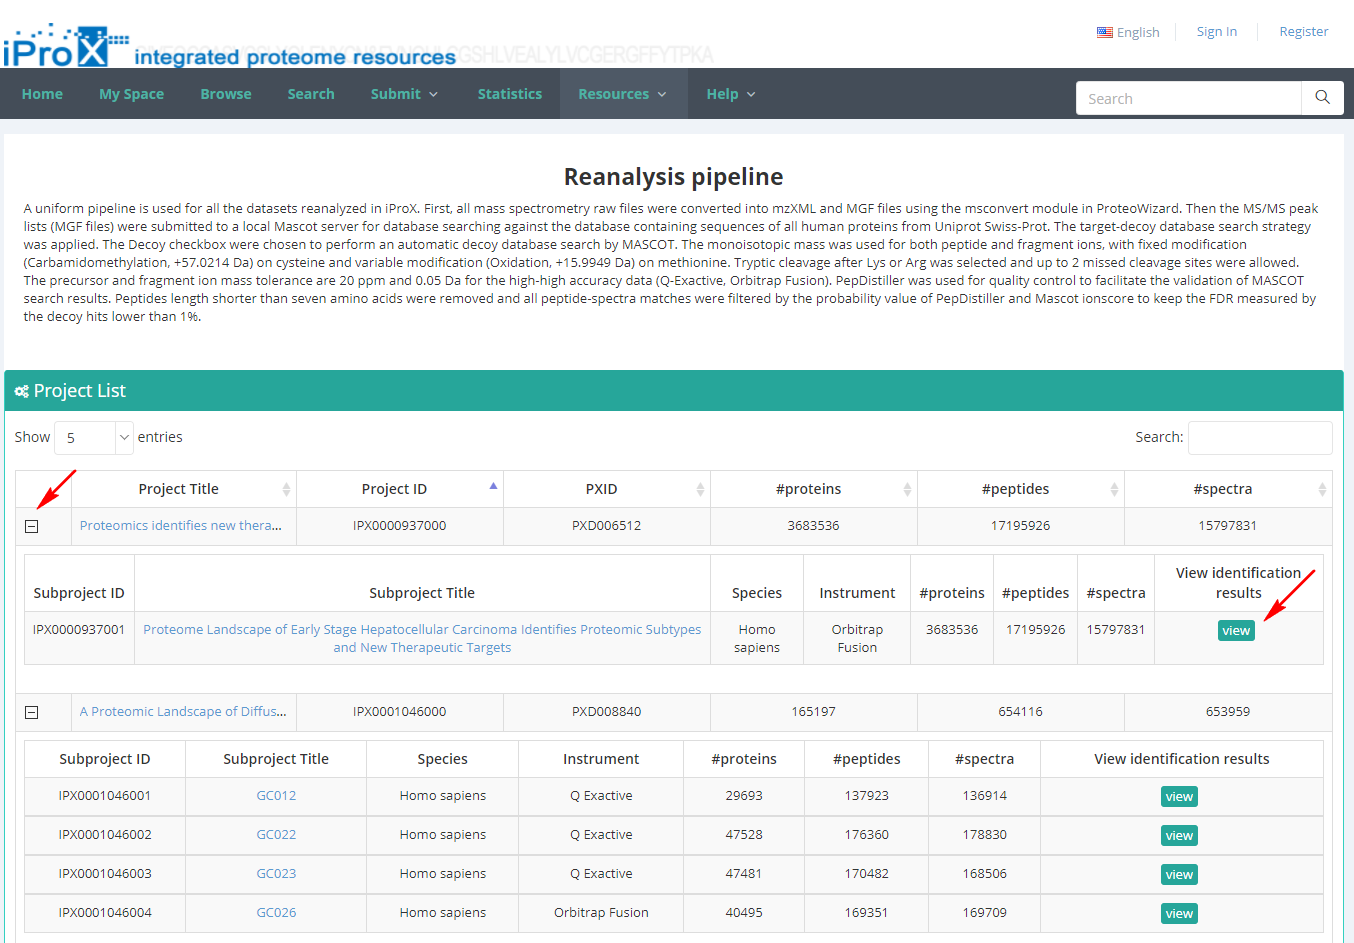
8.2 Reanalysis and visualization pipeline of public data
A high-efficiency reanalysis pipeline was built in iProX. First, all mass spectrometry raw files were converted into mzXML and MGF files using the msconvert module in ProteoWizard. Then the MS/MS peak lists (MGF files) were submitted to a local Mascot server for database searching against the database containing sequences of all human proteins from Uniprot Swiss-Prot. The target-decoy database search strategy was applied. The Decoy checkbox were chosen to perform an automatic decoy database search by MASCOT. Peptides length shorter than seven amino acids were removed and all peptide-spectra matches were filtered to keep the FDR measured by the decoy hits lower than 1%.
This reanalysis pipeline has been to several public datasets in iProX and generated 20 million identifications at controlled false discovery rates.
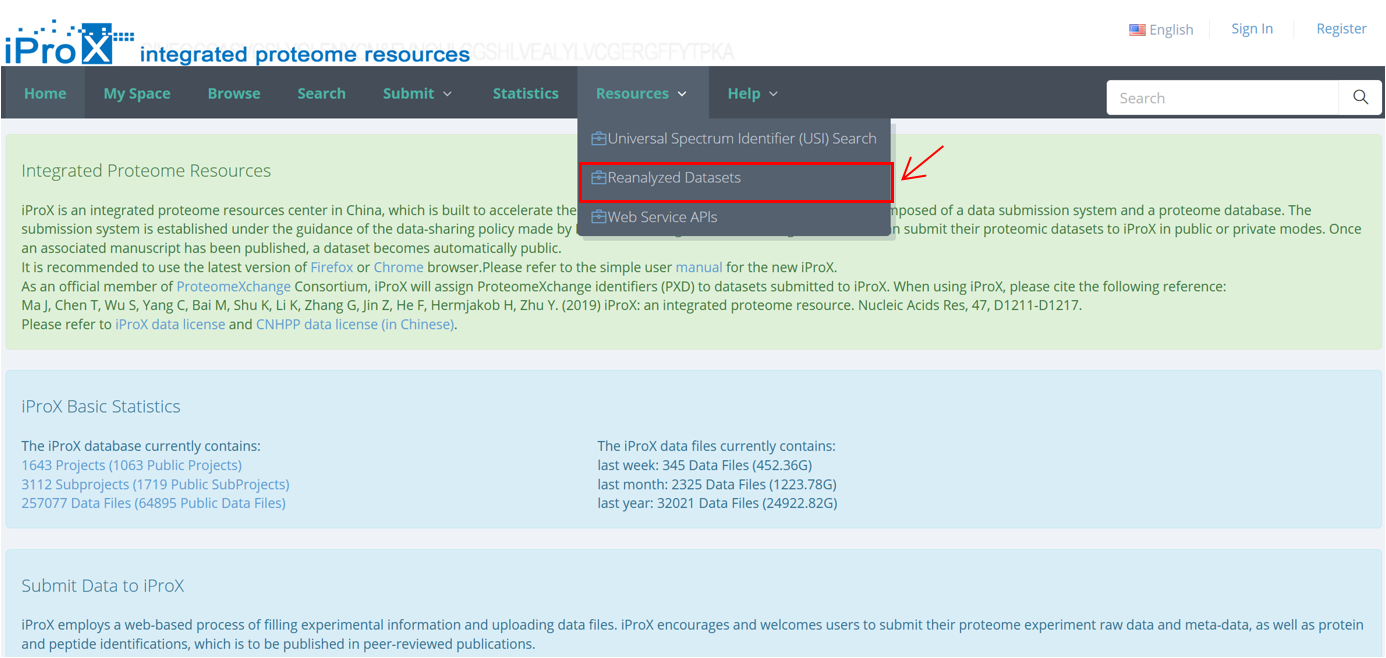
As shown in Figure 25-A, click the “Resources” menu on the iProX main page and select the sub-menu “Reanalyzed Datasets”. Then you can see the list of the re-analyzed datasets with the number of identifications (Figure 25-B).
(A)
(B)
Figure 25. Overview of the reanalysis pipeline function in iProX.
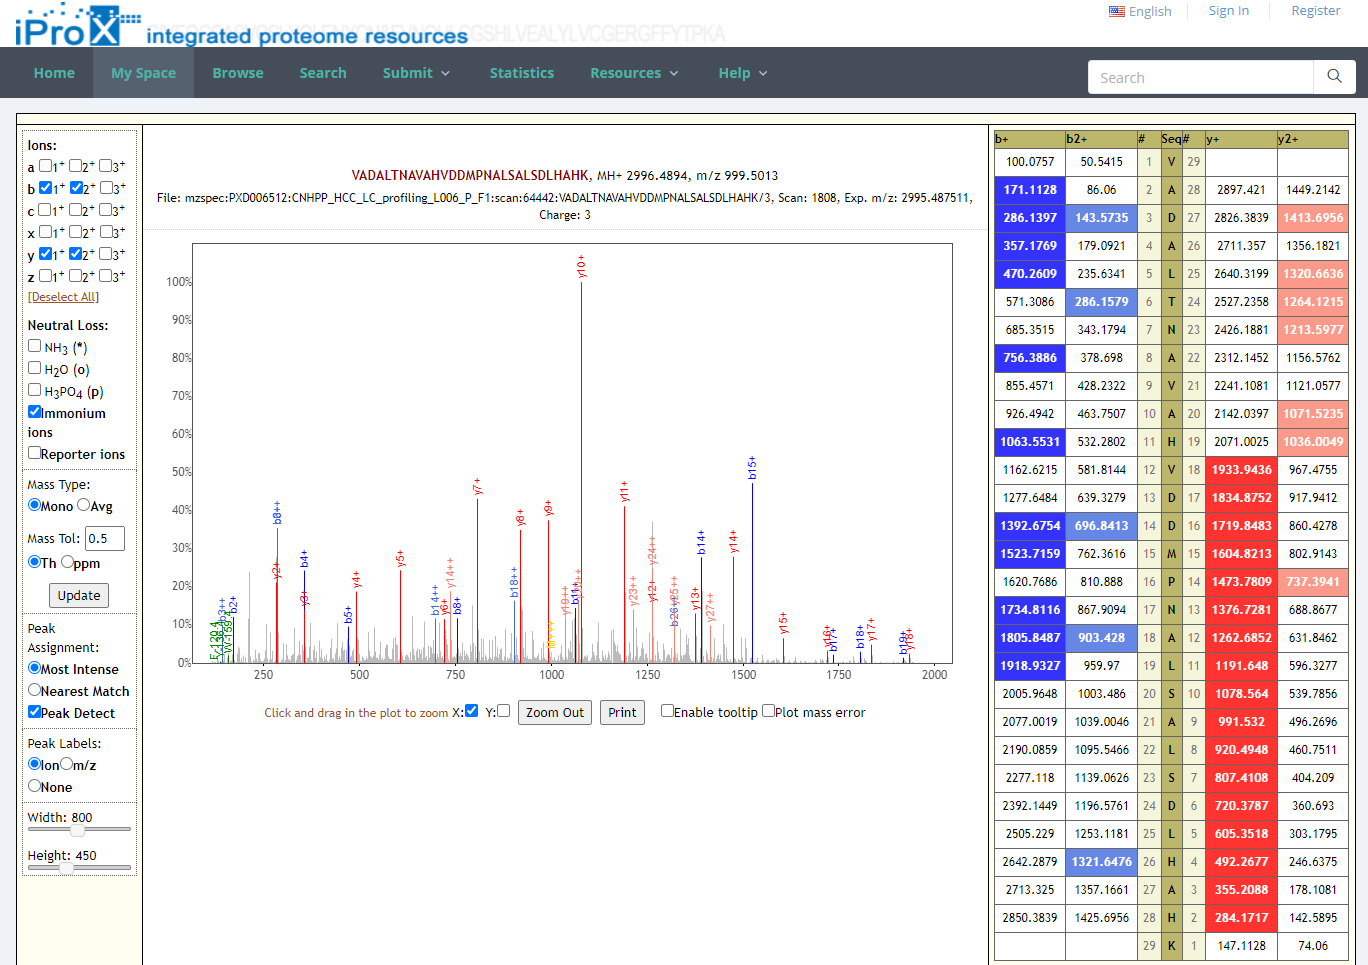
By unfolding the project and clicking the view button beside each subproject, the protein (Figure 26-A), peptide (Figure 26-B), and spectrum (Figure 26-C) identifications, as well as the summary information of the reanalyzed dataset can be viewed in iProX (Figure 26-D). By clicking the USI format link in the spectrum identifications page (Figure 26-C), the detailed information of each spectrum-peptide match can be viewed in an independent page (Figure 26-E).
(A)(B)
(C)(D)
(E)
Figure 26. The visualizations of identifications of reanalyzed datasets.
8.3 RESTful Web Service APIs
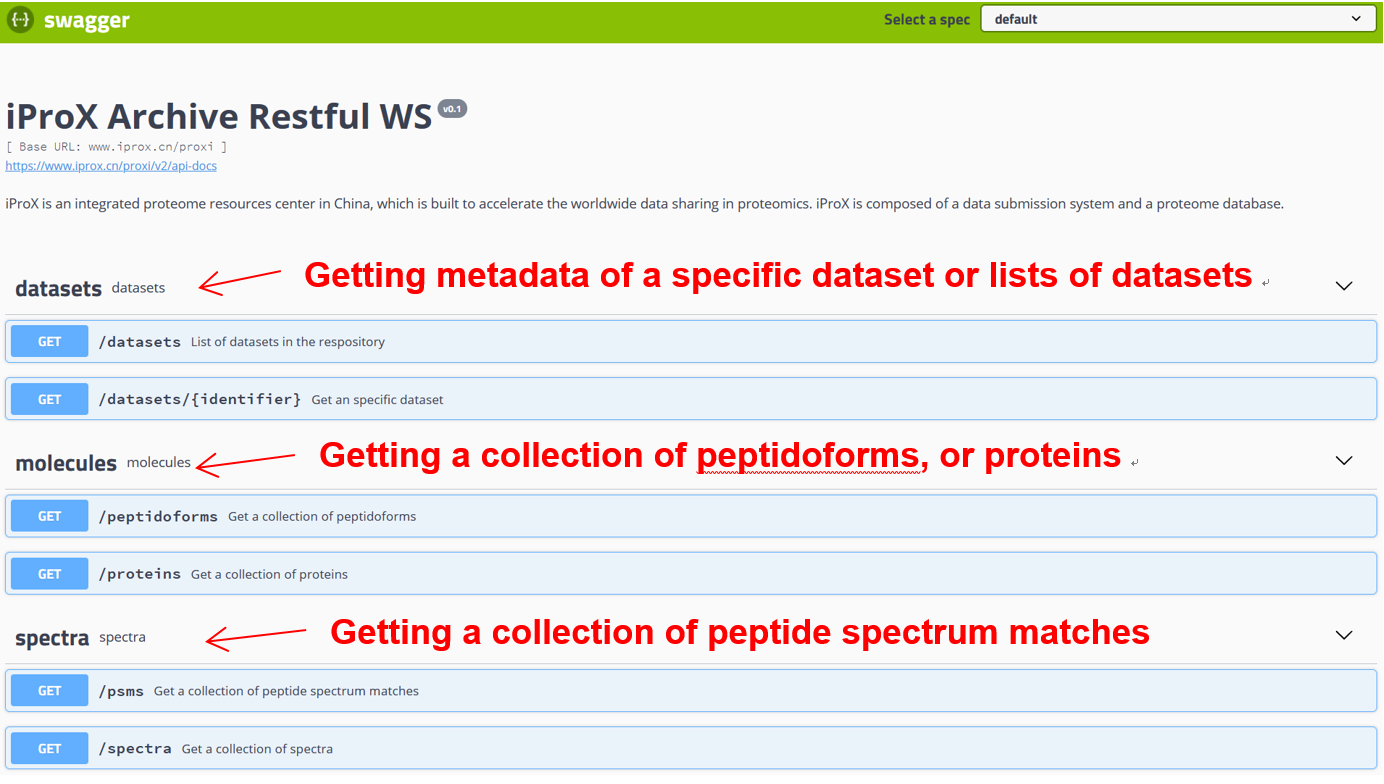
Besides supporting human interactions to access the data, iProX provides a RESTful Web Service Application Programming Interface (API) presented by PX for automatically accessing proteomics results. It reports the metadata of datasets, or peptide, protein, and spectra data for reanalysis.
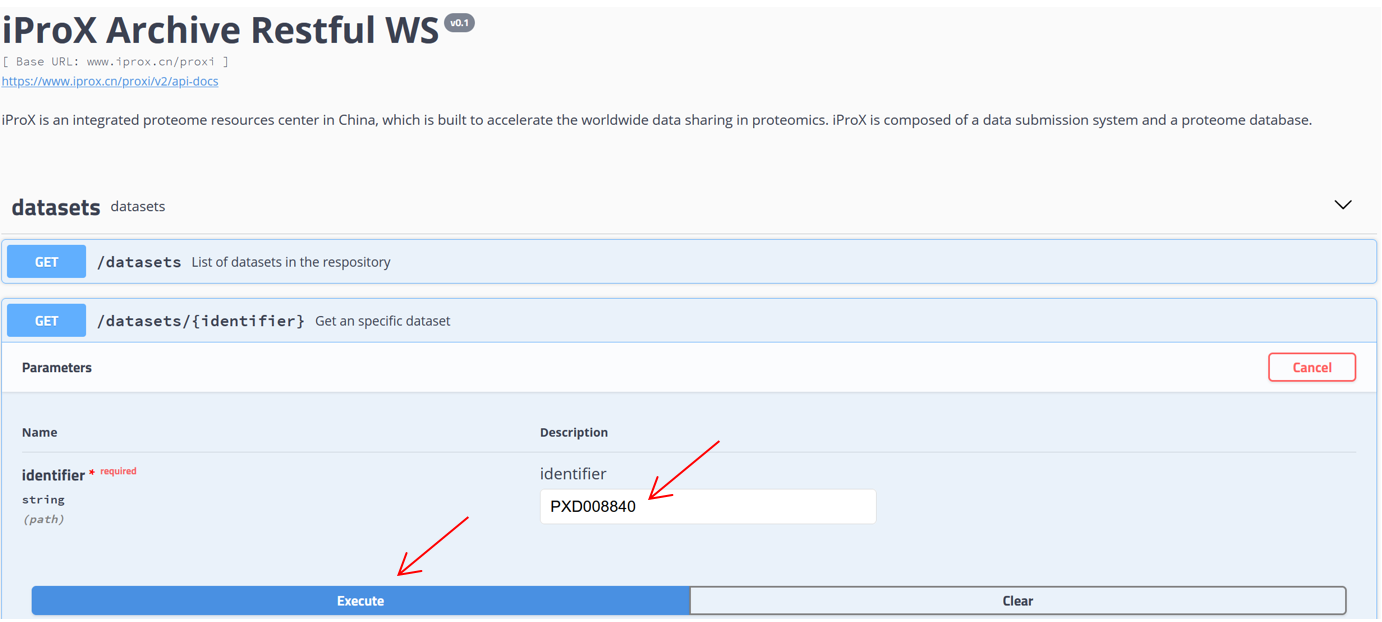
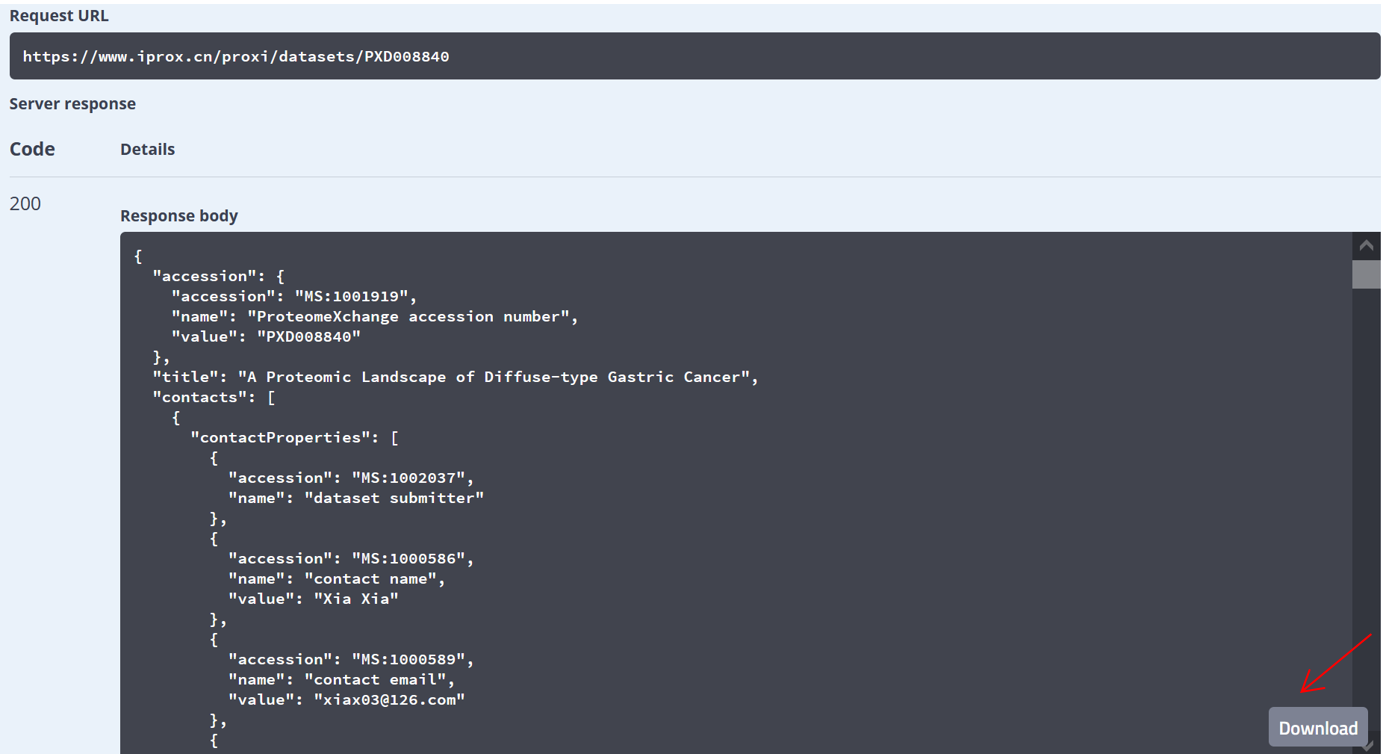
As shown in Figure 27-A, click the “Resources” menu on the main page and select the sub-menu “Web service APIs”. Then you can see the lists of APIs, including getting the metadata of a specific dataset or lists of datasets and collecting peptidoforms, proteins, and peptide spectrum matches (PSMs), or a list of spectra referred by USIs (Figure 27-B). Click “Try it out”, input PXD identifier “PXD008840” in the box, and press the “Execute” button (Figure 27-C). Then, the metadata of PXD008840 will be returned in the response body (Figure 27-D). You can also use the “download” button to get the json file (Figure 27-C). Directly, request URL “https://www.iprox.cn/proxi/datasets/PXD008840”returns the json format of the details of the dataset, PXD008840, which can be used for reprogramming. In the same way, you can get the information of peptide, protein, and spectra data for reanalysis.

(A)
(B)

(C)
(D)
(E)
Figure 27. RESTful Web Service APIs.